[av_heading tag=’h1′ padding=’20‘ heading=’Modul 2 – Lektion 9
ZU DUNKEL? ZU HELL? – Teil 2′ color=“ style=’blockquote modern-quote modern-centered‘ custom_font=“ size=“ subheading_active=’subheading_below‘ subheading_size=’16‘ custom_class=“ admin_preview_bg=“ av-desktop-hide=“ av-medium-hide=“ av-small-hide=“ av-mini-hide=“ av-medium-font-size-title=“ av-small-font-size-title=“ av-mini-font-size-title=“ av-medium-font-size=“ av-small-font-size=“ av-mini-font-size=“ margin=“]
Belichtungsbeurteilung und -korrektur:
[/av_heading]
[av_hr class=’invisible‘ height=’70‘ shadow=’no-shadow‘ position=’center‘ custom_border=’av-border-thin‘ custom_width=’50px‘ custom_border_color=“ custom_margin_top=’30px‘ custom_margin_bottom=’30px‘ icon_select=’yes‘ custom_icon_color=“ icon=’ue808′ font=’entypo-fontello‘ av_uid=’av-6yofkp‘ admin_preview_bg=“]
[av_textblock size=“ font_color=“ color=“ av-medium-font-size=“ av-small-font-size=“ av-mini-font-size=“ av_uid=’av-6t20jd‘ admin_preview_bg=“]
In dieser Lektion lernst du…
- …was überbelichtete und unterbelichtete Bilder sind.
- …was ein Histogramm ist und wie es uns hilft.
- …was es bedeutet auf die Lichter zu belichten.
Dieses Modul setzt am vorherigen an und taucht noch etwas tiefer in die Materie ein. Auch wenn dir zunächst das Ein oder Andere eher nach bömischen Dörfern aussieht. Ich möchte dich bitten alles erst einmal durchzuarbeiten. Am besten machst du dir Stichpunkte. Dann würde ich dir empfehlen nochmals alles anzuschauen und zu lesen (gerne auch mit 2 facher Geschwindigkeit bei der Video-Wiedergabe ;-) ). Diese Inhalte sind sicher nicht die spannendsten des Kurses aber womöglich die wichtigsten!
[/av_textblock]
[av_hr class=’invisible‘ height=’100′ shadow=’no-shadow‘ position=’center‘ custom_border=’av-border-thin‘ custom_width=’50px‘ custom_border_color=“ custom_margin_top=’30px‘ custom_margin_bottom=’30px‘ icon_select=’yes‘ custom_icon_color=“ icon=’ue808′ font=’entypo-fontello‘ av_uid=’av-6rta75′ admin_preview_bg=“]
[av_one_full first min_height=“ vertical_alignment=’av-align-top‘ space=“ margin=’0px‘ margin_sync=’true‘ padding=‘-15px,0px,0px,0px‘ border=“ border_color=“ radius=’0px‘ radius_sync=’true‘ background_color=“ src=“ attachment=“ attachment_size=“ background_position=’top left‘ background_repeat=’no-repeat‘ animation=“ mobile_breaking=“ mobile_display=“ av_uid=’av-3vv329′]
[av_textblock size=“ font_color=“ color=“ av-medium-font-size=“ av-small-font-size=“ av-mini-font-size=“ av_uid=’av-3pk0oh‘ admin_preview_bg=“]
Über- und Unterbelichtung:
[/av_textblock]
[av_hr class=’invisible‘ height=’10‘ shadow=’no-shadow‘ position=’center‘ custom_border=’av-border-thin‘ custom_width=’50px‘ custom_border_color=“ custom_margin_top=’30px‘ custom_margin_bottom=’30px‘ icon_select=’yes‘ custom_icon_color=“ icon=’ue808′ font=’entypo-fontello‘ admin_preview_bg=“ av_uid=’av-3mmztd‘]
[av_textblock size=“ font_color=“ color=“ av-medium-font-size=“ av-small-font-size=“ av-mini-font-size=“ av_uid=’av-3e13y9′ admin_preview_bg=“]
[s3mm type=“video“ source=“cloudfront“ files=“Videos/3..1_4 BELICHTUNGSMESSUNG Über und Unterbelichtung.mp4″ titles=“Videos/3..1_4 BELICHTUNGSMESSUNG Über und Unterbelichtung.mp4″ splash=“https://mlzwymt16oxv.i.optimole.com/w:auto/h:auto/q:90/ig:avif/f:best/https://photo-inspirator.com/wp-content/uploads/2018/10/Über-und-unter.jpg“ /]
[/av_textblock]
[/av_one_full]
[av_one_full first min_height=“ vertical_alignment=“ space=“ custom_margin=“ margin=’0px‘ link=“ linktarget=“ link_hover=“ padding=’0px‘ border=“ border_color=“ radius=’0px‘ background=’bg_color‘ background_color=“ background_gradient_color1=“ background_gradient_color2=“ background_gradient_direction=’vertical‘ src=“ background_position=’top left‘ background_repeat=’no-repeat‘ animation=“ mobile_breaking=“ mobile_display=“ av_uid=’av-n041f9′]
[av_hr class=’invisible‘ height=’100′ shadow=’no-shadow‘ position=’center‘ custom_border=’av-border-thin‘ custom_width=’50px‘ custom_border_color=“ custom_margin_top=’30px‘ custom_margin_bottom=’30px‘ icon_select=’yes‘ custom_icon_color=“ icon=’ue808′ font=’entypo-fontello‘ av_uid=’av-6rta75′ admin_preview_bg=“]
[av_image src=’https://mlzwymt16oxv.i.optimole.com/w:auto/h:auto/q:90/ig:avif/f:best/https://photo-inspirator.com/wp-content/uploads/2018/10/1-korrekt.png‘ attachment=’10554′ attachment_size=’full‘ align=’center‘ styling=“ hover=“ link=“ target=“ caption=“ font_size=“ appearance=“ overlay_opacity=’0.4′ overlay_color=’#000000′ overlay_text_color=’#ffffff‘ copyright=“ animation=’no-animation‘ av_uid=’av-pno40l‘ admin_preview_bg=“][/av_image]
[av_textblock size=“ font_color=“ color=“ av-medium-font-size=“ av-small-font-size=“ av-mini-font-size=“ av_uid=’av-jn6727mp‘ admin_preview_bg=“]
Ein korrekt belichtetes Bild: das Histogramm steht mittig und läuft auf keiner Seite hinaus.
[/av_textblock]
[/av_one_full]
[av_one_full first min_height=“ vertical_alignment=“ space=“ custom_margin=“ margin=’0px‘ link=“ linktarget=“ link_hover=“ padding=’0px‘ border=“ border_color=“ radius=’0px‘ background=’bg_color‘ background_color=“ background_gradient_color1=“ background_gradient_color2=“ background_gradient_direction=’vertical‘ src=“ background_position=’top left‘ background_repeat=’no-repeat‘ animation=“ mobile_breaking=“ mobile_display=“ av_uid=’av-n041f9′]
[av_image src=’https://mlzwymt16oxv.i.optimole.com/w:auto/h:auto/q:90/ig:avif/f:best/https://photo-inspirator.com/wp-content/uploads/2018/10/2-unter.png‘ attachment=’10560′ attachment_size=’full‘ align=’center‘ styling=“ hover=“ link=“ target=“ caption=“ font_size=“ appearance=“ overlay_opacity=’0.4′ overlay_color=’#000000′ overlay_text_color=’#ffffff‘ copyright=“ animation=’no-animation‘ av_uid=’av-pno40l‘ admin_preview_bg=“][/av_image]
[av_textblock size=“ font_color=“ color=“ av-medium-font-size=“ av-small-font-size=“ av-mini-font-size=“ av_uid=’av-jn6727mp‘ admin_preview_bg=“]
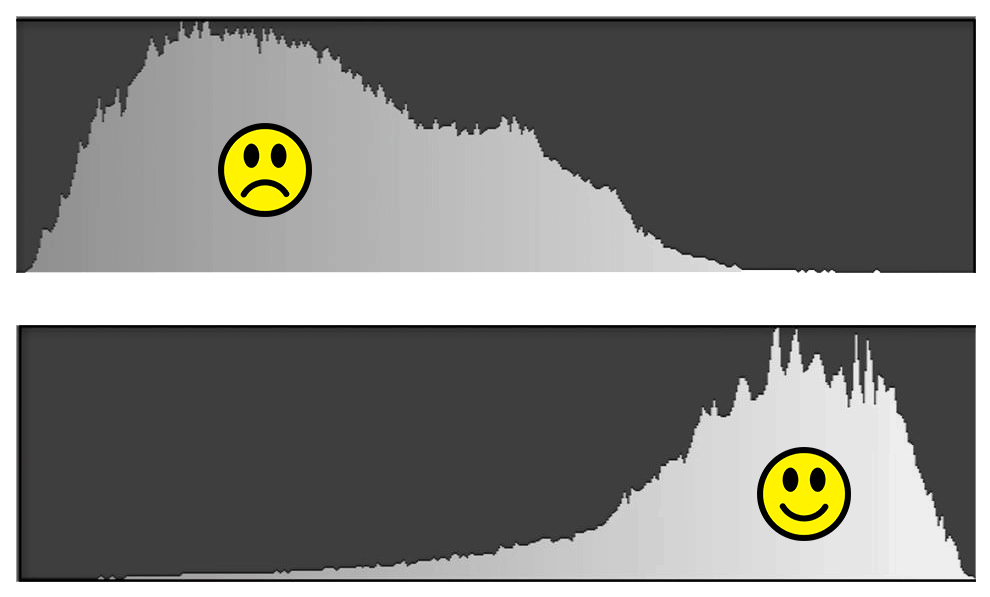
Ein unterbelichtetes Bild: das Histogramm läuft links hinaus und weist rechts einen großen Abstand zur Grenze auf.
[/av_textblock]
[av_hr class=’invisible‘ height=’100′ shadow=’no-shadow‘ position=’center‘ custom_border=’av-border-thin‘ custom_width=’50px‘ custom_border_color=“ custom_margin_top=’30px‘ custom_margin_bottom=’30px‘ icon_select=’yes‘ custom_icon_color=“ icon=’ue808′ font=’entypo-fontello‘ av_uid=’av-6rta75′ admin_preview_bg=“]
[/av_one_full]
[av_one_full first min_height=“ vertical_alignment=“ space=“ custom_margin=“ margin=’0px‘ link=“ linktarget=“ link_hover=“ padding=’0px‘ border=“ border_color=“ radius=’0px‘ background=’bg_color‘ background_color=“ background_gradient_color1=“ background_gradient_color2=“ background_gradient_direction=’vertical‘ src=“ background_position=’top left‘ background_repeat=’no-repeat‘ animation=“ mobile_breaking=“ mobile_display=“ av_uid=’av-n041f9′]
[av_image src=’https://mlzwymt16oxv.i.optimole.com/w:auto/h:auto/q:90/ig:avif/f:best/https://photo-inspirator.com/wp-content/uploads/2018/10/3-über.png‘ attachment=’10583′ attachment_size=’full‘ align=’center‘ styling=“ hover=“ link=“ target=“ caption=“ font_size=“ appearance=“ overlay_opacity=’0.4′ overlay_color=’#000000′ overlay_text_color=’#ffffff‘ copyright=“ animation=’no-animation‘ av_uid=’av-pno40l‘ admin_preview_bg=“][/av_image]
[av_textblock size=“ font_color=“ color=“ av-medium-font-size=“ av-small-font-size=“ av-mini-font-size=“ av_uid=’av-jn6727mp‘ admin_preview_bg=“]
Ein überbelichtetes Bild: das Histogramm läuft rechts hinaus und weist links einen großen Abstand zur Grenze auf.
[/av_textblock]
[av_hr class=’invisible‘ height=’100′ shadow=’no-shadow‘ position=’center‘ custom_border=’av-border-thin‘ custom_width=’50px‘ custom_border_color=“ custom_margin_top=’30px‘ custom_margin_bottom=’30px‘ icon_select=’yes‘ custom_icon_color=“ icon=’ue808′ font=’entypo-fontello‘ av_uid=’av-6rta75′ admin_preview_bg=“]
[/av_one_full][av_one_full first min_height=“ vertical_alignment=’av-align-top‘ space=“ margin=’0px‘ margin_sync=’true‘ padding=‘-15px,0px,0px,0px‘ border=“ border_color=“ radius=’0px‘ radius_sync=’true‘ background_color=“ src=“ attachment=“ attachment_size=“ background_position=’top left‘ background_repeat=’no-repeat‘ animation=“ mobile_breaking=“ mobile_display=“ av_uid=’av-3vv329′]
[av_textblock size=“ font_color=“ color=“ av-medium-font-size=“ av-small-font-size=“ av-mini-font-size=“ av_uid=’av-3pk0oh‘ admin_preview_bg=“]
Belichte auf die Lichter (ETTR):
[/av_textblock]
[av_hr class=’invisible‘ height=’10‘ shadow=’no-shadow‘ position=’center‘ custom_border=’av-border-thin‘ custom_width=’50px‘ custom_border_color=“ custom_margin_top=’30px‘ custom_margin_bottom=’30px‘ icon_select=’yes‘ custom_icon_color=“ icon=’ue808′ font=’entypo-fontello‘ admin_preview_bg=“ av_uid=’av-3mmztd‘]
[av_textblock size=“ font_color=“ color=“ av-medium-font-size=“ av-small-font-size=“ av-mini-font-size=“ av_uid=’av-3e13y9′ admin_preview_bg=“]
[s3mm type=“video“ source=“cloudfront“ files=“Videos/3..1_5 BELICHTUNGSMESSUNG ETTR.mp4″ titles=“Videos/3..1_5 BELICHTUNGSMESSUNG ETTR.mp4″ splash=“https://mlzwymt16oxv.i.optimole.com/w:auto/h:auto/q:90/ig:avif/f:best/https://photo-inspirator.com/wp-content/uploads/2018/10/ETTR.jpg“ /]
[/av_textblock]
[/av_one_full]
[av_hr class=’invisible‘ height=’100′ shadow=’no-shadow‘ position=’center‘ custom_border=’av-border-thin‘ custom_width=’50px‘ custom_border_color=“ custom_margin_top=’30px‘ custom_margin_bottom=’30px‘ icon_select=’yes‘ custom_icon_color=“ icon=’ue808′ font=’entypo-fontello‘ av_uid=’av-6rta75′ admin_preview_bg=“]
[av_icon_box position=’top‘ icon_style=“ boxed=“ icon=’ue803′ font=’entypo-fontello‘ title=’EXKURS:ETTR und das Histogramm‘ link=“ linktarget=“ linkelement=“ font_color=“ custom_title=“ custom_content=“ color=“ custom_bg=“ custom_font=“ custom_border=“ av-medium-font-size-title=“ av-small-font-size-title=“ av-mini-font-size-title=“ av-medium-font-size=“ av-small-font-size=“ av-mini-font-size=“ av_uid=’av-jh95m5n3′ admin_preview_bg=“]
Im englischen nennt man das Verfahren auf die Lichter zu belichten übrigens auch ETTR, was für Expose to the Right steht. Das bedeutet, dass man die Tonwerte eher auf die rechte Seite des Histogramms legt.
Was ist bitteschön ein Histogramm?
Grundsätzlich ist ein Histogramm die Darstellung einer Häufigkeitsverteilung bei statistischen Daten. In der digitalen Fotografie ist es die grafische Darstellung der Tonwertkurve eines Bildes. Man kann damit ablesen, wie häufig die jeweiligen Tonwerte in einem Bild vorhanden sind.
Das Histogramm ist echt nützlich und dein Freund und Helfer: denn je nach Leuchtkraft des Displays und der Umgebungshelligkeit ist es nahezu unmöglich, exakte Aussagen über die Belichtung des Bildes anhand der Displaywiedergabe zu machen. Die Belichtung kann mit dem Histogramm dann objektiv beurteilt werden.
Wie ein klassisches Diagramm wird das Histogramm in einer X- und einer Y-Achse dargestellt. Auf der X-Achse befinden sich die Tonwerte von ganz schwarz (links, 0) bis ganz weiß (rechts, 255). Auf der senkrecht stehenden Y-Achse ist nun abzulesen, wie häufig die jeweiligen Tonwerte im Bild vorhanden sind.
Farbbilder benötigen zur Darstellung die drei Grundfarben Rot, Grün, Blau (RGB) und demzufolge gibt es bei einem Farbbild auch drei unterschiedliche Histogramme, die aber zumeist praktischerweise zu einer Darstellung zusammengefasst werden. Fast alle Bildbearbeitungsprogramme bieten im Rahmen der Tonwertkorrektur die Möglichkeit an, das Histogramm zu verändern und das digitale Bild punktgenau zu optimieren. Im Modul zur Bildbearbeitung werden wir uns noch ausgiebiger mit dem Histogramm beschäftigen.
Wo finde ich das Histogramm?
Deine Kamera zeigt dir das Histogramm für deine fotografierten Bilder auf dem Display an. Viele Kameras zeigen dir das Histogramm auch bereits vor dem Fotografieren an. Wo du das Histogramm an deiner Kamera findest, ist bei jedem Modell anders. Da solltest du am besten einen Blick in dein Handbuch werfen.
[/av_icon_box]
[av_hr class=’invisible‘ height=’100′ shadow=’no-shadow‘ position=’center‘ custom_border=’av-border-thin‘ custom_width=’50px‘ custom_border_color=“ custom_margin_top=’30px‘ custom_margin_bottom=’30px‘ icon_select=’yes‘ custom_icon_color=“ icon=’ue808′ font=’entypo-fontello‘ av_uid=’av-6rta75′ admin_preview_bg=“]
[av_icon_box position=’top‘ icon_style=“ boxed=“ icon=’ue81e‘ font=’entypo-fontello‘ title=’Die Belichtungskorrektur‘ link=“ linktarget=“ linkelement=“ font_color=“ custom_title=“ custom_content=“ color=“ custom_bg=“ custom_font=“ custom_border=“ av-medium-font-size-title=“ av-small-font-size-title=“ av-mini-font-size-title=“ av-medium-font-size=“ av-small-font-size=“ av-mini-font-size=“ av_uid=’av-jh95m5n3′ admin_preview_bg=“]
Wahrscheinlich wird es keine absolut perfekte Belichtungsmessung geben und das Histogramm wird dir hin und wieder mal nicht gefallen. Außerdem kann die Kamera nicht wissen, wie du das Bild belichten möchtest. Vielleicht stehst du ja beispielsweise auf unterbelichtete Motive. In solchen Fällen kannst du per Hand eingreifen und die Belichtung manuell korrigieren. In der Regel haben die Kameras dafür ein Rad mit Blendenwerten von -3 bis + 3 oder ein +/- Symbol.
Meine alte Minolta hat z.B. ein solches Rad. Damit kann ich dann die Belichtung um bis zu 3 Blenden heller oder dunkler regeln. Ein drehen in Plus-Richtung macht das Bild heller, ein Drehen in Minus-Richtung macht es dunkler. Die Zahl entspricht der Blende um die das Bild heller oder dunkler wird. Dies funktioniert allerdings nur in den halbautomatischen Modi (P, A und S). Oder im manuellen Modus M, sofern die ISO auf Auto eingestellt ist.

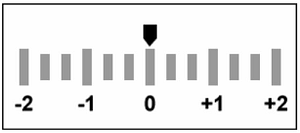
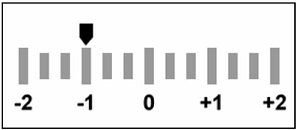
Wenn man durch den Sucher seiner Kamera schaut sieht man zudem je nach Kamera eine entsprechende Skala, die genau anzeigt, ob das Bild überbelichtet, unterbelichtet oder korrekt belichtet ist.
Wenn der kleine Pfeil mittig auf die 0 zeigt, dann ist dein Motiv korrekt belichtet. Befindet sich der Pfeil links oder rechts von der 0, dann ist dein Foto entweder unter- oder überbelichtet:
[/av_icon_box]
[av_hr class=’invisible‘ height=’100′ shadow=’no-shadow‘ position=’center‘ custom_border=’av-border-thin‘ custom_width=’50px‘ custom_border_color=“ custom_margin_top=’30px‘ custom_margin_bottom=’30px‘ icon_select=’yes‘ custom_icon_color=“ icon=’ue808′ font=’entypo-fontello‘ av_uid=’av-6rta75′ admin_preview_bg=“]
[av_textblock size=“ font_color=“ color=“ av-medium-font-size=“ av-small-font-size=“ av-mini-font-size=“ av_uid=’av-13f3op‘ admin_preview_bg=“]
Dein Kursfortschritt:
[av_hr class=’invisible‘ height=’100′ shadow=’no-shadow‘ position=’center‘ custom_border=’av-border-thin‘ custom_width=’50px‘ custom_border_color=“ custom_margin_top=’30px‘ custom_margin_bottom=’30px‘ icon_select=’yes‘ custom_icon_color=“ icon=’ue808′ font=’entypo-fontello‘ av_uid=’av-6rta75′ admin_preview_bg=“]
[av_one_half first min_height=“ vertical_alignment=“ space=“ custom_margin=“ margin=’0px‘ padding=’0px‘ border=“ border_color=“ radius=’0px‘ background_color=“ src=“ background_position=’top left‘ background_repeat=’no-repeat‘ animation=“ mobile_breaking=“ mobile_display=“ av_uid=’av-rlrep‘]
[av_button label=’VORHERIGE LEKTION‘ link=’page,6770′ link_target=“ size=’small‘ position=’center‘ label_display=“ icon_select=’no‘ icon=’ue800′ font=’entypo-fontello‘ color=’theme-color‘ custom_bg=’#444444′ custom_font=’#ffffff‘ av_uid=’av-ixlr5′ admin_preview_bg=“]
[/av_one_half]
[av_one_half min_height=“ vertical_alignment=“ space=“ custom_margin=“ margin=’0px‘ padding=’0px‘ border=“ border_color=“ radius=’0px‘ background_color=“ src=“ background_position=’top left‘ background_repeat=’no-repeat‘ animation=“ mobile_breaking=“ mobile_display=“ av_uid=’av-csyup‘]
[av_button label=’NÄCHSTE LEKTION‘ link=’page,6773′ link_target=“ size=’small‘ position=’center‘ label_display=“ icon_select=’no‘ icon=’ue800′ font=’entypo-fontello‘ color=’theme-color‘ custom_bg=’#444444′ custom_font=’#ffffff‘ av_uid=’av-ayi3t‘ admin_preview_bg=“]
[/av_one_half]