[av_heading heading=‘Bildrezept
Sterne‚ tag=’h1′ link_apply=“ link=’manually,http://‘ link_target=“ style=’blockquote modern-quote modern-centered‘ size=“ subheading_active=’subheading_below‘ subheading_size=’16‘ margin=“ padding=’20‘ color=“ custom_font=“ custom_class=“ admin_preview_bg=“ av-desktop-hide=“ av-medium-hide=“ av-small-hide=“ av-mini-hide=“ av-medium-font-size-title=“ av-small-font-size-title=“ av-mini-font-size-title=“ av-medium-font-size=“ av-small-font-size=“ av-mini-font-size=“][/av_heading]
[av_textblock size=“ font_color=“ color=“ av-medium-font-size=“ av-small-font-size=“ av-mini-font-size=“ av_uid=’av-3q3u6x‘ admin_preview_bg=“]
Fotografie ist im Allgemeinen einfach – oder? Du nimmst deine Kamera, richtest sie auf das, was dich interessiert, und drückst auf den Auslöser. Das es nicht immer so einfach ist sollte bis jetzt klar sein.
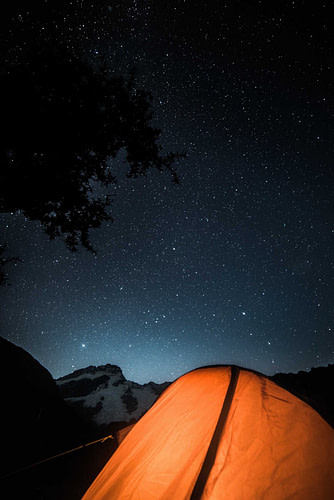
In diesem Bildrezept widmen wir uns einer etwas fortgeschritteneren Technik, der Fotografie des Sternenhimmels, auch Astrofotografie genannt.
[/av_textblock]
[av_image src=’https://mlzwymt16oxv.i.optimole.com/w:auto/h:auto/q:90/ig:avif/f:best/https://photo-inspirator.com/wp-content/uploads/2018/10/michael-paredes-466598-unsplash.jpg‘ attachment=’10610′ attachment_size=’full‘ align=’center‘ styling=“ hover=“ link=“ target=“ caption=“ font_size=“ appearance=“ overlay_opacity=’0.4′ overlay_color=’#000000′ overlay_text_color=’#ffffff‘ copyright=“ animation=’no-animation‘ av_uid=’av-ju8iru5c‘ admin_preview_bg=“][/av_image]
[av_textblock size=“ font_color=“ color=“ av-medium-font-size=“ av-small-font-size=“ av-mini-font-size=“ av_uid=’av-jnqae3wy‘ admin_preview_bg=“]
[/av_textblock]
[av_one_full first min_height=“ vertical_alignment=’av-align-top‘ space=“ margin=’0px‘ margin_sync=’true‘ padding=’0px,0px,20px,0px‘ border=“ border_color=“ radius=’0px‘ radius_sync=’true‘ background_color=“ src=“ attachment=“ attachment_size=“ background_position=’top left‘ background_repeat=’no-repeat‘ animation=“ mobile_breaking=“ mobile_display=“ av_uid=’av-3gkvqp‘]
[av_textblock size=“ font_color=“ color=“ av-medium-font-size=“ av-small-font-size=“ av-mini-font-size=“ av_uid=’av-39uvjt‘ admin_preview_bg=“]
#1 Kameraeinstellungen und Zubehör
[/av_textblock]
[av_textblock size=“ font_color=“ color=“ av-medium-font-size=“ av-small-font-size=“ av-mini-font-size=“ av_uid=’av-3q3u6x‘ admin_preview_bg=“]
Belichtungsmodus
Manuell (M)
ISO
möglichst niedrig aber in der Regel mindestens ISO 800, aufgrund der Dunkelheit
Belichtungszeit
In der Regel 20 bis 30sec – mehr dazu weiter unten.
Blende
So weit auf wie möglich für eine maximale Lichtausbeute.
Brennweite des Objektivs
Idealerweise eie Festbrennweite zwischen 10 und 16mm
Betriebsart/Bildfolgemodus
2 sec Selbstauslöser oder Fernauslöser
Fokus
Manuell
Weißabgleich
Hauptsache keinen automatischen Weißabgleich!
Stativ
unbedingt ein gutes Stativ verwenden!
[/av_textblock]
[av_image src=’https://mlzwymt16oxv.i.optimole.com/w:auto/h:auto/q:90/ig:avif/f:best/https://photo-inspirator.com/wp-content/uploads/2018/08/jeshoots-com-219059-unsplash.jpg‘ attachment=’8737′ attachment_size=’full‘ align=’center‘ styling=“ hover=“ link=“ target=“ caption=“ font_size=“ appearance=“ overlay_opacity=’0.4′ overlay_color=’#000000′ overlay_text_color=’#ffffff‘ copyright=“ animation=’no-animation‘ av_uid=’av-jnpxgup3′ admin_preview_bg=“][/av_image]
[/av_one_full]
[av_hr class=’invisible‘ height=’100′ shadow=’no-shadow‘ position=’center‘ custom_border=’av-border-thin‘ custom_width=’50px‘ custom_border_color=“ custom_margin_top=’30px‘ custom_margin_bottom=’30px‘ icon_select=’yes‘ custom_icon_color=“ icon=’ue808′ font=’entypo-fontello‘ av_uid=’av-3ht53t‘ admin_preview_bg=“]
[av_one_full first min_height=“ vertical_alignment=’av-align-top‘ space=“ margin=’0px‘ margin_sync=’true‘ padding=’0px,0px,20px,0px‘ border=“ border_color=“ radius=’0px‘ radius_sync=’true‘ background_color=“ src=“ attachment=“ attachment_size=“ background_position=’top left‘ background_repeat=’no-repeat‘ animation=“ mobile_breaking=“ mobile_display=“ av_uid=’av-3gkvqp‘]
[av_textblock size=“ font_color=“ color=“ av-medium-font-size=“ av-small-font-size=“ av-mini-font-size=“ av_uid=’av-39uvjt‘ admin_preview_bg=“]
#2 Welches Objektiv ist das Richtige?
[/av_textblock]
[av_textblock size=“ font_color=“ color=“ av-medium-font-size=“ av-small-font-size=“ av-mini-font-size=“ av_uid=’av-3q3u6x‘ admin_preview_bg=“]
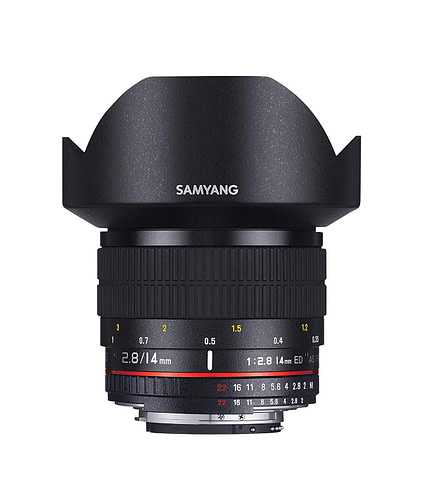
Wenn du Sterne fotografieren willst, sollte das Objektiv eine Lichtstärke von mindestens f2.8 haben oder noch lichtstärker.
Außerdem kann die Brennweite fast nicht zu kurz sein – Ultraweitwinkel-Objektive sind hier optimal. Ich nutze für die Astrofotografie diese 14mm Festbrennweite von Samyang mit einer Lichtstärke von f2.8:
[/av_textblock]
[/av_one_full]
[av_one_full first min_height=“ vertical_alignment=’av-align-top‘ space=“ margin=’0px‘ margin_sync=’true‘ padding=’0px,0px,20px,0px‘ border=“ border_color=“ radius=’0px‘ radius_sync=’true‘ background_color=“ src=“ attachment=“ attachment_size=“ background_position=’top left‘ background_repeat=’no-repeat‘ animation=“ mobile_breaking=“ mobile_display=“ av_uid=’av-3gkvqp‘]
[av_textblock size=“ font_color=“ color=“ av-medium-font-size=“ av-small-font-size=“ av-mini-font-size=“ av_uid=’av-39uvjt‘ admin_preview_bg=“]
#3 Wie belichtet und fokussiert man richtig?
[/av_textblock]
[av_textblock size=“ font_color=“ color=“ av-medium-font-size=“ av-small-font-size=“ av-mini-font-size=“ av_uid=’av-3q3u6x‘ admin_preview_bg=“]
Mit meinem 14mm Objektiv bei f2.8 belichte ich den Sternenhimmel in der Regel etwa 25 – 30sec und ISO 800 – 1600!
Doch wie komme ich auf diese Belichtungszeit?
Da sich die Erde dreht, erscheinen Sterne ab bestimmten Belichtungszeiten als Sternspuren.
Je weitwinkliger ein Objektiv ist und umso näher der Bildausschnitt in Richtung des Polarsterns ausgerichtet ist, umso länger können wir belichten, ohne sichtbare Sternspuren zu bekommen.
Die maximale Belichtungszeit für Sternenfotos ohne Sternspuren lässt sich ausrechnen:
max. Belichtungszeit = 500 / (Cropfaktor der Kamera x Brennweite)
Daraus ergibt sich für meine Vollformatkamera und 14mm Brennweite folgende Rechnung:
500 / (1 x 14) = 35,7
Aus diesem Grund kann ich das Foto ohne Probleme mit 30 Sekunden machen. Dann öffne ich die Blende komplett (in meinem Fall auf f2.8) und regel den ISO auf etwa 800 und mache ein Testfoto (f2.8, 30sec, ISO 800).
Da das Bild dann in aller Regel noch zu dunkel ist erhöhe ich die ISO schrittweise, bis die Belichtung passt. Die obige Formel sollte als Starthilfe dienen, sie ist nicht in Stein gemeißelt!
Und wie sieht es mit dem Fokus aus?
Du solltest auf jeden Fall manuell fokussieren!
Für eine optimale Schärfe empfehle ich dir das Bonus-Modul durchzuarbeiten.
[/av_textblock]
[/av_one_full]
[av_one_full first min_height=“ vertical_alignment=’av-align-top‘ space=“ margin=’0px‘ margin_sync=’true‘ padding=’0px,0px,20px,0px‘ border=“ border_color=“ radius=’0px‘ radius_sync=’true‘ background_color=“ src=“ attachment=“ attachment_size=“ background_position=’top left‘ background_repeat=’no-repeat‘ animation=“ mobile_breaking=“ mobile_display=“ av_uid=’av-3gkvqp‘]
[av_textblock size=“ font_color=“ color=“ av-medium-font-size=“ av-small-font-size=“ av-mini-font-size=“ av_uid=’av-39uvjt‘ admin_preview_bg=“]
#4 Nützliche Helfer
[/av_textblock]
[av_textblock size=“ font_color=“ color=“ av-medium-font-size=“ av-small-font-size=“ av-mini-font-size=“ av_uid=’av-3q3u6x‘ admin_preview_bg=“]
Wenn du die Zeit und Muße hast, gibt es einige Helfer, mit denen dir perfekte Astrofotos gelingen:
- Ultra-Weitwinkel-Objektiv
Ich nutze diese 14mm Festbrennweite von Samyang. - Gutes Stativ
Sollte robust sein aber nicht Tonnen wiegen. Meine Empfehlung ist das Rollei C5i. - Taukappenheizung gegen Feuchtigkeitsniederschlag
Die Feuchtigkeit kann dazu führen, dass das Objektiv beschlägt und die Fotos unbrauchbar werden. Abhilfe leistet eine Taukappenheizung. Ich nutze diese. - Fernauslöser
Ermöglicht verwacklungsfreie Fotos über 30sec sowie Intervallaufnahmen. Ich nutze den JJC TM-C Timer-Auslöser, den es für alle gängigen Kameramodelle gibt.
[/av_textblock]
[/av_one_full]
[av_image src=’https://photo-inspirator.com/wp-content/uploads/2019/04/DSC1847-334×500.jpg‘ attachment=’12907′ attachment_size=’medium‘ align=’center‘ styling=“ hover=“ link=“ target=“ caption=“ font_size=“ appearance=“ overlay_opacity=’0.4′ overlay_color=’#000000′ overlay_text_color=’#ffffff‘ copyright=“ animation=’no-animation‘ av_uid=’av-juidv2k1′ admin_preview_bg=“]
Unbearbeitetes RAW
[/av_image]
[av_one_full first min_height=“ vertical_alignment=’av-align-top‘ space=“ margin=’0px‘ margin_sync=’true‘ padding=’0px,0px,20px,0px‘ border=“ border_color=“ radius=’0px‘ radius_sync=’true‘ background_color=“ src=“ attachment=“ attachment_size=“ background_position=’top left‘ background_repeat=’no-repeat‘ animation=“ mobile_breaking=“ mobile_display=“ av_uid=’av-3gkvqp‘]
[av_textblock size=“ font_color=“ color=“ av-medium-font-size=“ av-small-font-size=“ av-mini-font-size=“ av_uid=’av-39uvjt‘ admin_preview_bg=“]
#5 Das WANN und WO ist wichtiger als das WIE!
[/av_textblock]
[av_textblock size=“ font_color=“ color=“ av-medium-font-size=“ av-small-font-size=“ av-mini-font-size=“ av_uid=’av-3q3u6x‘ admin_preview_bg=“]
Nun reicht es aber leider nicht aus, die Ausrüstung zu haben. Und auch das Wissen um die Einstellung der Kamera führt noch nicht zu spektakulären Astrofotos.
Du musst zur richtigen Zeit am richtigen Ort sein, um den Nachthimmel zu fotografieren!
Lichtverschmutzung ist ein ernstes Problem für die Astrofotografie. Wenn du dich in oder in der Nähe einer großen Stadt befindest, wirst du zuviel Lichtverschmutzung durch die Lichter der Stadt haben, daher gelingen gute Sternenfotos nur weit außerhalb großer Städte.
Ich wohne mitten in Köln, wo man nicht die geringste Chance hat Sterne zu fotografieren. Um gerade auf Reisen den richtigen Ort zu finden, nutze ich Apps wie Mobile Observatory oder Google Earth.
Neben dem Ort ist aber logischerweise auch die Zeit sehr wichtig.
Die besten Fotos von Sternen gelingen bei Neumond, da das fehlen des Mondlichts den Sternen die Bühne frei macht.
[/av_textblock]
[/av_one_full]
[av_textblock size=“ font_color=“ color=“ av-medium-font-size=“ av-small-font-size=“ av-mini-font-size=“ av_uid=’av-39uvjt‘ admin_preview_bg=“]
#6 Nach dem Bild ist vor dem Bild
[/av_textblock]
[av_textblock size=“ font_color=“ color=“ av-medium-font-size=“ av-small-font-size=“ av-mini-font-size=“ av_uid=’av-3q3u6x‘ admin_preview_bg=“]
Die Nachbearbeitung von Astrofotos kann ein wenig einschüchternd sein, da man zunächst nicht viel sieht. Wie bereits erwähnt, empfehle ich unbedingt, im RAW-Format zu fotografieren, um eine solide Basis zu haben.
Es gibt wohl kein anderes fotografisches Genre, bei dem die Nachbearbeitung derart wichtig ist, wie bei der Astrofotografie!
Für die Aufnahme unten habe ich das Foto in zwei zu bearbeitende Zonen aufgeteilt, den Himmel und den Vordergrund mit dem Zelt. Ich habe den Verlaufsfilter verwendet, um beide Bildbereiche selektiv anpassen zu können, bis ich mit dem Endergebnis zufrieden war.
[/av_textblock]
[av_one_half first min_height=“ vertical_alignment=“ space=“ custom_margin=“ margin=’0px‘ row_boxshadow=“ row_boxshadow_color=“ row_boxshadow_width=’10‘ link=“ linktarget=“ link_hover=“ padding=’0px‘ highlight=“ highlight_size=“ border=“ border_color=“ radius=’0px‘ column_boxshadow=“ column_boxshadow_color=“ column_boxshadow_width=’10‘ background=’bg_color‘ background_color=“ background_gradient_color1=“ background_gradient_color2=“ background_gradient_direction=’vertical‘ src=“ background_position=’top left‘ background_repeat=’no-repeat‘ animation=“ mobile_breaking=“ mobile_display=“ av_uid=’av-1dgan10′]
[av_textblock size=“ font_color=“ color=“ av-medium-font-size=“ av-small-font-size=“ av-mini-font-size=“ av_uid=’av-3q3u6x‘ admin_preview_bg=“]
UNBEARBEITET
[/av_textblock]
[av_image src=’https://mlzwymt16oxv.i.optimole.com/w:auto/h:auto/q:90/ig:avif/f:best/https://photo-inspirator.com/wp-content/uploads/2019/04/DSC1816-2.jpg‘ attachment=’12913′ attachment_size=’full‘ align=’center‘ styling=“ hover=“ link=“ target=“ caption=“ font_size=“ appearance=“ overlay_opacity=’0.4′ overlay_color=’#000000′ overlay_text_color=’#ffffff‘ copyright=“ animation=’no-animation‘ av_uid=’av-juidv2k1′ admin_preview_bg=“]
Unbearbeitetes RAW
[/av_image]
[/av_one_half]
[av_one_half min_height=“ vertical_alignment=“ space=“ custom_margin=“ margin=’0px‘ row_boxshadow=“ row_boxshadow_color=“ row_boxshadow_width=’10‘ link=“ linktarget=“ link_hover=“ padding=’0px‘ highlight=“ highlight_size=“ border=“ border_color=“ radius=’0px‘ column_boxshadow=“ column_boxshadow_color=“ column_boxshadow_width=’10‘ background=’bg_color‘ background_color=“ background_gradient_color1=“ background_gradient_color2=“ background_gradient_direction=’vertical‘ src=“ background_position=’top left‘ background_repeat=’no-repeat‘ animation=“ mobile_breaking=“ mobile_display=“ av_uid=’av-k68tn8′]
[av_textblock size=“ font_color=“ color=“ av-medium-font-size=“ av-small-font-size=“ av-mini-font-size=“ av_uid=’av-3q3u6x‘ admin_preview_bg=“]
BEARBEITET
[/av_textblock]
[av_image src=’https://mlzwymt16oxv.i.optimole.com/w:auto/h:auto/q:90/ig:avif/f:best/https://photo-inspirator.com/wp-content/uploads/2019/04/DSC1816.jpg‘ attachment=’12912′ attachment_size=’full‘ align=’center‘ styling=“ hover=“ link=“ target=“ caption=“ font_size=“ appearance=“ overlay_opacity=’0.4′ overlay_color=’#000000′ overlay_text_color=’#ffffff‘ copyright=“ animation=’no-animation‘ av_uid=’av-juidv2k1′ admin_preview_bg=“]
Unbearbeitetes RAW
[/av_image]
[/av_one_half][av_one_full first min_height=“ vertical_alignment=’av-align-top‘ space=“ margin=’0px‘ margin_sync=’true‘ padding=’20px,0px,0px,0px‘ border=“ border_color=“ radius=’0px‘ radius_sync=’true‘ background_color=“ src=“ attachment=“ attachment_size=“ background_position=’top left‘ background_repeat=’no-repeat‘ animation=“ mobile_breaking=“ mobile_display=“ av_uid=’av-i4znt‘]
[av_textblock size=“ font_color=“ color=“ av-medium-font-size=“ av-small-font-size=“ av-mini-font-size=“ av_uid=’av-39uvjt‘ admin_preview_bg=“]
#7 Kurz und knapp
[/av_textblock]
[av_iconlist position=’left‘ iconlist_styling=“ animation=“ custom_title_size=’30‘ custom_content_size=“ font_color=’custom‘ custom_title=“ custom_content=“ color=’custom‘ custom_bg=’#719430′ custom_font=“ custom_border=“ av-medium-font-size-title=“ av-small-font-size-title=“ av-mini-font-size-title=“ av-medium-font-size=“ av-small-font-size=“ av-mini-font-size=“ av_uid=’av-4qd88p‘ admin_preview_bg=“]
[av_iconlist_item title=’Belichtungsmodus‘ link=“ linktarget=“ linkelement=“ icon=’ue855′ font=’entypo-fontello‘ av_uid=’av-2q94ivo‘]
Manuell: M
[/av_iconlist_item]
[av_iconlist_item title=’ISO‘ link=“ linktarget=“ linkelement=“ icon=’ue867′ font=’entypo-fontello‘ av_uid=’av-2443jck‘]
So niedrig wie möglich (in der Regel aber 800 bis 3200)
[/av_iconlist_item]
[av_iconlist_item title=’Belichtungszeit‘ link=“ linktarget=“ linkelement=“ icon=’ue862′ font=’entypo-fontello‘ av_uid=’av-1rmajtg‘]
In der Regel 20 bis 30sec.
[/av_iconlist_item]
[av_iconlist_item title=’Blende‘ link=“ linktarget=“ linkelement=“ icon=’ue912′ font=’entypo-fontello‘ av_uid=’av-10l5jjo‘]
so weit auf wie möglich, für eine maximale Lichtausbeute.
[/av_iconlist_item]
[av_iconlist_item title=’Sonstige Einstellungen‘ link=“ linktarget=“ linkelement=“ icon=’ue816′ font=’entypo-fontello‘ av_uid=’av-snumgk‘]
- RAW-Format
- Selbstauslöser oder Fernauslöser
- Manueller Fokus
- kein automatischer Weißabgleich!
- Blitz deaktivieren
- Bildstabilisator deaktivieren
[/av_iconlist_item]
[av_iconlist_item title=’Zubehör‘ link=“ linktarget=“ linkelement=“ icon=’ue856′ font=’entypo-fontello‘ av_uid=’av-sb3y44′]
- Lichtstarkes Ultra-Weitwinkel- oder Fisheye-Objektiv
- Stativ
- Fernauslöser
- ggf. Taukappenheizung
[/av_iconlist_item]
[/av_iconlist]
[/av_one_full]