[av_heading heading=’Modul 1 – Lektion 6
Die Belichtungsmodi‚ tag=’h1′ link_apply=“ link=“ link_target=“ style=’blockquote modern-quote modern-centered‘ size=“ subheading_active=’subheading_below‘ subheading_size=’16‘ margin=“ padding=’20‘ color=“ custom_font=“ custom_class=“ admin_preview_bg=“ av-desktop-hide=“ av-medium-hide=“ av-small-hide=“ av-mini-hide=“ av-medium-font-size-title=“ av-small-font-size-title=“ av-mini-font-size-title=“ av-medium-font-size=“ av-small-font-size=“ av-mini-font-size=“]
Sag deiner Kamera, wie sie arbeiten soll.
[/av_heading]
[av_hr class=’invisible‘ height=’70‘ shadow=’no-shadow‘ position=’center‘ custom_border=’av-border-thin‘ custom_width=’50px‘ custom_border_color=“ custom_margin_top=’30px‘ custom_margin_bottom=’30px‘ icon_select=’yes‘ custom_icon_color=“ icon=’ue808′ font=’entypo-fontello‘ av_uid=’av-6yofkp‘ admin_preview_bg=“]
[av_textblock size=“ font_color=“ color=“ av-medium-font-size=“ av-small-font-size=“ av-mini-font-size=“ av_uid=’av-6t20jd‘ admin_preview_bg=“]
In dieser Lektion lernst du…
- …was der Sinn und Zweck von Belichtungsmodi ist
- …welche Belichtungsmodi dir in aller Regel zur Wahl stehen
- …wie du konkret mithilfe der Belichtungsmodi fotografieren kannst
Belichtungsmodi auch Belichtungsprogramme genannt, über die heutzutage die meisten Kameras verfügen, sollen dich in deiner fotografischen Tätigkeit unterstützen.
Während einige dieser Modi nur wenige Parameter selbst regeln, stellt die Kamera bei anderen gleich alles automatisch ein.
Bei der Programmautomatik sowie bei den Motivprogrammen, kannst du in der Folge häufig keine eigenen Einstellungen, zur Feinjustierung, selbst vornehmen. Das kann zu Beginn noch nützlich sein, allerdings überwiegt mit der Zeit meistens der Wunsch nach dem eigenen Optimieren der Einstellungen. Dennoch nutzen auch viele erfahrene Fotografen die Vorzüge der Belichtungsautomatik, während auf Motivprogramme in der Regel vollständig verzichtet wird. In dieser Lektion lernst du, die Belichtungsmodi sinnvoll für dich einzusetzen.
[/av_textblock]
[av_hr class=’invisible‘ height=’70‘ shadow=’no-shadow‘ position=’center‘ custom_border=’av-border-thin‘ custom_width=’50px‘ custom_border_color=“ custom_margin_top=’30px‘ custom_margin_bottom=’30px‘ icon_select=’yes‘ custom_icon_color=“ icon=’ue808′ font=’entypo-fontello‘ av_uid=’av-6yofkp‘ admin_preview_bg=“]
[av_icon_box position=’top‘ icon_style=“ boxed=“ icon=’ue80f‘ font=’entypo-fontello‘ title=’Das Moduswahlrad‘ link=“ linktarget=“ linkelement=“ font_color=“ custom_title=“ custom_content=“ color=“ custom_bg=“ custom_font=“ custom_border=“ av-medium-font-size-title=“ av-small-font-size-title=“ av-mini-font-size-title=“ av-medium-font-size=“ av-small-font-size=“ av-mini-font-size=“ av_uid=’av-jhxpi0i5′ admin_preview_bg=“]
Je nachdem was für eine Kamera du hast wird das Modus-Wahlrad mit den verschiedenen Belichtungsmodi so oder so ähnlich aussehen:
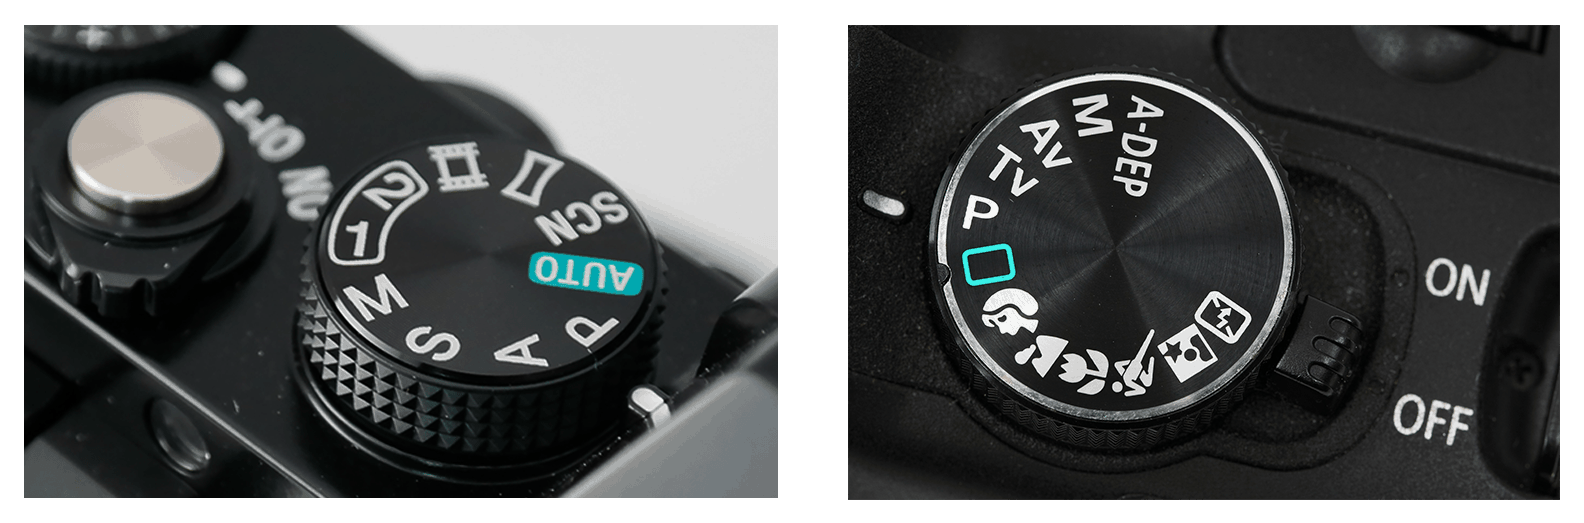
Lass dich bitte nicht von der Menge an Einstellmöglichkeiten verunsichern sowie den Unterschieden zwischen verschiedenen Modellen. Wie wir noch sehen werden, wirst du die wenigsten wirklich brauchen und diejenigen, die du brauchst findest du in aller Regel an jeder Spiegelreflex oder Systemkamera.
[/av_icon_box]
[av_hr class=’invisible‘ height=’100′ shadow=’no-shadow‘ position=’center‘ custom_border=’av-border-thin‘ custom_width=’50px‘ custom_border_color=“ custom_margin_top=’30px‘ custom_margin_bottom=’30px‘ icon_select=’yes‘ custom_icon_color=“ icon=’ue808′ font=’entypo-fontello‘ av_uid=’av-6yofkp‘ admin_preview_bg=“]
[av_one_full first min_height=“ vertical_alignment=“ space=“ custom_margin=“ margin=’0px‘ link=“ linktarget=“ link_hover=“ padding=’0px‘ border=“ border_color=“ radius=’0px‘ background=’bg_color‘ background_color=“ background_gradient_color1=“ background_gradient_color2=“ background_gradient_direction=’vertical‘ src=“ background_position=’top left‘ background_repeat=’no-repeat‘ animation=“ mobile_breaking=“ mobile_display=“ av_uid=’av-bic4j3′]
[av_textblock size=“ font_color=“ color=“ av-medium-font-size=“ av-small-font-size=“ av-mini-font-size=“ av_uid=’av-5q61m9′ admin_preview_bg=“]
Blendenvorwahl = Zeitautomatik = Aperture Priority = A = Av
[/av_textblock]
[av_textblock size=“ font_color=“ color=“ av-medium-font-size=“ av-small-font-size=“ av-mini-font-size=“ av_uid=’av-6t20jd‘ admin_preview_bg=“]
Bei der Zeitautomatik, die auch Blendenvorwahl genannt wird, musst du die Blendenzahl selbst einstellen, die Kamera stellt daraufhin die Belichtungszeit komplett automatisch ein. Diese Funktion wird auf den Wahlrädern digitaler Kameras oft als „A“ bezeichnet, was für „Aperture priority“ steht. Auch Av wird als Bezeichnung für diese Automatik verwendet.
Wofür und für wen eignet sich die Zeitautomatik?
Die Zeitautomatik sollte dann angewendet werden, wenn man gezielt Einfluss auf die Schärfentiefe in einem Bild nehmen möchte.
Für viele Fotografen – mich eingeschlossen – stellt dieser Modus einen Standardmodus dar.
[/av_textblock]
[av_image src=’https://mlzwymt16oxv.i.optimole.com/w:auto/h:auto/q:90/ig:avif/f:best/https://photo-inspirator.com/wp-content/uploads/2018/10/Av-e1538999216884.png‘ attachment=’10370′ attachment_size=’full‘ align=’center‘ styling=“ hover=“ link=“ target=“ caption=“ font_size=“ appearance=“ overlay_opacity=’0.4′ overlay_color=’#000000′ overlay_text_color=’#ffffff‘ copyright=“ animation=’no-animation‘ av_uid=’av-ji1zqmc2′ admin_preview_bg=“][/av_image]
[/av_one_full]
[av_one_full first min_height=“ vertical_alignment=“ space=“ custom_margin=“ margin=’0px‘ link=“ linktarget=“ link_hover=“ padding=’0px‘ border=“ border_color=“ radius=’0px‘ background=’bg_color‘ background_color=“ background_gradient_color1=“ background_gradient_color2=“ background_gradient_direction=’vertical‘ src=“ background_position=’top left‘ background_repeat=’no-repeat‘ animation=“ mobile_breaking=“ mobile_display=“ av_uid=’av-bic4j3′]
[av_textblock size=“ font_color=“ color=“ av-medium-font-size=“ av-small-font-size=“ av-mini-font-size=“ av_uid=’av-5q61m9′ admin_preview_bg=“]
Zeitvorwahl = Blendenautomatik = Shutter Priority = S = Tv
[/av_textblock]
[av_textblock size=“ font_color=“ color=“ av-medium-font-size=“ av-small-font-size=“ av-mini-font-size=“ av_uid=’av-6t20jd‘ admin_preview_bg=“]
Bei der Blendenautomatik, auch Zeitvorwahl genannt, muss die Belichtungszeit des Verschlusses selbst eingestellt werden. Die Blendenzahl wird von der Kamera dagegen automatisch eingestellt. Diese Funktion wird auf den Wahlrädern digitaler Kameras oft als „S“ bezeichnet, was für „Shutter priority“ steht. Auch die Bezeichnungen „T“ und „Tv“ finden für diese Automatik Verwendung.
Du solltest die Blendenautomatik dann einsetzen, wenn du situationsbedingt eine ganz bestimmte Belichtungszeit anstrebst, um somit die Bewegungsunschärfe des Motivs zu beeinflussen.
Wir haben im letzten Modul über die Auswirkungen der Belichtungszeit auf die Bewegungsunschärfe gesprochen. Die Blendenautomatik ermöglicht dir, die Belichtungszeit genau anzupassen, während die Kamera den Rest regelt.
[/av_textblock]
[av_image src=’https://mlzwymt16oxv.i.optimole.com/w:auto/h:auto/q:90/ig:avif/f:best/https://photo-inspirator.com/wp-content/uploads/2018/10/Tv-e1538999066390.png‘ attachment=’10374′ attachment_size=’full‘ align=’center‘ styling=“ hover=“ link=“ target=“ caption=“ font_size=“ appearance=“ overlay_opacity=’0.4′ overlay_color=’#000000′ overlay_text_color=’#ffffff‘ copyright=“ animation=’no-animation‘ av_uid=’av-ji1zqmc2′ admin_preview_bg=“][/av_image]
[/av_one_full]
[av_one_full first min_height=“ vertical_alignment=“ space=“ custom_margin=“ margin=’0px‘ link=“ linktarget=“ link_hover=“ padding=’0px‘ border=“ border_color=“ radius=’0px‘ background=’bg_color‘ background_color=“ background_gradient_color1=“ background_gradient_color2=“ background_gradient_direction=’vertical‘ src=“ background_position=’top left‘ background_repeat=’no-repeat‘ animation=“ mobile_breaking=“ mobile_display=“ av_uid=’av-bic4j3′]
[av_textblock size=“ font_color=“ color=“ av-medium-font-size=“ av-small-font-size=“ av-mini-font-size=“ av_uid=’av-5q61m9′ admin_preview_bg=“]
Programmautomatik = Program Mode = P
[/av_textblock]
[av_textblock size=“ font_color=“ color=“ av-medium-font-size=“ av-small-font-size=“ av-mini-font-size=“ av_uid=’av-6t20jd‘ admin_preview_bg=“]
Bei der Programmautomatik werden sowohl die Belichtungszeit als auch die Blendenzahl, von der Kamera automatisch ausgewählt. Dargestellt wird die Programmautomatik, auf den Wahlrädern digitaler Kameras, in den meisten Fällen durch ein „P“, welches für „Program mode“ steht.
Im Gegensatz zu der Vollautomatik, kann man jedoch bei der Programmautomatik Einstellungen wie den Blitz, den ISO-Wert oder auch Belichtungskorrekturen, manuell vornehmen. Die Kamera gleicht daraufhin die weiteren Einstellungen, an die selbst getroffenen Einstellungen an.
Genutzt wird die Programmautomatik zumeist von Anfängern, die noch über wenig Erfahrung in Bezug auf die Funktionen Ihrer Kamera verfügen.
Dies kann sich vereinzelt sogar dadurch äußern, dass Kamerahersteller die Anzahl der Einstellungen, die man selber vornehmen kann, deutlich begrenzen oder das sogar komplett auf Untermenüs verzichtet wird.
[/av_textblock]
[av_image src=’https://mlzwymt16oxv.i.optimole.com/w:auto/h:auto/q:90/ig:avif/f:best/https://photo-inspirator.com/wp-content/uploads/2018/10/P-Mode-e1538999514765.png‘ attachment=’10378′ attachment_size=’full‘ align=’center‘ styling=“ hover=“ link=“ target=“ caption=“ font_size=“ appearance=“ overlay_opacity=’0.4′ overlay_color=’#000000′ overlay_text_color=’#ffffff‘ copyright=“ animation=’no-animation‘ av_uid=’av-ji1zqmc2′ admin_preview_bg=“][/av_image]
[/av_one_full]
[av_one_full first min_height=“ vertical_alignment=“ space=“ custom_margin=“ margin=’0px‘ link=“ linktarget=“ link_hover=“ padding=’0px‘ border=“ border_color=“ radius=’0px‘ background=’bg_color‘ background_color=“ background_gradient_color1=“ background_gradient_color2=“ background_gradient_direction=’vertical‘ src=“ background_position=’top left‘ background_repeat=’no-repeat‘ animation=“ mobile_breaking=“ mobile_display=“ av_uid=’av-bic4j3′]
[av_textblock size=“ font_color=“ color=“ av-medium-font-size=“ av-small-font-size=“ av-mini-font-size=“ av_uid=’av-5q61m9′ admin_preview_bg=“]
Motivprogramme
[/av_textblock]
[av_textblock size=“ font_color=“ color=“ av-medium-font-size=“ av-small-font-size=“ av-mini-font-size=“ av_uid=’av-6t20jd‘ admin_preview_bg=“]
Bei den Motivprogrammen, stellt die Kamera einem eine Reihe von Programmen bereit, die in speziellen Situationen angewendet werden können. Die Einstellungen hierfür, nimmt die Kamera vollständig Selbstständig vor.
Die Kamera weiß allerdings nicht, was dir als Fotograf gefällt und was nicht. Daher rate ich von der Verwendung der Motivprogramme ab, die eher für Anfänger geeignet sind.
Zu den häufig zu findenden Motiv-Programmen gehören:
- Sportaufnahmen:
Hierbei wählt die Kamera eine kurze Belichtungszeit und in der Regel auch einen Nachführ-Fokus, um Spielszenen, während einem Fußballspiel, schnell einfangen zu können. Vereinzelt schalten Kameras bei diesem Motivmodus zudem in den Serienbildmodus, wodurch mehrere Bilder in Folge aufgenommen werden können. - Portraits:
Zum Anfertigen von Portraitfotos, wird von der Kamera die Blende weit geöffnet (kleine Blendenzahl) um einen unscharfen Hintergrund in den Bildern zu erzeugen. - Landschaftsaufnahmen:
Bei Landschaftsfotografien, sorgt eine voreingestellt weit geschlossene Blende (große Blendenzahl) für eine höhere Schärfentiefe. - Nahaufnahmen:
Für Nahaufnahmen, werden die Blende und Belichtungszeit, für möglichst viel Schärfe, von der Kamera optimiert eingestellt. - Nachtportraits:
Für Nachtportraits empfiehlt es sich stets einen Stabilisator oder ein Stativ zu nutzen, um ein Verwackeln möglichst zu verhindern. Zur Erstellung eines Nachtportraits wird von der Kamera ein Blitz erzeugt, welcher den Vordergrund ausleuchtet. Um den Hintergrund bestmöglich zu erhalten, wählt die Kamera zudem eine längere Belichtungszeit aus. Die Kamera währenddessen zu halten und nicht zu verwackeln, ist daher äußerst anspruchsvoll. - Kein Blitz:
Hierbei werden Bilder komplett ohne Blitz erstellt. An Orten wo das Fotografieren mit Blitz nicht gestattet ist, kann dieser Motivmodus es Anfängern deutlich erleichtern, ohne manuell den Blitz in den Einstellungen deaktivieren zu müssen.
[/av_textblock]
[av_image src=’https://mlzwymt16oxv.i.optimole.com/w:auto/h:auto/q:90/ig:avif/f:best/https://photo-inspirator.com/wp-content/uploads/2018/10/Scene-e1538999102755.png‘ attachment=’10373′ attachment_size=’full‘ align=’center‘ styling=“ hover=“ link=“ target=“ caption=“ font_size=“ appearance=“ overlay_opacity=’0.4′ overlay_color=’#000000′ overlay_text_color=’#ffffff‘ copyright=“ animation=’no-animation‘ av_uid=’av-ji1zqmc2′ admin_preview_bg=“][/av_image]
[/av_one_full]
[av_one_full first min_height=“ vertical_alignment=“ space=“ custom_margin=“ margin=’0px‘ link=“ linktarget=“ link_hover=“ padding=’0px‘ border=“ border_color=“ radius=’0px‘ background=’bg_color‘ background_color=“ background_gradient_color1=“ background_gradient_color2=“ background_gradient_direction=’vertical‘ src=“ background_position=’top left‘ background_repeat=’no-repeat‘ animation=“ mobile_breaking=“ mobile_display=“ av_uid=’av-bic4j3′]
[av_textblock size=“ font_color=“ color=“ av-medium-font-size=“ av-small-font-size=“ av-mini-font-size=“ av_uid=’av-5q61m9′ admin_preview_bg=“]
Vollautomatik
[/av_textblock]
[av_textblock size=“ font_color=“ color=“ av-medium-font-size=“ av-small-font-size=“ av-mini-font-size=“ av_uid=’av-6t20jd‘ admin_preview_bg=“]
Bei der Vollautomatik werden, wie der Name bereits andeutet, sämtliche Einstellungen von der Kamera, anhand einer Auswertung von Autofokussensoren, Belichtungsmessern sowie der Brennweite, ausgewertet.
In diesem Modus kann der Nutzer in der Folge keine großen Einstellungen zur Optimierung vornehmen, weshalb sich die Vollautomatik auch in erster Linie an komplette Einsteiger richtet.
[/av_textblock]
[av_image src=’https://mlzwymt16oxv.i.optimole.com/w:auto/h:auto/q:90/ig:avif/f:best/https://photo-inspirator.com/wp-content/uploads/2018/10/Auto-e1538999025311.png‘ attachment=’10369′ attachment_size=’full‘ align=’center‘ styling=“ hover=“ link=“ target=“ caption=“ font_size=“ appearance=“ overlay_opacity=’0.4′ overlay_color=’#000000′ overlay_text_color=’#ffffff‘ copyright=“ animation=’no-animation‘ av_uid=’av-ji1zqmc2′ admin_preview_bg=“][/av_image]
[/av_one_full]
[av_one_full first min_height=“ vertical_alignment=“ space=“ custom_margin=“ margin=’0px‘ link=“ linktarget=“ link_hover=“ padding=’0px‘ border=“ border_color=“ radius=’0px‘ background=’bg_color‘ background_color=“ background_gradient_color1=“ background_gradient_color2=“ background_gradient_direction=’vertical‘ src=“ background_position=’top left‘ background_repeat=’no-repeat‘ animation=“ mobile_breaking=“ mobile_display=“ av_uid=’av-bic4j3′]
[av_textblock size=“ font_color=“ color=“ av-medium-font-size=“ av-small-font-size=“ av-mini-font-size=“ av_uid=’av-5q61m9′ admin_preview_bg=“]
Manueller Modus = Manual Mode = M
[/av_textblock]
[av_textblock size=“ font_color=“ color=“ av-medium-font-size=“ av-small-font-size=“ av-mini-font-size=“ av_uid=’av-6t20jd‘ admin_preview_bg=“]
Der manuelle Modus ist so etwas wie das Gegenstück zur Vollautomatik, während bei dieser, sämtliche Einstellungen von der Kamera vorgenommen werden, ist im manuellen Modus das Gegenteil der Fall.
Hier musst du selber die erforderlichen Einstellungen für Belichtungszeit, Blende sowie den ISO-Wert auswählen. Diese Funktion wird auf den Wahlrädern digitaler Kameras als „M“ bezeichnet, was für „Manual mode“ steht.
Zwar hast du in diesem Modus mit Abstand die meisten Möglichkeiten, doch kann hier eben deshalb auch am meisten schief gehen. So sollte man stets neben der Blende sowie der Belichtungszeit auch die ISO-Einstellungen nicht vernachlässigen, da ein falscher ISO-Wert zu einem rauschen in den Bildern führen kann.
Wer sich darauf versteht die Einstellungen im manuellen Modus bestmöglich anzupassen, der kann in der Folge, durch die Wirkung von Belichtungszeit und Blendeneinstellungen im richtigen Moment, deutlich bessere Ergebnisse erzielen als in anderen Modi.
[/av_textblock]
[av_image src=’https://mlzwymt16oxv.i.optimole.com/w:auto/h:auto/q:90/ig:avif/f:best/https://photo-inspirator.com/wp-content/uploads/2018/10/M-e1538999183641.png‘ attachment=’10371′ attachment_size=’full‘ align=’center‘ styling=“ hover=“ link=“ target=“ caption=“ font_size=“ appearance=“ overlay_opacity=’0.4′ overlay_color=’#000000′ overlay_text_color=’#ffffff‘ copyright=“ animation=’no-animation‘ av_uid=’av-ji1zqmc2′ admin_preview_bg=“][/av_image]
[/av_one_full]
[av_one_full first min_height=“ vertical_alignment=’av-align-top‘ space=“ margin=’0px‘ margin_sync=’true‘ padding=’20px,0px,0px,0px‘ border=“ border_color=“ radius=’0px‘ radius_sync=’true‘ background_color=“ src=“ attachment=“ attachment_size=“ background_position=’top left‘ background_repeat=’no-repeat‘ animation=“ mobile_breaking=“ mobile_display=“ av_uid=’av-i4znt‘]
[av_icon_box position=’left_content‘ icon_style=“ boxed=“ icon=’ue81e‘ font=’entypo-fontello‘ title=’KURZ UND KNAPP:‘ link=“ linktarget=“ linkelement=“ font_color=“ custom_title=“ custom_content=“ color=’custom‘ custom_bg=’#719430′ custom_font=’#ffffff‘ custom_border=“ av-medium-font-size-title=“ av-small-font-size-title=“ av-mini-font-size-title=“ av-medium-font-size=“ av-small-font-size=“ av-mini-font-size=“ av_uid=’av-jhz46osr‘ admin_preview_bg=“]
Ich verwende im Grunde genommen einen der folgenden drei Modi zum fotografieren. Alle anderen wirst du nicht brauchen. Punkt. Aus. Ende. Der Sinn ist es, damit festzulegen, ob du nach Einstellung der ISO-Empfindlichkeit die Kontrolle über die Blende (Blendenvorwahl), die Belichtungszeit (Zeitvorwahl) oder beide Parameter (Manuell) übernehmen willst. Nicht mehr und nicht weniger:
[/av_icon_box]
[av_iconlist position=’left‘ iconlist_styling=“ custom_title_size=’30‘ custom_content_size=“ font_color=’custom‘ custom_title=“ custom_content=“ color=’custom‘ custom_bg=’#719430′ custom_font=“ custom_border=“ av-medium-font-size-title=“ av-small-font-size-title=“ av-mini-font-size-title=“ av-medium-font-size=“ av-small-font-size=“ av-mini-font-size=“ av_uid=’av-4qd88p‘ admin_preview_bg=“]
[av_iconlist_item title=‘Blendenvorwahl‚ link=“ linktarget=“ linkelement=“ icon=’ue912′ font=’entypo-fontello‘ av_uid=’av-3a6h33′]
Du bestimmst die Blende und die Kamera regelt automatisch die Verschlusszeit. Damit hast du direkten Einfluss auf die Schärfentiefe!
[/av_iconlist_item]
[av_iconlist_item title=‘Zeitvorwahl‚ link=“ linktarget=“ linkelement=“ icon=’ue862′ font=’entypo-fontello‘ av_uid=’av-47fbi7′]
Du bestimmst die Belichtungszeit und die Kamera regelt automatisch die Blende. Damit hast du direkten Einfluss auf die Bewegungsunschärfe!
[/av_iconlist_item]
[av_iconlist_item title=‘Manuell‚ link=“ linktarget=“ linkelement=“ icon=’ue855′ font=’entypo-fontello‘ av_uid=’av-26nxnz‘]
Du bestimmst sowohl die Blende , als auch die Verschlusszeit selbst. Damit hast du direkten Einfluss auf die Schärfentiefe und Bewegungsunschärfe!
[/av_iconlist_item]
[/av_iconlist]
[/av_one_full]
[av_one_full first min_height=“ vertical_alignment=“ space=“ custom_margin=“ margin=’0px‘ link=“ linktarget=“ link_hover=“ padding=’0px‘ border=“ border_color=“ radius=’0px‘ background=’bg_color‘ background_color=“ background_gradient_color1=“ background_gradient_color2=“ background_gradient_direction=’vertical‘ src=“ background_position=’top left‘ background_repeat=’no-repeat‘ animation=“ mobile_breaking=“ mobile_display=“ av_uid=’av-bic4j3′]
[av_textblock size=“ font_color=“ color=“ av-medium-font-size=“ av-small-font-size=“ av-mini-font-size=“ av_uid=’av-5q61m9′ admin_preview_bg=“]
Fazit:
[/av_textblock]
[av_textblock size=“ font_color=“ color=“ av-medium-font-size=“ av-small-font-size=“ av-mini-font-size=“ av_uid=’av-6t20jd‘ admin_preview_bg=“]
[s3mm type=“video“ source=“cloudfront“ files=“Videos/2.6_2 FAZIT BELICHTUNGSMODI.mp4″ titles=“Videos/2.6_2 FAZIT BELICHTUNGSMODI.mp4″ splash=“https://mlzwymt16oxv.i.optimole.com/w:auto/h:auto/q:90/ig:avif/f:best/https://photo-inspirator.com/wp-content/uploads/2019/02/2.6.jpg“ /]
[/av_textblock]
[/av_one_full][av_hr class=’invisible‘ height=’100′ shadow=’no-shadow‘ position=’center‘ custom_border=’av-border-thin‘ custom_width=’50px‘ custom_border_color=“ custom_margin_top=’30px‘ custom_margin_bottom=’30px‘ icon_select=’yes‘ custom_icon_color=“ icon=’ue808′ font=’entypo-fontello‘ av_uid=’av-6rta75′ admin_preview_bg=“]
[av_icon_box position=’top‘ icon_style=“ boxed=“ icon=’ue80f‘ font=’entypo-fontello‘ title=’Wie sollte ich konkret vorgehen?‘ link=“ linktarget=“ linkelement=“ font_color=“ custom_title=“ custom_content=“ color=“ custom_bg=“ custom_font=“ custom_border=“ av-medium-font-size-title=“ av-small-font-size-title=“ av-mini-font-size-title=“ av-medium-font-size=“ av-small-font-size=“ av-mini-font-size=“ av_uid=’av-jj6xeb9n‘ admin_preview_bg=“]
In der Praxis empfehle ich dir bis auf weiteres folgende Schritte zur ersten Fotografie:
- Stelle deine Kamera auf Blendenvorwahl (A / Av)
- Wähle eine ISO-Empfindlichkeit entsprechend der Motivhelligkeit. Bei Tageslicht ISO 100 -200, an bewölkten Tagen ISO 200 – 400 und in Räumen bzw. bei Kunstlicht eher ISO 400 – 800. Das sind gute Richtwerte für den Start.
- Entscheide dich je nach Motiv für eine passende Blende. Kleinere Blenden (hoher Zahlenwert) führen zu großer Schärfentiefe und größere Blenden (niedriger Zahlenwert) zu geringer Schärfentiefe.
- Sollte es (trotz ggf. Bildstabilisator) zu Verwacklungsunschärfe wegen zu langer Belichtungszeit kommen, dann
- wenn möglich ein Stativ verwenden
- wenn du von Hand fotografierst, die ISO hochregeln
[/av_icon_box]
[av_hr class=’invisible‘ height=’100′ shadow=’no-shadow‘ position=’center‘ custom_border=’av-border-thin‘ custom_width=’50px‘ custom_border_color=“ custom_margin_top=’30px‘ custom_margin_bottom=’30px‘ icon_select=’yes‘ custom_icon_color=“ icon=’ue808′ font=’entypo-fontello‘ av_uid=’av-6rta75′ admin_preview_bg=“]
[av_icon_box position=’top‘ icon_style=“ boxed=“ icon=’ue82d‘ font=’entypo-fontello‘ title=’Spickzettel‘ link=“ linktarget=“ linkelement=“ font_color=“ custom_title=“ custom_content=“ color=“ custom_bg=“ custom_font=“ custom_border=“ av-medium-font-size-title=“ av-small-font-size-title=“ av-mini-font-size-title=“ av-medium-font-size=“ av-small-font-size=“ av-mini-font-size=“ av_uid=’av-jhuj5m5e‘ admin_preview_bg=“]
Lade dir hier deinen Spickzettel für die Hosentasche herunter:
[s3mm type=“file“ source=“cloudfront“ files=“Dateien/Spickzettel Modi.pdf“ linknewtab=“yes“]Belichtungsmodi[/s3mm]
[/av_icon_box]
[av_hr class=’invisible‘ height=’100′ shadow=’no-shadow‘ position=’center‘ custom_border=’av-border-thin‘ custom_width=’50px‘ custom_border_color=“ custom_margin_top=’30px‘ custom_margin_bottom=’30px‘ icon_select=’yes‘ custom_icon_color=“ icon=’ue808′ font=’entypo-fontello‘ av_uid=’av-6rta75′ admin_preview_bg=“]
[av_textblock size=“ font_color=“ color=“ av-medium-font-size=“ av-small-font-size=“ av-mini-font-size=“ av_uid=’av-13f3op‘ admin_preview_bg=“]
Dein Kursfortschritt:
[av_hr class=’invisible‘ height=’100′ shadow=’no-shadow‘ position=’center‘ custom_border=’av-border-thin‘ custom_width=’50px‘ custom_border_color=“ custom_margin_top=’30px‘ custom_margin_bottom=’30px‘ icon_select=’yes‘ custom_icon_color=“ icon=’ue808′ font=’entypo-fontello‘ av_uid=’av-6rta75′ admin_preview_bg=“]
[av_one_half first min_height=“ vertical_alignment=“ space=“ custom_margin=“ margin=’0px‘ padding=’0px‘ border=“ border_color=“ radius=’0px‘ background_color=“ src=“ background_position=’top left‘ background_repeat=’no-repeat‘ animation=“ mobile_breaking=“ mobile_display=“ av_uid=’av-rlrep‘]
[av_button label=’VORHERIGE LEKTION‘ link=’page,1052′ link_target=“ size=’small‘ position=’center‘ label_display=“ icon_select=’no‘ icon=’ue800′ font=’entypo-fontello‘ color=’theme-color‘ custom_bg=’#444444′ custom_font=’#ffffff‘ av_uid=’av-ixlr5′ admin_preview_bg=“]
[/av_one_half]
[av_one_half min_height=“ vertical_alignment=“ space=“ custom_margin=“ margin=’0px‘ padding=’0px‘ border=“ border_color=“ radius=’0px‘ background_color=“ src=“ background_position=’top left‘ background_repeat=’no-repeat‘ animation=“ mobile_breaking=“ mobile_display=“ av_uid=’av-csyup‘]
[av_button label=’NÄCHSTE LEKTION‘ link=’page,7321′ link_target=“ size=’small‘ position=’center‘ label_display=“ icon_select=’no‘ icon=’ue800′ font=’entypo-fontello‘ color=’theme-color‘ custom_bg=’#444444′ custom_font=’#ffffff‘ av_uid=’av-ayi3t‘ admin_preview_bg=“]
[/av_one_half]