[av_heading heading=‘Bildrezept
Lichter der Nacht‚ tag=’h1′ link_apply=“ link=’manually,http://‘ link_target=“ style=’blockquote modern-quote modern-centered‘ size=“ subheading_active=’subheading_below‘ subheading_size=’16‘ margin=“ padding=’20‘ color=“ custom_font=“ custom_class=“ id=“ admin_preview_bg=“ av-desktop-hide=“ av-medium-hide=“ av-small-hide=“ av-mini-hide=“ av-medium-font-size-title=“ av-small-font-size-title=“ av-mini-font-size-title=“ av-medium-font-size=“ av-small-font-size=“ av-mini-font-size=“][/av_heading]
[av_textblock size=“ font_color=“ color=“ av-medium-font-size=“ av-small-font-size=“ av-mini-font-size=“ av_uid=’av-3q3u6x‘ admin_preview_bg=“]
Nachts ist es kälter als draußen…und dunkler.
Scherzkeks
[/av_textblock]
[av_textblock size=“ font_color=“ color=“ av-medium-font-size=“ av-small-font-size=“ av-mini-font-size=“ av_uid=’av-3q3u6x‘ admin_preview_bg=“]
Das Fotografieren bei Nacht hat seinen ganz eigenen Reiz. Das gilt insbesondere für Gebäude, die oftmals tagsüber eher langweilig aussehen und nachts ganz toll beleuchtet werden. Manche Städte erwachen erst so richtig, wenn die Sonne längst untergegangen ist und die Lichter der Stadt erleuchten. So verwandeln sich Gebäude wie der Kölner Dom oder die Straßen Amsterdams nachts in attraktive Fotomotive die nur darauf warten abgelichtet zu werden.
In diesem Bildrezept soll es um das Fotografieren in der Stadt bei Nacht gehen und die folgenden Tipps bereiten dich auf dieses Projekt vor.
[/av_textblock]
[av_hr class=’invisible‘ height=’50‘ shadow=’no-shadow‘ position=’center‘ custom_border=’av-border-thin‘ custom_width=’50px‘ custom_border_color=“ custom_margin_top=’30px‘ custom_margin_bottom=’30px‘ icon_select=’yes‘ custom_icon_color=“ icon=’ue808′ font=’entypo-fontello‘ av_uid=’av-3ht53t‘ admin_preview_bg=“]
[av_textblock size=“ font_color=“ color=“ av-medium-font-size=“ av-small-font-size=“ av-mini-font-size=“ av_uid=’av-3q3u6x‘ admin_preview_bg=“]
[/av_textblock]
[av_hr class=’invisible‘ height=’50‘ shadow=’no-shadow‘ position=’center‘ custom_border=’av-border-thin‘ custom_width=’50px‘ custom_border_color=“ custom_margin_top=’30px‘ custom_margin_bottom=’30px‘ icon_select=’yes‘ custom_icon_color=“ icon=’ue808′ font=’entypo-fontello‘ av_uid=’av-3ht53t‘ admin_preview_bg=“]
[av_icon_box position=’top‘ icon_style=“ boxed=“ icon=’ue80e‘ font=’entypo-fontello‘ title=’Amsterdam‘ link=“ linktarget=“ linkelement=“ font_color=“ custom_title=“ custom_content=“ color=“ custom_bg=“ custom_font=“ custom_border=“ av-medium-font-size-title=“ av-small-font-size-title=“ av-mini-font-size-title=“ av-medium-font-size=“ av-small-font-size=“ av-mini-font-size=“ av_uid=’av-jh9510ue‘ admin_preview_bg=“]

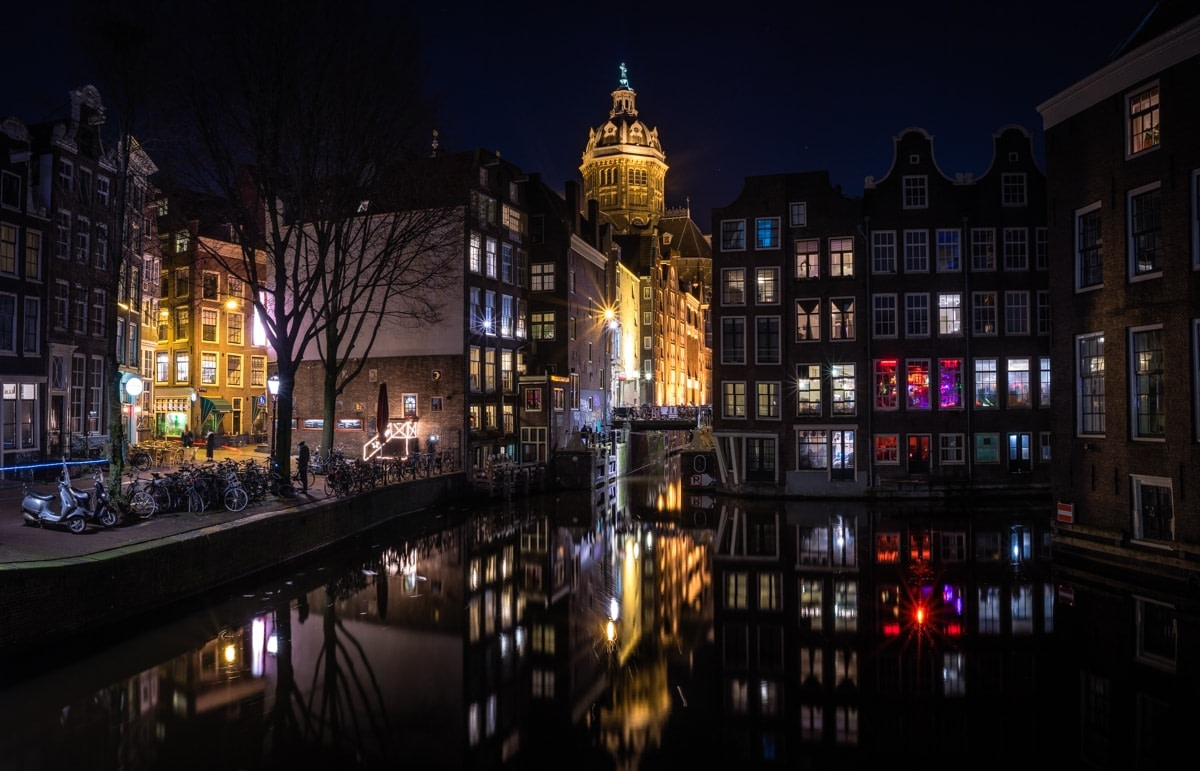
f 18 | 30 sec | ISO 160 | Panorama
[/av_icon_box]
[av_hr class=’invisible‘ height=’25‘ shadow=’no-shadow‘ position=’center‘ custom_border=’av-border-thin‘ custom_width=’50px‘ custom_border_color=“ custom_margin_top=’30px‘ custom_margin_bottom=’30px‘ icon_select=’yes‘ custom_icon_color=“ icon=’ue808′ font=’entypo-fontello‘ av_uid=’av-3ht53t‘ admin_preview_bg=“]
[av_icon_box position=’top‘ icon_style=“ boxed=“ icon=’ue80e‘ font=’entypo-fontello‘ title=’Kölner Dom‘ link=“ linktarget=“ linkelement=“ font_color=“ custom_title=“ custom_content=“ color=“ custom_bg=“ custom_font=“ custom_border=“ av-medium-font-size-title=“ av-small-font-size-title=“ av-mini-font-size-title=“ av-medium-font-size=“ av-small-font-size=“ av-mini-font-size=“ av_uid=’av-jh9510ue‘ admin_preview_bg=“]

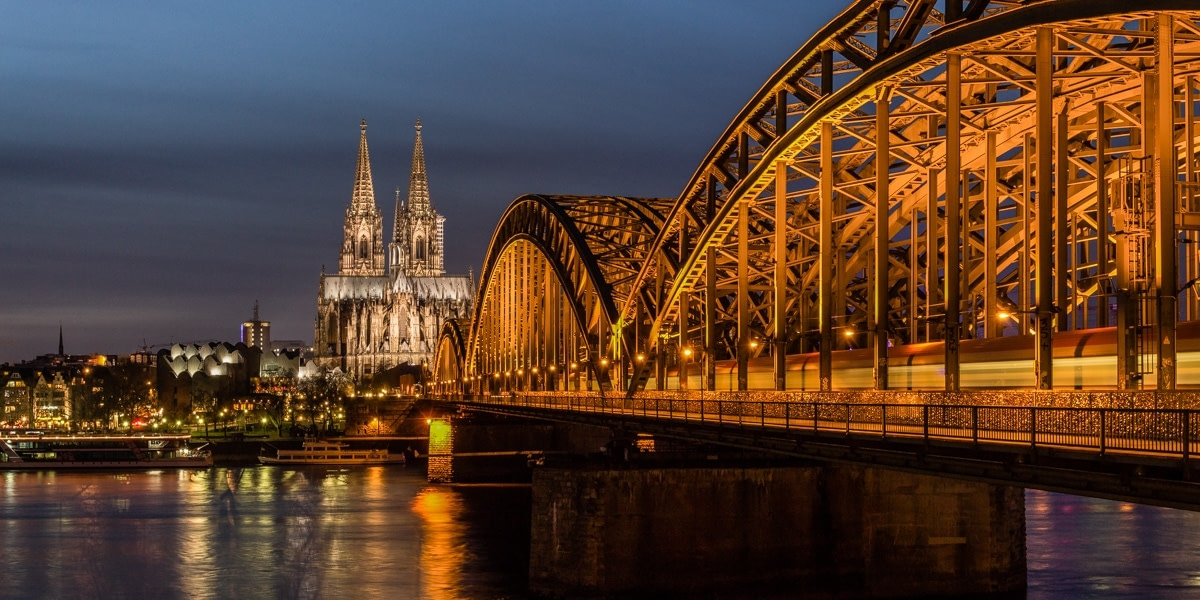
f 10 | 5 sec | ISO 400
[/av_icon_box]
[av_hr class=’invisible‘ height=’50‘ shadow=’no-shadow‘ position=’center‘ custom_border=’av-border-thin‘ custom_width=’50px‘ custom_border_color=“ custom_margin_top=’30px‘ custom_margin_bottom=’30px‘ icon_select=’yes‘ custom_icon_color=“ icon=’ue808′ font=’entypo-fontello‘ av_uid=’av-3ht53t‘ admin_preview_bg=“]
[av_one_full first min_height=“ vertical_alignment=’av-align-top‘ space=“ margin=’0px‘ margin_sync=’true‘ padding=’0px,0px,20px,0px‘ border=“ border_color=“ radius=’0px‘ radius_sync=’true‘ background_color=“ src=“ attachment=“ attachment_size=“ background_position=’top left‘ background_repeat=’no-repeat‘ animation=“ mobile_breaking=“ mobile_display=“ av_uid=’av-3gkvqp‘]
[av_textblock size=“ font_color=“ color=“ av-medium-font-size=“ av-small-font-size=“ av-mini-font-size=“ av_uid=’av-39uvjt‘ admin_preview_bg=“]
#1 Welches Zubehör brauche ich?
[/av_textblock]
[av_textblock size=“ font_color=“ color=“ av-medium-font-size=“ av-small-font-size=“ av-mini-font-size=“ av_uid=’av-3q3u6x‘ admin_preview_bg=“]
Bevor wir an die Kameraeinstellung gehen möchte ich gerne ein paar Worte zum Zubehör verlieren, dass dir das Leben für dieses Projekt leichter machen wird:
Stativ
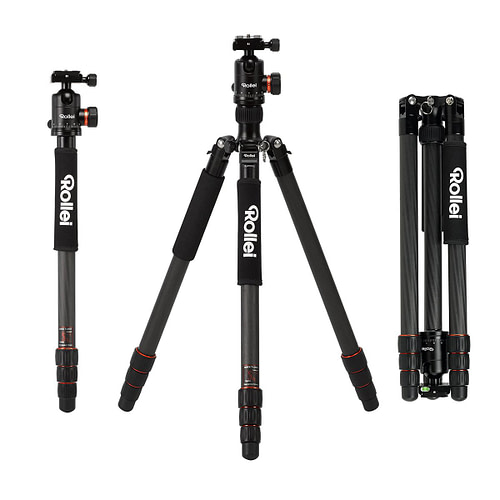
Das spärliche Licht in der Nacht zwingt uns zu relativ langen Belichtungszeiten, die von Hand nicht realisierbar sind. Ein Stativ ist daher ein Muss. Ich kann es nicht oft genug betonen, dass man nie am Stativ sparen sollte. Dieses sollte robust und schwer genug sein, um auch Windböen die Kalte schulter zu zeigen. Weiter unten siehst du das Stativ, dass ich verwende, welches ich dir uneingeschränkt empfehlen kann. Ich habe viele viele Stative getestet.
Kabel-, Fern-, oder Selbstauslöser
Wie erwähnt haben wir es mit langen Verschlusszeiten zu tun. D.h. der Auslöser deiner Kamera sollte nicht gedrückt werden, was zu Verwacklungsunschärfe führen würde. Daher bitte den Selbstauslöser deiner Kamera verwenden. Diesen kannst du in aller Regel auf 2 sec stellen. Dann darfst du auch den Auslöser der Kamera verwenden, die das Foto dann erst schießt, wenn du kein Kontakt mehr zur Kamera hast und diese somit nicht wackelt. Noch besser ist ein Kabel- oder Fernauslöser: damit kannst du ein Verwacklungsfreises Foto ohne Verzögerung machen. Zudem erlaubt dir dieser Fernauslöser auch Verschlusszeiten im Bereich über 30 sec.
Weitwinkel-Objektiv
Die Gute Nachricht zuerst. Auch mit der einfachen Kit-Optik kann man ganz hervorragende Nachtfotos machen. Ich bevorzuge bei dieser Art von Fotografie allerdingsWeitwinkel-Objektive. 35mm abwärts sollte dein Objektiv mindestens können. Idealerweise bis zu 16mm. Das liegt einfach daran, dass man Gebäude oder „Cityscapes“ am allerbesten mit einer relativ kurzen Brennweite bild füllend einfangen kann.
Taschenlampe
Das ist etwas, dass man sehr gerne vergisst. Gerade, wenn du deine Kamera noch nicht aus dem Effeff beherrschst, rate ich dir eine Taschenlampe mitzunehmen, um auch bei Dunkelheit den Überblick zu behalten.
[/av_textblock]
[/av_one_full]
[av_hr class=’invisible‘ height=’25‘ shadow=’no-shadow‘ position=’center‘ custom_border=’av-border-thin‘ custom_width=’50px‘ custom_border_color=“ custom_margin_top=’30px‘ custom_margin_bottom=’30px‘ icon_select=’yes‘ custom_icon_color=“ icon=’ue808′ font=’entypo-fontello‘ av_uid=’av-3ht53t‘ admin_preview_bg=“]
[av_one_full first min_height=“ vertical_alignment=“ space=“ custom_margin=“ margin=’0px‘ link=“ linktarget=“ link_hover=“ padding=’0px‘ border=“ border_color=“ radius=’0px‘ background=’bg_color‘ background_color=“ background_gradient_color1=“ background_gradient_color2=“ background_gradient_direction=’vertical‘ src=“ background_position=’top left‘ background_repeat=’no-repeat‘ animation=“ mobile_breaking=“ mobile_display=“ av_uid=’av-dpzwj‘]
[av_icon_box position=’top‘ icon_style=“ boxed=“ icon=’ue82b‘ font=’entypo-fontello‘ title=’Stativ‘ link=’manually,https://amzn.to/2mgq8bi‘ linktarget=’_blank‘ linkelement=’both‘ font_color=“ custom_title=“ custom_content=“ color=“ custom_bg=“ custom_font=“ custom_border=“ av-medium-font-size-title=“ av-small-font-size-title=“ av-mini-font-size-title=“ av-medium-font-size=“ av-small-font-size=“ av-mini-font-size=“ av_uid=’av-jh9510ue‘ admin_preview_bg=“]
Meine Empfehlung: das Rollei C6i
[/av_icon_box]
[/av_one_full]
[av_one_full first min_height=“ vertical_alignment=“ space=“ custom_margin=“ margin=’0px‘ link=“ linktarget=“ link_hover=“ padding=’0px‘ border=“ border_color=“ radius=’0px‘ background=’bg_color‘ background_color=“ background_gradient_color1=“ background_gradient_color2=“ background_gradient_direction=’vertical‘ src=“ background_position=’top left‘ background_repeat=’no-repeat‘ animation=“ mobile_breaking=“ mobile_display=“ av_uid=’av-dpzwj‘]
[av_icon_box position=’top‘ icon_style=“ boxed=“ icon=’ue82b‘ font=’entypo-fontello‘ title=’Auslöser‘ link=“ linktarget=’_blank‘ linkelement=’both‘ font_color=“ custom_title=“ custom_content=“ color=“ custom_bg=“ custom_font=“ custom_border=“ av-medium-font-size-title=“ av-small-font-size-title=“ av-mini-font-size-title=“ av-medium-font-size=“ av-small-font-size=“ av-mini-font-size=“ av_uid=’av-jh9510ue‘ admin_preview_bg=“]
Meine Empfehlung: Kabel-Auslöser von JJC
Achtung: unbedingt darauf achten den richtigen für das eigene Kameramodell zu kaufen. In der Artikelbeschreibung von Amazon stehen die Kameramodelle.

[av_button label=’Canon‘ link=’manually,https://amzn.to/2NcDpxe‘ link_target=’_blank‘ size=’small‘ position=’center‘ label_display=“ icon_select=’yes‘ icon=’ue835′ font=’entypo-fontello‘ color=’theme-color‘ custom_bg=’#444444′ custom_font=’#ffffff‘ av_uid=’av-7rc40j‘ admin_preview_bg=“]
[av_button label=’Nikon‘ link=’manually,https://amzn.to/2ujzisl‘ link_target=’_blank‘ size=’small‘ position=’center‘ label_display=“ icon_select=’yes‘ icon=’ue835′ font=’entypo-fontello‘ color=’theme-color‘ custom_bg=’#444444′ custom_font=’#ffffff‘ av_uid=’av-5bpj77′ admin_preview_bg=“]
[av_button label=’Sony E‘ link=’manually,https://amzn.to/2L7SKBY‘ link_target=’_blank‘ size=’small‘ position=’center‘ label_display=“ icon_select=’yes‘ icon=’ue835′ font=’entypo-fontello‘ color=’theme-color‘ custom_bg=’#444444′ custom_font=’#ffffff‘ av_uid=’av-3zoa43′ admin_preview_bg=“]
[av_button label=’Sony A‘ link=’manually,https://amzn.to/2zDwds4′ link_target=’_blank‘ size=’small‘ position=’center‘ label_display=“ icon_select=’yes‘ icon=’ue835′ font=’entypo-fontello‘ color=’theme-color‘ custom_bg=’#444444′ custom_font=’#ffffff‘ av_uid=’av-b69fn‘ admin_preview_bg=“]
[/av_icon_box]
[/av_one_full]
[av_hr class=’invisible‘ height=’50‘ shadow=’no-shadow‘ position=’center‘ custom_border=’av-border-thin‘ custom_width=’50px‘ custom_border_color=“ custom_margin_top=’30px‘ custom_margin_bottom=’30px‘ icon_select=’yes‘ custom_icon_color=“ icon=’ue808′ font=’entypo-fontello‘ av_uid=’av-3ht53t‘ admin_preview_bg=“]
[av_one_full first min_height=“ vertical_alignment=’av-align-top‘ space=“ margin=’0px‘ margin_sync=’true‘ padding=’0px,0px,20px,0px‘ border=“ border_color=“ radius=’0px‘ radius_sync=’true‘ background_color=“ src=“ attachment=“ attachment_size=“ background_position=’top left‘ background_repeat=’no-repeat‘ animation=“ mobile_breaking=“ mobile_display=“ av_uid=’av-3gkvqp‘]
[av_textblock size=“ font_color=“ color=“ av-medium-font-size=“ av-small-font-size=“ av-mini-font-size=“ av_uid=’av-39uvjt‘ admin_preview_bg=“]
#2 Wie sollte ich die Kamera einstellen?
[/av_textblock]
[av_textblock size=“ font_color=“ color=“ av-medium-font-size=“ av-small-font-size=“ av-mini-font-size=“ av_uid=’av-3q3u6x‘ admin_preview_bg=“]
Belichtungsmodus
Manuell (M) – der Belichtungsmesser deiner Kamera wird mit diesen Nachtfotos etwas überfordert sein. Daher müssen wir hier selbst Hand anlegen.
ISO
Möglichst niedrig; idealerweise auf 100
Blende
Starte mit der förderlichen Blende (das ist in aller Regel f 8) und regel die Blende nur hoch oder runter wenn unbedingt nötig. In der Bonuslektion „Profi-Tipps für perfekte Bildschärfe“ lernst du, was es mit der förderlichen Blende auf sich hat.
Verschlusszeit
So wählen, dass das Bild mit der vorher festgelegten ISO und Blende korrekt belichtet ist (Belichtungsdreieck!). Am besten auf die Lichter belichten. Dazu noch mehr weiter unten. Da du mit Stativ fotografierst, ist auch eine lange Belichtungszeit kein Problem.
Blitz und Bildstabilisator
Blitz und Bildstabilisator bitte deaktivieren. Brauchst du beides nicht, da du ein Stativ verwendest.
Weißabgleich
Wurscht egal – da du RAW fotografierst und nicht JPEG, kann dieser später in der Nachbearbeitung gewählt werden.
[/av_textblock]
[/av_one_full]
[av_hr class=’invisible‘ height=’50‘ shadow=’no-shadow‘ position=’center‘ custom_border=’av-border-thin‘ custom_width=’50px‘ custom_border_color=“ custom_margin_top=’30px‘ custom_margin_bottom=’30px‘ icon_select=’yes‘ custom_icon_color=“ icon=’ue808′ font=’entypo-fontello‘ av_uid=’av-3ht53t‘ admin_preview_bg=“]
[av_one_full first min_height=“ vertical_alignment=’av-align-top‘ space=“ margin=’0px‘ margin_sync=’true‘ padding=’0px,0px,20px,0px‘ border=“ border_color=“ radius=’0px‘ radius_sync=’true‘ background_color=“ src=“ attachment=“ attachment_size=“ background_position=’top left‘ background_repeat=’no-repeat‘ animation=“ mobile_breaking=“ mobile_display=“ av_uid=’av-3gkvqp‘]
[av_textblock size=“ font_color=“ color=“ av-medium-font-size=“ av-small-font-size=“ av-mini-font-size=“ av_uid=’av-39uvjt‘ admin_preview_bg=“]
#3 Wie sollte ich fokussieren?
[/av_textblock]
[av_textblock size=“ font_color=“ color=“ av-medium-font-size=“ av-small-font-size=“ av-mini-font-size=“ av_uid=’av-3q3u6x‘ admin_preview_bg=“]
Bei Nachtfotos empfehle ich dir manuell zu fokussieren statt den Autofokus zu verwenden. Wie der Belichtungsmesser, sind auch die Autofokussensoren bei diesen Lichtverhältnissen nicht immer präzise.
Wenn du eine DSLR hast, dann solltest du außerdem den Live View aktivieren und in diesem Modus fotografieren. Dann:
- siehst du dein Motiv direkt auf dem Display
- kannst du beim Fokussieren heranzoomen und exakt auf dein Motiv fokussieren
Wenn du eine DSLM dein Eigen nennst erübrigt sich das, da du, wenn man so will, immer im Live View bist.
[/av_textblock]
[/av_one_full]
[av_hr class=’invisible‘ height=’25‘ shadow=’no-shadow‘ position=’center‘ custom_border=’av-border-thin‘ custom_width=’50px‘ custom_border_color=“ custom_margin_top=’30px‘ custom_margin_bottom=’30px‘ icon_select=’yes‘ custom_icon_color=“ icon=’ue808′ font=’entypo-fontello‘ av_uid=’av-3ht53t‘ admin_preview_bg=“]
[av_icon_box position=’top‘ icon_style=“ boxed=“ icon=’ue81e‘ font=’entypo-fontello‘ title=’TIPP: Focus Peaking‘ link=“ linktarget=“ linkelement=“ font_color=“ custom_title=“ custom_content=“ color=“ custom_bg=“ custom_font=“ custom_border=“ av-medium-font-size-title=“ av-small-font-size-title=“ av-mini-font-size-title=“ av-medium-font-size=“ av-small-font-size=“ av-mini-font-size=“ av_uid=’av-jh9510ue‘ admin_preview_bg=“]
Wenn deine Kamera Focus Peaking unterstützt, dann aktiviere dies. Beim Focus-Peaking (Sony nennt das z.B. Kantenanhebung) werden die scharfen Bildbereiche auf deinem Display farblich hervorgehoben. Ein super Werkzeug, um den Fokus im Blick zu behalten.
[/av_icon_box]
[av_hr class=’invisible‘ height=’50‘ shadow=’no-shadow‘ position=’center‘ custom_border=’av-border-thin‘ custom_width=’50px‘ custom_border_color=“ custom_margin_top=’30px‘ custom_margin_bottom=’30px‘ icon_select=’yes‘ custom_icon_color=“ icon=’ue808′ font=’entypo-fontello‘ av_uid=’av-3ht53t‘ admin_preview_bg=“]
[av_one_full first min_height=“ vertical_alignment=’av-align-top‘ space=“ margin=’0px‘ margin_sync=’true‘ padding=’0px,0px,20px,0px‘ border=“ border_color=“ radius=’0px‘ radius_sync=’true‘ background_color=“ src=“ attachment=“ attachment_size=“ background_position=’top left‘ background_repeat=’no-repeat‘ animation=“ mobile_breaking=“ mobile_display=“ av_uid=’av-3gkvqp‘]
[av_textblock size=“ font_color=“ color=“ av-medium-font-size=“ av-small-font-size=“ av-mini-font-size=“ av_uid=’av-39uvjt‘ admin_preview_bg=“]
#4 Wie entstehen spannende Bilder?
[/av_textblock]
[av_textblock size=“ font_color=“ color=“ av-medium-font-size=“ av-small-font-size=“ av-mini-font-size=“ av_uid=’av-3q3u6x‘ admin_preview_bg=“]
Natürlich gibt es auch in der Nachtfotografie kein Patentrezept für tolle Bilder. Allerdings habe ich trotzdem ein paar Tipps, mit denen du deinen Bildern mehr Charme verleihen kannst:
Wasser und Spieglungen
Halte nach Wasser ausschau. Es liefert oft Reflexionen, die deinem Bild das gewisse etwas verleihen können (siehe auch das Amsterdam-Foto oben). Je glatter die Wasseroberfläche, desto besser!
Geister einfangen
Benutze Bewegung, um Menschen in Geister zu verwandeln. Bei längeren Belichtungszeiten werden sich bewegende Personen zu Geistern (siehe Bild unten von der Slinky Springs to Fame Brücke in Oberhausen). Die Belichtungszeit sollte aber nicht zu lang sein, sonst werden die Menschen irgendwann komplett verschwinden.
[/av_textblock]
[/av_one_full]
[av_hr class=’invisible‘ height=’25‘ shadow=’no-shadow‘ position=’center‘ custom_border=’av-border-thin‘ custom_width=’50px‘ custom_border_color=“ custom_margin_top=’30px‘ custom_margin_bottom=’30px‘ icon_select=’yes‘ custom_icon_color=“ icon=’ue808′ font=’entypo-fontello‘ av_uid=’av-3ht53t‘ admin_preview_bg=“]
[av_icon_box position=’top‘ icon_style=“ boxed=“ icon=’ue80e‘ font=’entypo-fontello‘ title=’Slinky Springs to Fame‘ link=“ linktarget=“ linkelement=“ font_color=“ custom_title=“ custom_content=“ color=“ custom_bg=“ custom_font=“ custom_border=“ av-medium-font-size-title=“ av-small-font-size-title=“ av-mini-font-size-title=“ av-medium-font-size=“ av-small-font-size=“ av-mini-font-size=“ av_uid=’av-jh9510ue‘ admin_preview_bg=“]

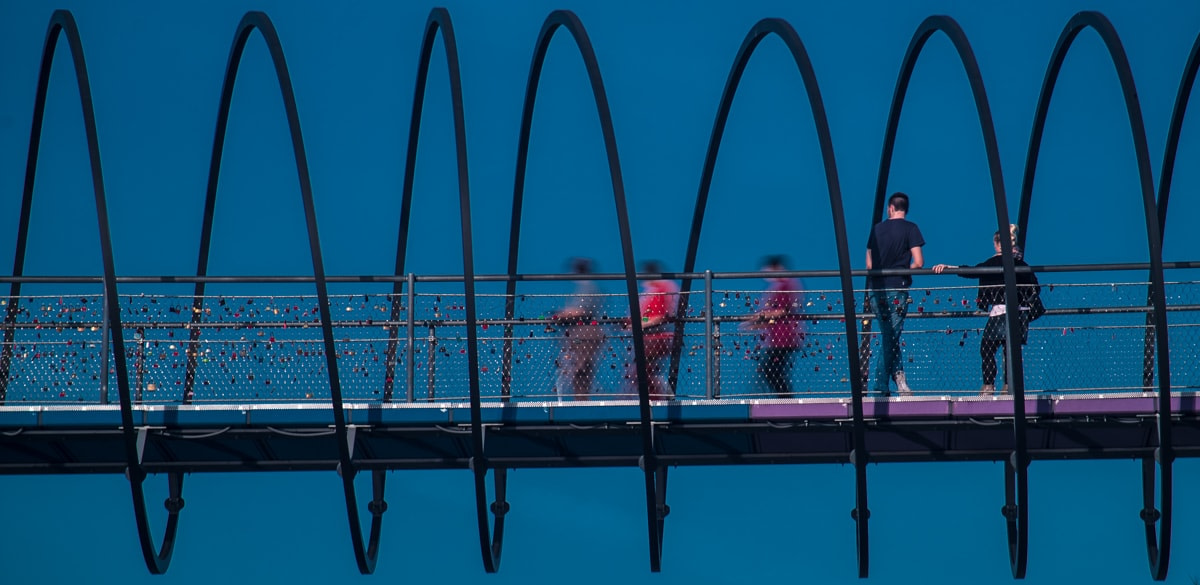
f 11 | 0,4 sec | ISO 100
[/av_icon_box]
[av_hr class=’invisible‘ height=’25‘ shadow=’no-shadow‘ position=’center‘ custom_border=’av-border-thin‘ custom_width=’50px‘ custom_border_color=“ custom_margin_top=’30px‘ custom_margin_bottom=’30px‘ icon_select=’yes‘ custom_icon_color=“ icon=’ue808′ font=’entypo-fontello‘ av_uid=’av-3ht53t‘ admin_preview_bg=“]
[av_one_full first min_height=“ vertical_alignment=’av-align-top‘ space=“ margin=’0px‘ margin_sync=’true‘ padding=’0px,0px,20px,0px‘ border=“ border_color=“ radius=’0px‘ radius_sync=’true‘ background_color=“ src=“ attachment=“ attachment_size=“ background_position=’top left‘ background_repeat=’no-repeat‘ animation=“ mobile_breaking=“ mobile_display=“ av_uid=’av-3gkvqp‘]
[av_textblock size=“ font_color=“ color=“ av-medium-font-size=“ av-small-font-size=“ av-mini-font-size=“ av_uid=’av-3q3u6x‘ admin_preview_bg=“]
Lichtspuren einfangen
Ein weiterer interessanter Effekt längerer Belichtungszeiten sind Lichtspuren. Diese entstehen etwa wenn Autos bei Nacht an der Kamera vorbeifahren (siehe Bild unten von der Flughafenbrücke in Düsseldorf). Man kann natürlich auch selbst lichtspuren malen, mit einer Taschenlampe oder Fackeln (siehe Bild unten von der Drachenbrücke). Der Kreativität sind hier keine Grenzen gesetzt.
Für die letzten Beispiele ist die wichtigste Stellschraube natürlich Belichtungszeit. Durch das Variieren der Zeit kannst du dann den Lichtspureffekt beeinflussen. Hier hilft nur mit Werten ab 2 sec aufwärts zu probieren, bis du zufrieden bist. Generell wirken Bilder gut, wenn man die sich bewegenden Bildelemente mit statischen kombiniert.
[/av_textblock]
[/av_one_full]
[av_hr class=’invisible‘ height=’25‘ shadow=’no-shadow‘ position=’center‘ custom_border=’av-border-thin‘ custom_width=’50px‘ custom_border_color=“ custom_margin_top=’30px‘ custom_margin_bottom=’30px‘ icon_select=’yes‘ custom_icon_color=“ icon=’ue808′ font=’entypo-fontello‘ av_uid=’av-3ht53t‘ admin_preview_bg=“]
[av_icon_box position=’top‘ icon_style=“ boxed=“ icon=’ue80e‘ font=’entypo-fontello‘ title=’Flughafenbrücke Düsseldorf‘ link=“ linktarget=“ linkelement=“ font_color=“ custom_title=“ custom_content=“ color=“ custom_bg=“ custom_font=“ custom_border=“ av-medium-font-size-title=“ av-small-font-size-title=“ av-mini-font-size-title=“ av-medium-font-size=“ av-small-font-size=“ av-mini-font-size=“ av_uid=’av-jh9510ue‘ admin_preview_bg=“]

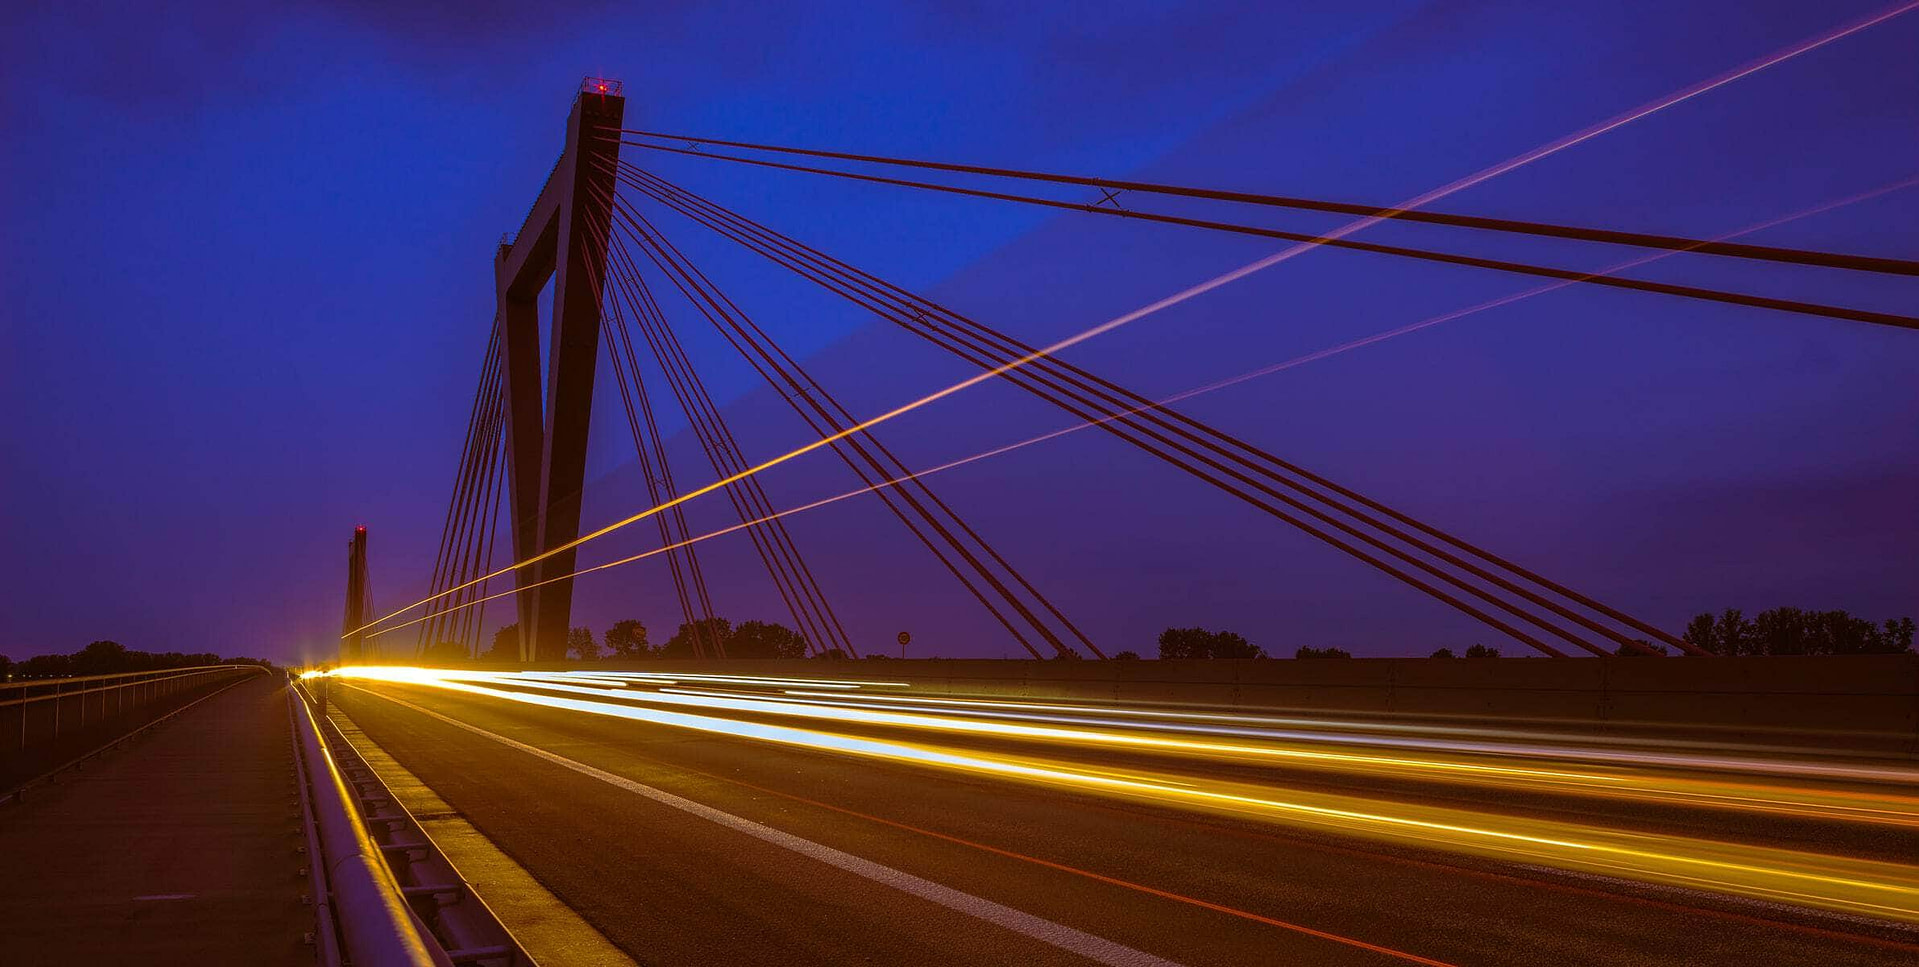
f 11 | 6 sec | ISO 100
[/av_icon_box]
[av_hr class=’invisible‘ height=’25‘ shadow=’no-shadow‘ position=’center‘ custom_border=’av-border-thin‘ custom_width=’50px‘ custom_border_color=“ custom_margin_top=’30px‘ custom_margin_bottom=’30px‘ icon_select=’yes‘ custom_icon_color=“ icon=’ue808′ font=’entypo-fontello‘ av_uid=’av-3ht53t‘ admin_preview_bg=“]
[av_icon_box position=’top‘ icon_style=“ boxed=“ icon=’ue80e‘ font=’entypo-fontello‘ title=’Drachenbrücke‘ link=“ linktarget=“ linkelement=“ font_color=“ custom_title=“ custom_content=“ color=“ custom_bg=“ custom_font=“ custom_border=“ av-medium-font-size-title=“ av-small-font-size-title=“ av-mini-font-size-title=“ av-medium-font-size=“ av-small-font-size=“ av-mini-font-size=“ av_uid=’av-jh9510ue‘ admin_preview_bg=“]


f 22 | 30 sec | ISO 100
[/av_icon_box]
[av_hr class=’invisible‘ height=’50‘ shadow=’no-shadow‘ position=’center‘ custom_border=’av-border-thin‘ custom_width=’50px‘ custom_border_color=“ custom_margin_top=’30px‘ custom_margin_bottom=’30px‘ icon_select=’yes‘ custom_icon_color=“ icon=’ue808′ font=’entypo-fontello‘ av_uid=’av-3ht53t‘ admin_preview_bg=“]
[av_one_full first min_height=“ vertical_alignment=’av-align-top‘ space=“ margin=’0px‘ margin_sync=’true‘ padding=’0px,0px,20px,0px‘ border=“ border_color=“ radius=’0px‘ radius_sync=’true‘ background_color=“ src=“ attachment=“ attachment_size=“ background_position=’top left‘ background_repeat=’no-repeat‘ animation=“ mobile_breaking=“ mobile_display=“ av_uid=’av-3gkvqp‘]
[av_textblock size=“ font_color=“ color=“ av-medium-font-size=“ av-small-font-size=“ av-mini-font-size=“ av_uid=’av-39uvjt‘ admin_preview_bg=“]
#5 Gibt es noch Extra-Tipps für Nerds und Besserwisser?
[/av_textblock]
[av_textblock size=“ font_color=“ color=“ av-medium-font-size=“ av-small-font-size=“ av-mini-font-size=“ av_uid=’av-3q3u6x‘ admin_preview_bg=“]
Ja klar :-) Mit den folgenden Tipps geht noch mehr:
Blendensterne
Wenn du kleine Blendenwerte verwendest, erzeugen die Blendenlamellen deines Objektivs Sterne auf den Lichtquellen des Motivs (Straßenlaternen, Autolampen, …). Das kannst du auf dem Fote unten aus Rom gut sehen. Ich empfehle Blendenwerte zwischen f 11 und f 16. Das ist von Objektiv zu Objektiv verschieden und muss letztlich auch getestet werden.
[/av_textblock]
[av_hr class=’invisible‘ height=’25‘ shadow=’no-shadow‘ position=’center‘ custom_border=’av-border-thin‘ custom_width=’50px‘ custom_border_color=“ custom_margin_top=’30px‘ custom_margin_bottom=’30px‘ icon_select=’yes‘ custom_icon_color=“ icon=’ue808′ font=’entypo-fontello‘ av_uid=’av-3ht53t‘ admin_preview_bg=“]
[av_icon_box position=’top‘ icon_style=“ boxed=“ icon=’ue80e‘ font=’entypo-fontello‘ title=’Rom‘ link=“ linktarget=“ linkelement=“ font_color=“ custom_title=“ custom_content=“ color=“ custom_bg=“ custom_font=“ custom_border=“ av-medium-font-size-title=“ av-small-font-size-title=“ av-mini-font-size-title=“ av-medium-font-size=“ av-small-font-size=“ av-mini-font-size=“ av_uid=’av-jh9510ue‘ admin_preview_bg=“]
Funkelnde Blendensterne:
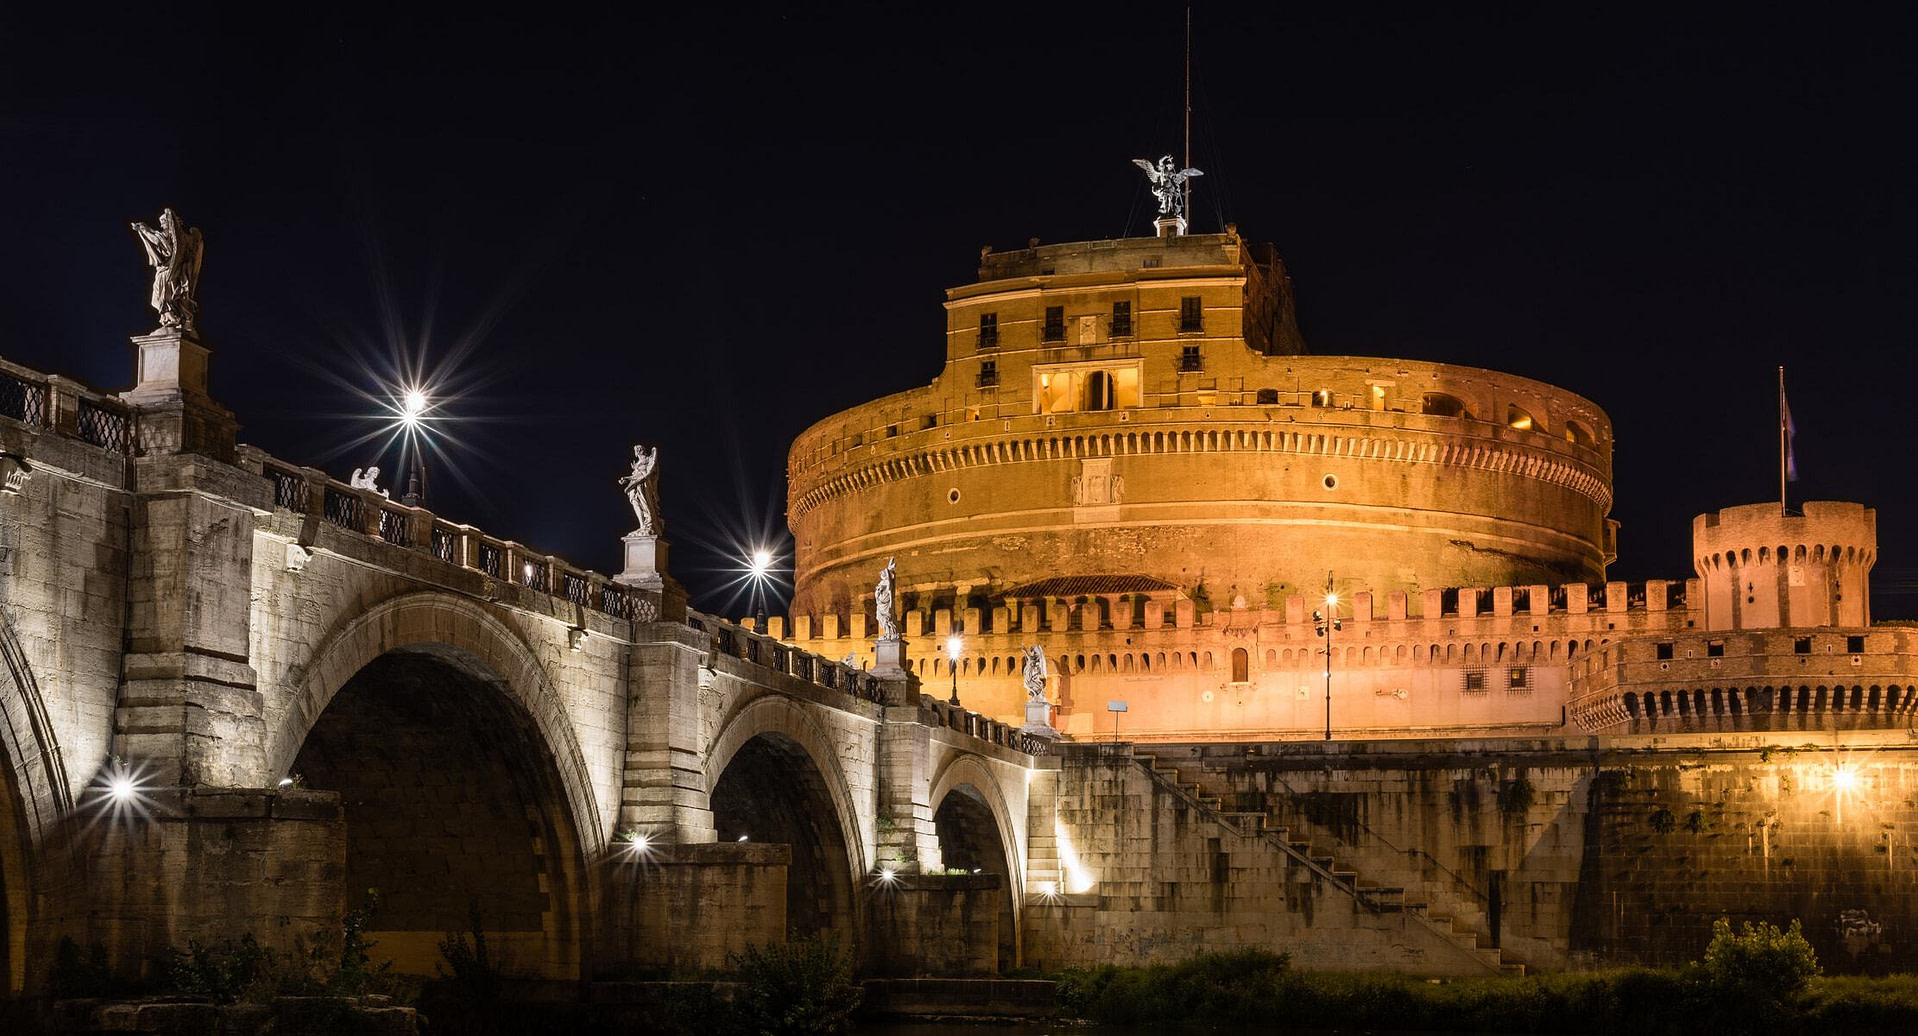

f 16 | 30 sec | ISO 100
[/av_icon_box]
[av_hr class=’invisible‘ height=’25‘ shadow=’no-shadow‘ position=’center‘ custom_border=’av-border-thin‘ custom_width=’50px‘ custom_border_color=“ custom_margin_top=’30px‘ custom_margin_bottom=’30px‘ icon_select=’yes‘ custom_icon_color=“ icon=’ue808′ font=’entypo-fontello‘ av_uid=’av-3ht53t‘ admin_preview_bg=“]
[av_textblock size=“ font_color=“ color=“ id=“ custom_class=“ av-medium-font-size=“ av-small-font-size=“ av-mini-font-size=“ av_uid=’av-3q3u6x‘ admin_preview_bg=“]
Testshots mit hohen ISO-Werten
Wenn ich in der Nacht fotografiere, mache ich Grundsätzlich ertst einmal Testshots mit sehr hohen ISO-Werten. Das erlaubt mir sehr kurze Verschlusszeiten. Sinn und Zweck besteht darin, schneller ein Gefühl für die Bildkomposition und Belichtung zu bekommen. Wenn ich mit dem Bildausschnitt zufrieden bin, kann ich mich um die Belichtung kümmern. Angenommen ich mache erst einen Testshot bei ISO 12800. Das Bild wird natürlich eine Miese Qualität haben, aber ich werde sehen, ob die Belichtung als solche passt. Wenn ich dann ein korrekt belichtetes Bild habe, schaue ich mir die Verschlusszeit an die beispielsweise bei 1 sec liegt. Dann kann ich die ISO auf 100 herunterdrehen, was 7-Blenden bzw. Belichtungsschritten entspricht. Damit weiß ich, dass ich bloß die Belichtungszeit entsprechend um das 7-fache verlängern muss um wieder die korrekte Belichtung zu erreichen. Dementsprechend müsste ich die Belichtungszeit auf 7 sec stellen. Die Blende muss natürlich während der ganzen Geschichte unverändert bleiben.
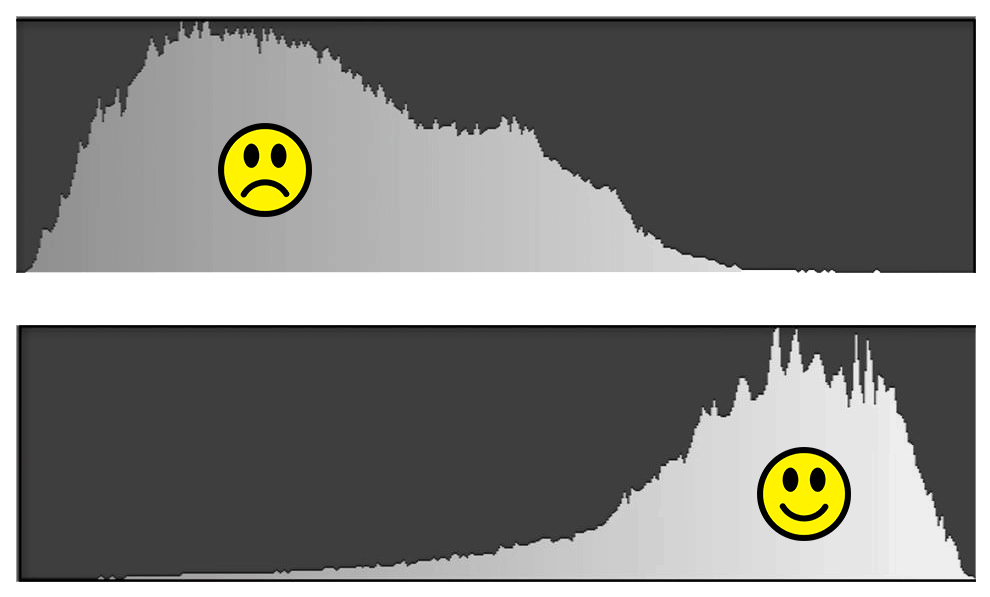
Auf die Lichter belichten
Um den maximalen Dynamikumfang zu erzielen empfehle ich dir auf die Lichter zu belichten. Am Besten mithilfe deines Histogramms. Das rechte Ende des Histogramms sollte die Begrenzung auf der rechten Seite küssen um sicherzustellen, das die Lichter gerade so nicht ausfressen und noch Information enthalten. Das obere Histogramm ist nicht falsch, aber das untere besser. In Lektion 8 erkläre ich im Detail, was es damit auf sich hat:

Belichtungsreihen
Gerade in der Nachtfotografie können Belichtungsreihen (HDRs) sehr hilfreich sein. Das bedeutet neben dem „normal“ belichteten Foto, macht man noch je ein oder mehr Bilder des gleichen Motivs, die über- und unterbelichtet werden. Diese kann man dann in der Nachbearbeitung zu einer Fotografie zusammenfügen, um so den Dynamikumfang zu erweitern. Um dir im Detail zu zeigen, wie das funktioniert, habe ich im Bonus-Mudul eine eigene Lektion dazu gebastelt.
Schnelle Speicherkarte
Der letzte Tipp ist plump aber wichtig. Deine Speicherkarte sollte nicht zu langsam sein. Das gilt insbesondere für Langzeitbelichtungen. Nichts ist nerviger, als der Kamera beim berechnen einer eben gemachten Fotografie zuzusehen. Speicherkarten kosten heutzutage nicht mehr viel, daher lohnt es sich in ein paar schnelle Karten zu investieren, wovon man dann auch länger etwas hat. Empfehlen kann ich die Transcend SDHC UHS-II U3 EXTREME Karten, die meiner Ansicht nach das beste Preis-Leistungsverhältnis am Markt bieten.
[/av_textblock]
[/av_one_full][av_hr class=’invisible‘ height=’50‘ shadow=’no-shadow‘ position=’center‘ custom_border=’av-border-thin‘ custom_width=’50px‘ custom_border_color=“ custom_margin_top=’30px‘ custom_margin_bottom=’30px‘ icon_select=’yes‘ custom_icon_color=“ icon=’ue808′ font=’entypo-fontello‘ av_uid=’av-3ht53t‘ admin_preview_bg=“]
[av_one_full first min_height=“ vertical_alignment=’av-align-top‘ space=“ margin=’0px‘ margin_sync=’true‘ padding=’0px,0px,20px,0px‘ border=“ border_color=“ radius=’0px‘ radius_sync=’true‘ background_color=“ src=“ attachment=“ attachment_size=“ background_position=’top left‘ background_repeat=’no-repeat‘ animation=“ mobile_breaking=“ mobile_display=“ av_uid=’av-3gkvqp‘]
[av_textblock size=“ font_color=“ color=“ av-medium-font-size=“ av-small-font-size=“ av-mini-font-size=“ av_uid=’av-39uvjt‘ admin_preview_bg=“]
#6 Achtsames Ausrasten
[/av_textblock]
[av_textblock size=“ font_color=“ color=“ av-medium-font-size=“ av-small-font-size=“ av-mini-font-size=“ av_uid=’av-3q3u6x‘ admin_preview_bg=“]
Der letzte Tipp ist einfach: lass dir Zeit. Verinnerliche die Tipps und probiere, probiere, probiere. Befolge alle Regeln und dann breche sie Alle!
[/av_textblock]
[/av_one_full]
[av_hr class=’invisible‘ height=’50‘ shadow=’no-shadow‘ position=’center‘ custom_border=’av-border-thin‘ custom_width=’50px‘ custom_border_color=“ custom_margin_top=’30px‘ custom_margin_bottom=’30px‘ icon_select=’yes‘ custom_icon_color=“ icon=’ue808′ font=’entypo-fontello‘ av_uid=’av-3ht53t‘ admin_preview_bg=“]
[av_one_full first min_height=“ vertical_alignment=’av-align-top‘ space=“ margin=’0px‘ margin_sync=’true‘ padding=’20px,0px,0px,0px‘ border=“ border_color=“ radius=’0px‘ radius_sync=’true‘ background_color=“ src=“ attachment=“ attachment_size=“ background_position=’top left‘ background_repeat=’no-repeat‘ animation=“ mobile_breaking=“ mobile_display=“ av_uid=’av-i4znt‘]
[av_textblock size=“ font_color=“ color=“ av-medium-font-size=“ av-small-font-size=“ av-mini-font-size=“ av_uid=’av-39uvjt‘ admin_preview_bg=“]
#7 Kurz und knapp
[/av_textblock]
[av_iconlist position=’left‘ iconlist_styling=“ custom_title_size=’30‘ custom_content_size=“ font_color=’custom‘ custom_title=“ custom_content=“ color=’custom‘ custom_bg=’#719430′ custom_font=“ custom_border=“ av-medium-font-size-title=“ av-small-font-size-title=“ av-mini-font-size-title=“ av-medium-font-size=“ av-small-font-size=“ av-mini-font-size=“ av_uid=’av-4qd88p‘ admin_preview_bg=“]
[av_iconlist_item title=’Belichtungsmodus‘ link=“ linktarget=“ linkelement=“ icon=’ue855′ font=’entypo-fontello‘ av_uid=’av-14en8j‘]
Manuell: M
[/av_iconlist_item]
[av_iconlist_item title=’ISO‘ link=“ linktarget=“ linkelement=“ icon=’ue867′ font=’entypo-fontello‘ av_uid=’av-9rg4sz‘]
So niedrig wie möglich (idealerweise ISO 100)
[/av_iconlist_item]
[av_iconlist_item title=’Blende‘ link=“ linktarget=“ linkelement=“ icon=’ue912′ font=’entypo-fontello‘ av_uid=’av-2b852b‘]
Im Idealfall die förderliche Blende (in der Regel Blende 8). Du kannst die Blende für mehr Schärfentiefe und Blendensterne weiter schließen. Um Beugungsunschärfe zu vermeiden am besten bis maximal f 16.
[/av_iconlist_item]
[av_iconlist_item title=’Belichtungszeit‘ link=“ linktarget=“ linkelement=“ icon=’ue862′ font=’entypo-fontello‘ av_uid=’av-6bn1k3′]
So wählen, dass bei der eingestellten ISO und Blende das Bild korrekt belichtet wird. Wird dann besonders relevant, wenn du Lichtspuren darstellen willst, was dir ab etwa 2 sec gelingt.
[/av_iconlist_item]
[av_iconlist_item title=’Sonstige Einstellungen‘ link=“ linktarget=“ linkelement=“ icon=’ue816′ font=’entypo-fontello‘ av_uid=’av-2c37w3′]
- RAW-Format
- Blitz deaktivieren
- Bildstabilisator deaktivieren
[/av_iconlist_item]
[av_iconlist_item title=’Zubehör‘ link=“ linktarget=“ linkelement=“ icon=’ue856′ font=’entypo-fontello‘ av_uid=’av-323flf‘]
- Stativ
- Weitwinkel Objektiv
- Fernauslöser
- Taschenlampe
[/av_iconlist_item]
[/av_iconlist]
[/av_one_full]