[av_heading heading=‘Bildrezept
Portrait-Fotos‚ tag=’h1′ link_apply=“ link=’manually,http://‘ link_target=“ style=’blockquote modern-quote modern-centered‘ size=“ subheading_active=’subheading_below‘ subheading_size=’16‘ margin=“ margin_sync=’true‘ padding=’20‘ color=“ custom_font=“ av-medium-font-size-title=“ av-small-font-size-title=“ av-mini-font-size-title=“ av-medium-font-size=“ av-small-font-size=“ av-mini-font-size=“ av_uid=’av-ju9t9itl‘ admin_preview_bg=“][/av_heading]
[av_hr class=’invisible‘ height=’50‘ shadow=’no-shadow‘ position=’center‘ custom_border=’av-border-thin‘ custom_width=’50px‘ custom_border_color=“ custom_margin_top=’30px‘ custom_margin_bottom=’30px‘ icon_select=’yes‘ custom_icon_color=“ icon=’ue808′ font=’entypo-fontello‘ av_uid=’av-3ht53t‘ admin_preview_bg=“]
[av_image src=’https://photo-inspirator.com/wp-content/uploads/2018/10/alex-perez-570754-unsplash-333×500.jpg‘ attachment=’10795′ attachment_size=’medium‘ align=’center‘ styling=“ hover=“ link=“ target=“ caption=“ font_size=“ appearance=“ overlay_opacity=’0.4′ overlay_color=’#000000′ overlay_text_color=’#ffffff‘ copyright=“ animation=’no-animation‘ av_uid=’av-jsakut1c‘ admin_preview_bg=“][/av_image]
[av_hr class=’invisible‘ height=’50‘ shadow=’no-shadow‘ position=’center‘ custom_border=’av-border-thin‘ custom_width=’50px‘ custom_border_color=“ custom_margin_top=’30px‘ custom_margin_bottom=’30px‘ icon_select=’yes‘ custom_icon_color=“ icon=’ue808′ font=’entypo-fontello‘ av_uid=’av-3ht53t‘ admin_preview_bg=“]
[av_textblock size=“ font_color=“ color=“ av-medium-font-size=“ av-small-font-size=“ av-mini-font-size=“ av_uid=’av-jog7l07m‘ admin_preview_bg=“]
In diesem Bildrezept widmen wir uns der Portrait-Fotografie. Der Fokus liegt darauf zu lernen, wie uns spielend leicht Portrait-Fotos unterwegs und auf Reisen gelingen. Wir möchten dir dafür Tipps und Kameraeinstellungen an die Hand geben. Dies sind nur Anhaltspunkte, um dir beim Einstieg zu helfen. Verwende sie, aber verfeiner sie auch mit der Zeit.
Nicht vergessen: Regeln kennen heißt Regeln brechen!
[/av_textblock]
[av_textblock size=“ font_color=“ color=“ av-medium-font-size=“ av-small-font-size=“ av-mini-font-size=“ av_uid=’av-jog7l07m‘ admin_preview_bg=“]
[/av_textblock]
[av_one_full first min_height=“ vertical_alignment=’av-align-top‘ space=“ margin=’0px‘ margin_sync=’true‘ padding=’0px,0px,20px,0px‘ border=“ border_color=“ radius=’0px‘ radius_sync=’true‘ background_color=“ src=“ attachment=“ attachment_size=“ background_position=’top left‘ background_repeat=’no-repeat‘ animation=“ mobile_breaking=“ mobile_display=“ av_uid=’av-3gkvqp‘]
[av_textblock size=“ font_color=“ color=“ av-medium-font-size=“ av-small-font-size=“ av-mini-font-size=“ av_uid=’av-39uvjt‘ admin_preview_bg=“]
#1 Ausdruck und Emotion
[/av_textblock]
[av_hr class=’invisible‘ height=’10‘ shadow=’no-shadow‘ position=’center‘ custom_border=’av-border-thin‘ custom_width=’50px‘ custom_border_color=“ custom_margin_top=’30px‘ custom_margin_bottom=’30px‘ icon_select=’yes‘ custom_icon_color=“ icon=’ue808′ font=’entypo-fontello‘ admin_preview_bg=“ av_uid=’av-348z15′]
[av_textblock size=“ font_color=“ color=“ av-medium-font-size=“ av-small-font-size=“ av-mini-font-size=“ av_uid=’av-2y2n69′ admin_preview_bg=“]
Gerade in der Portrait-Fotografie neigen viele Fotografen dazu zu vergessen, dass ein Porträt ohne einen wirklichen Ausdruck und Emotion beim Motiv, keine Verbindung zum Betrachter herstellen.
Menschen wollen echte Emotionen sehen und kein „Colgate-Lächeln“. Dieser Aspekt ist weitaus wichtiger als die Ausrüstung und Perspektiven.
Als Fotograf ist es daher für ein gelungenes Portrait das A und O, dass man eine angenehme Atmosphäre schafft, damit die fotografierte Person sich wohlfühlt. Man sieht es später in den Fotos, ob das Modell authentische Freude ausstrahlt oder nur ein lächeln aufsetzt.
[/av_textblock]
[/av_one_full]
[av_one_full first min_height=“ vertical_alignment=’av-align-top‘ space=“ margin=’0px‘ margin_sync=’true‘ padding=’0px,0px,20px,0px‘ border=“ border_color=“ radius=’0px‘ radius_sync=’true‘ background_color=“ src=“ attachment=“ attachment_size=“ background_position=’top left‘ background_repeat=’no-repeat‘ animation=“ mobile_breaking=“ mobile_display=“ av_uid=’av-3gkvqp‘]
[av_textblock size=“ font_color=“ color=“ av-medium-font-size=“ av-small-font-size=“ av-mini-font-size=“ av_uid=’av-39uvjt‘ admin_preview_bg=“]
#2 Kameraeinstellungen
[/av_textblock]
[av_hr class=’invisible‘ height=’10‘ shadow=’no-shadow‘ position=’center‘ custom_border=’av-border-thin‘ custom_width=’50px‘ custom_border_color=“ custom_margin_top=’30px‘ custom_margin_bottom=’30px‘ icon_select=’yes‘ custom_icon_color=“ icon=’ue808′ font=’entypo-fontello‘ admin_preview_bg=“ av_uid=’av-348z15′]
[av_textblock size=“ font_color=“ color=“ av-medium-font-size=“ av-small-font-size=“ av-mini-font-size=“ av_uid=’av-2y2n69′ admin_preview_bg=“]
Belichtungsmodus
Blendenvorwahl (A / Av)
ISO
möglichst niedrig; idealerweise auf 100
Blende
Je weiter geöffnet, desto besser – für einen schönen unscharfen Hintergrund und ein ansprechendes Bokeh.
Belichtungszeit
Die Belichtungszeit wird automatisch von der Kamera geregelt.
Brennweite des Objektivs
Es kommt darauf an. mehr zum Thema Brennweite und Objektivwahl unter Punkt #3
Betriebsart/Bildfolgemodus
Serienbild-Modus: ich fotografiere Prortraits gerne im Serienbild-Modus. Somit kann man im Nachhinein aus einer Serie von 2 bis 5 Bildern das perfekte herausfiltern.
[/av_textblock]
[/av_one_full]
[av_one_full first min_height=“ vertical_alignment=’av-align-top‘ space=“ margin=’0px‘ margin_sync=’true‘ padding=’0px,0px,20px,0px‘ border=“ border_color=“ radius=’0px‘ radius_sync=’true‘ background_color=“ src=“ attachment=“ attachment_size=“ background_position=’top left‘ background_repeat=’no-repeat‘ animation=“ mobile_breaking=“ mobile_display=“ av_uid=’av-3gkvqp‘]
[av_textblock size=“ font_color=“ color=“ av-medium-font-size=“ av-small-font-size=“ av-mini-font-size=“ av_uid=’av-39uvjt‘ admin_preview_bg=“]
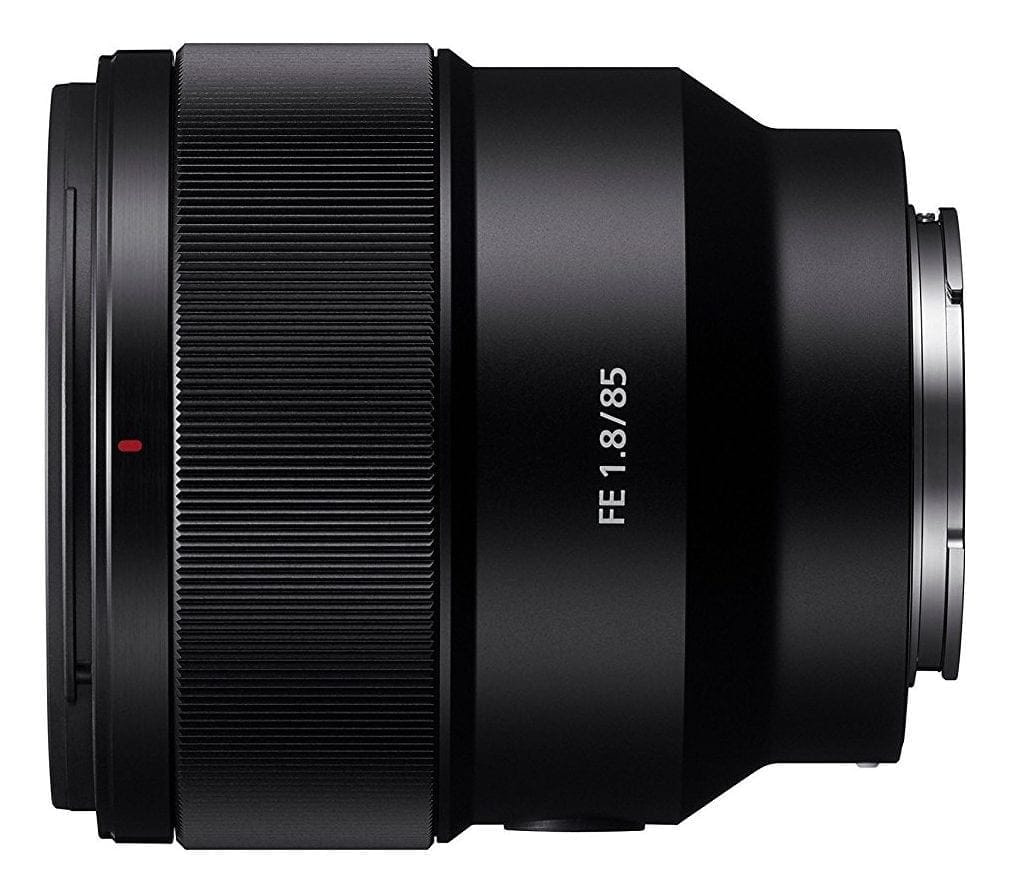
#3 Brennweite und Objektivwahl
[/av_textblock]
[av_hr class=’invisible‘ height=’10‘ shadow=’no-shadow‘ position=’center‘ custom_border=’av-border-thin‘ custom_width=’50px‘ custom_border_color=“ custom_margin_top=’30px‘ custom_margin_bottom=’30px‘ icon_select=’yes‘ custom_icon_color=“ icon=’ue808′ font=’entypo-fontello‘ admin_preview_bg=“ av_uid=’av-348z15′]
[av_textblock size=“ font_color=“ color=“ av-medium-font-size=“ av-small-font-size=“ av-mini-font-size=“ av_uid=’av-2y2n69′ admin_preview_bg=“]
Die kurze Antwort ist diese: wenn du deinem Motiv schmeicheln möchtest, solltest du ein kurzes Teleobjektiv verwenden. So etwas wie ein 85-100mm ist eine gute Wahl. An einer Vollformat-Kamera kannst du auch ohne weiteres bis auf 150mm gehen.
Ein Teleobjektiv hilft dir dabei, die Perspektive zu komprimieren und sorgt für eine geringe Schärfentiefe. Der Hintergrund ist unscharf und das Gesicht der fotografierten Person erscheint unverzerrt.
Wenn du ein Editorial Portrait oder etwa ein Gruppenfoto machen möchtest, kann die Verwendung eines leichten Weitwinkels (etwa 35mm) allerdings durchaus sinnvoll sein, um den Bildausschnitt zu vergrößern.
[/av_textblock]
[av_icon_box position=’top‘ icon_style=“ boxed=“ icon=’ue82b‘ font=’entypo-fontello‘ title=’Portrait-Objektive‘ link=’manually,https://amzn.to/2N5iOe9′ linktarget=’_blank‘ linkelement=’both‘ font_color=“ custom_title=“ custom_content=“ color=“ custom_bg=“ custom_font=“ custom_border=“ av-medium-font-size-title=“ av-small-font-size-title=“ av-mini-font-size-title=“ av-medium-font-size=“ av-small-font-size=“ av-mini-font-size=“ av_uid=’av-jh9510ue‘ admin_preview_bg=“]
Wie bereits in Lektion 10 gelernt, sind Festbrennweiten-Objektive mit einer Brennweite zwischen 85 bis 135 mm perfekt für Portraits geeignet. Für den Anfang tut es aber auch ein Zoom-Objektiv, dass diesen Bereich abdeckt.
[/av_icon_box]
[/av_one_full]
[av_one_full first min_height=“ vertical_alignment=’av-align-top‘ space=“ margin=’0px‘ margin_sync=’true‘ padding=’0px,0px,20px,0px‘ border=“ border_color=“ radius=’0px‘ radius_sync=’true‘ background_color=“ src=“ attachment=“ attachment_size=“ background_position=’top left‘ background_repeat=’no-repeat‘ animation=“ mobile_breaking=“ mobile_display=“ av_uid=’av-3gkvqp‘]
[av_textblock size=“ font_color=“ color=“ av-medium-font-size=“ av-small-font-size=“ av-mini-font-size=“ av_uid=’av-39uvjt‘ admin_preview_bg=“]
#4 Lichtgestaltung und hilfreiches Zubehör
[/av_textblock]
[av_hr class=’invisible‘ height=’10‘ shadow=’no-shadow‘ position=’center‘ custom_border=’av-border-thin‘ custom_width=’50px‘ custom_border_color=“ custom_margin_top=’30px‘ custom_margin_bottom=’30px‘ icon_select=’yes‘ custom_icon_color=“ icon=’ue808′ font=’entypo-fontello‘ admin_preview_bg=“ av_uid=’av-348z15′]
[av_textblock size=“ font_color=“ color=“ av-medium-font-size=“ av-small-font-size=“ av-mini-font-size=“ av_uid=’av-2y2n69′ admin_preview_bg=“]
Über die Lichtsetzung in der Portrait-Fotografie wurden ganze Bücher geschrieben. Wir möchten es einfach halten:
Sorge für diffuses Licht!
Was heißt das? Portraitfotos leben von der plastischen Ausleuchtung mit großen Lichtquellen (Mehr dazu in Modul 4).
Wenn du unterwegs fotografierst, dann am besten wenn der Himmel wolkenverhangen ist und nicht bei direktem Sonnenlicht. An einem wolkenlosen Tag solltest du dein Model in den Schatten stellen und nicht in das direkte harte Sonnenlicht!
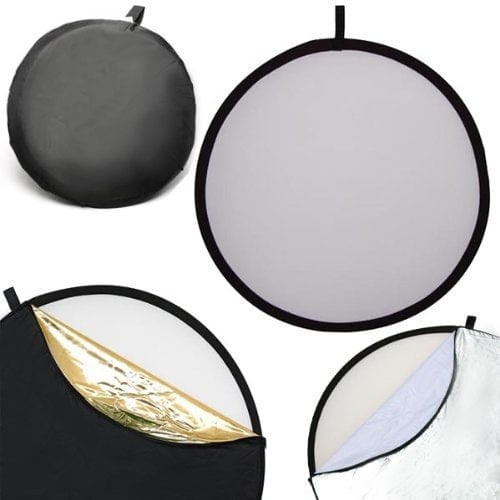
Ein nützliches Werkzeug ist zudem der Faltreflektor. Nutze den Reflektor, um das Sonnenlicht zu reflektieren und entsprechend das Gesicht deines Models gleichmäßig aufzuhellen.
Wenn du dir einen Reflektor gekauft hast, wirst du feststellen, dass der Reflektor verschiedene Oberflächen hat. Du kannst dann zwischen einer silbernen, einer goldenen, einer weißen und einer schwarzen Seite wählen.
Die silberne Seite reflektiert das Licht eher hart und kühl. Mit der weißen Seite erzielst du weichere und farbneutrale Reflexionen und die goldene Seite zaubert einen warmen Lichtschimmer ins Gesicht deines Models. Die schwarze Seite kannst du dazu nutzen, um dein Model abzuschatten, wenn du mit sehr starker Sonneneinstrahlung zu kämpfen hast.
Probiere dich einfach ein bisschen aus mit deinem Reflektor. Die Effekte lernst du am besten im praktischen Selbstversuch kennen.
[/av_textblock]
[av_hr class=’invisible‘ height=’10‘ shadow=’no-shadow‘ position=’center‘ custom_border=’av-border-thin‘ custom_width=’50px‘ custom_border_color=“ custom_margin_top=’30px‘ custom_margin_bottom=’30px‘ icon_select=’yes‘ custom_icon_color=“ icon=’ue808′ font=’entypo-fontello‘ admin_preview_bg=“ av_uid=’av-348z15′]
[av_icon_box position=’top‘ icon_style=“ boxed=“ icon=’ue82b‘ font=’entypo-fontello‘ title=’5in1 Faltreflektor‘ link=’manually,https://amzn.to/2N5iOe9′ linktarget=’_blank‘ linkelement=’both‘ font_color=“ custom_title=“ custom_content=“ color=“ custom_bg=“ custom_font=“ custom_border=“ av-medium-font-size-title=“ av-small-font-size-title=“ av-mini-font-size-title=“ av-medium-font-size=“ av-small-font-size=“ av-mini-font-size=“ av_uid=’av-jh9510ue‘ admin_preview_bg=“]
Ich empfehle ein solches Faltreflektor-Set, dass unter anderem als Diffusor verwendet werden kann:
[av_button label=’Auf Amazon anzeigen‘ link=’manually,https://amzn.to/2N5iOe9′ link_target=’_blank‘ size=’small‘ position=’center‘ label_display=“ icon_select=’yes‘ icon=’ue835′ font=’entypo-fontello‘ color=’theme-color‘ custom_bg=’#444444′ custom_font=’#ffffff‘ av_uid=’av-2qkgh9′ admin_preview_bg=“]
[/av_icon_box]
[/av_one_full]
[av_one_full first min_height=“ vertical_alignment=’av-align-top‘ space=“ margin=’0px‘ margin_sync=’true‘ padding=’0px,0px,20px,0px‘ border=“ border_color=“ radius=’0px‘ radius_sync=’true‘ background_color=“ src=“ attachment=“ attachment_size=“ background_position=’top left‘ background_repeat=’no-repeat‘ animation=“ mobile_breaking=“ mobile_display=“ av_uid=’av-3gkvqp‘]
[av_textblock size=“ font_color=“ color=“ av-medium-font-size=“ av-small-font-size=“ av-mini-font-size=“ av_uid=’av-39uvjt‘ admin_preview_bg=“]
#5 Augen und Fokus
[/av_textblock]
[av_hr class=’invisible‘ height=’10‘ shadow=’no-shadow‘ position=’center‘ custom_border=’av-border-thin‘ custom_width=’50px‘ custom_border_color=“ custom_margin_top=’30px‘ custom_margin_bottom=’30px‘ icon_select=’yes‘ custom_icon_color=“ icon=’ue808′ font=’entypo-fontello‘ admin_preview_bg=“ av_uid=’av-348z15′]
[av_textblock size=“ font_color=“ color=“ av-medium-font-size=“ av-small-font-size=“ av-mini-font-size=“ av_uid=’av-2y2n69′ admin_preview_bg=“]
Die Augen werden als „Fenster zur Seele“ bezeichnet. Wenn du Menschen fotografierst, möchtest du in aller Regel den Fokus auf ihre Augen legen. Das Foto kann perfekt gestaltet und belichtet sein, aber wenn die Augen nicht scharf sind, leidet das gesamte Bild.
[/av_textblock]
[av_hr class=’invisible‘ height=’10‘ shadow=’no-shadow‘ position=’center‘ custom_border=’av-border-thin‘ custom_width=’50px‘ custom_border_color=“ custom_margin_top=’30px‘ custom_margin_bottom=’30px‘ icon_select=’yes‘ custom_icon_color=“ icon=’ue808′ font=’entypo-fontello‘ admin_preview_bg=“ av_uid=’av-348z15′]
[av_icon_box position=’top‘ icon_style=“ boxed=“ icon=’ue82b‘ font=’entypo-fontello‘ title=’Augen-AF‘ link=“ linktarget=’_blank‘ linkelement=’both‘ font_color=“ custom_title=“ custom_content=“ color=“ custom_bg=“ custom_font=“ custom_border=“ av-medium-font-size-title=“ av-small-font-size-title=“ av-mini-font-size-title=“ av-medium-font-size=“ av-small-font-size=“ av-mini-font-size=“ av_uid=’av-jh9510ue‘ admin_preview_bg=“]
Sony’s Spiegellose Systemkameras, wie meine a7r besitzen dafür den sogenannten Augen-Autofokus. Damit kann die Schärfentiefe noch so klein sein, die Augen sind immer scharf:

[/av_icon_box]
[/av_one_full]
[av_one_full first min_height=“ vertical_alignment=’av-align-top‘ space=“ margin=’0px‘ margin_sync=’true‘ padding=’0px,0px,20px,0px‘ border=“ border_color=“ radius=’0px‘ radius_sync=’true‘ background_color=“ src=“ attachment=“ attachment_size=“ background_position=’top left‘ background_repeat=’no-repeat‘ animation=“ mobile_breaking=“ mobile_display=“ av_uid=’av-3gkvqp‘]
[av_textblock size=“ font_color=“ color=“ av-medium-font-size=“ av-small-font-size=“ av-mini-font-size=“ av_uid=’av-39uvjt‘ admin_preview_bg=“]
#6 Blende, Bokeh und Schärfentiefe
[/av_textblock]
[av_hr class=’invisible‘ height=’10‘ shadow=’no-shadow‘ position=’center‘ custom_border=’av-border-thin‘ custom_width=’50px‘ custom_border_color=“ custom_margin_top=’30px‘ custom_margin_bottom=’30px‘ icon_select=’yes‘ custom_icon_color=“ icon=’ue808′ font=’entypo-fontello‘ admin_preview_bg=“ av_uid=’av-348z15′]
[av_textblock size=“ font_color=“ color=“ av-medium-font-size=“ av-small-font-size=“ av-mini-font-size=“ av_uid=’av-2y2n69′ admin_preview_bg=“]
In der Portraitfotografie wirkt eine sehr geringe Schärfentiefe in aller Regel am besten. Ich fotografiere Portraits daher am liebsten mit Festbrennweiten-Objektiven da diese eine große Lichtstärke haben und und ein sehr schönes Bokeh.
In der Regel verwende ich Blendenwerte im Bereich f1,4 bis f4
[/av_textblock]
[av_hr class=’invisible‘ height=’10‘ shadow=’no-shadow‘ position=’center‘ custom_border=’av-border-thin‘ custom_width=’50px‘ custom_border_color=“ custom_margin_top=’30px‘ custom_margin_bottom=’30px‘ icon_select=’yes‘ custom_icon_color=“ icon=’ue808′ font=’entypo-fontello‘ admin_preview_bg=“ av_uid=’av-348z15′]
[av_textblock size=“ font_color=“ color=“ av-medium-font-size=“ av-small-font-size=“ av-mini-font-size=“ av_uid=’av-2y2n69′ admin_preview_bg=“]
Dieses Bild wurde mit der Blende f1.8 fotografiert:
[/av_textblock]
[av_image src=’https://mlzwymt16oxv.i.optimole.com/w:auto/h:auto/q:90/ig:avif/f:best/https://photo-inspirator.com/wp-content/uploads/2018/11/warren-wong-242286-unsplash.jpg‘ attachment=’11786′ attachment_size=’full‘ align=’center‘ styling=“ hover=“ link=“ target=“ caption=“ font_size=“ appearance=“ overlay_opacity=’0.4′ overlay_color=’#000000′ overlay_text_color=’#ffffff‘ copyright=“ animation=’no-animation‘ av_uid=’av-jpttfyqj‘ admin_preview_bg=“][/av_image]
[/av_one_full]
[av_one_full first min_height=“ vertical_alignment=’av-align-top‘ space=“ margin=’0px‘ margin_sync=’true‘ padding=’20px,0px,0px,0px‘ border=“ border_color=“ radius=’0px‘ radius_sync=’true‘ background_color=“ src=“ attachment=“ attachment_size=“ background_position=’top left‘ background_repeat=’no-repeat‘ animation=“ mobile_breaking=“ mobile_display=“ av_uid=’av-i4znt‘]
[av_textblock size=“ font_color=“ color=“ av-medium-font-size=“ av-small-font-size=“ av-mini-font-size=“ av_uid=’av-39uvjt‘ admin_preview_bg=“]
#7 Kurz und knapp
[/av_textblock]
[av_iconlist position=’left‘ iconlist_styling=“ animation=“ custom_title_size=’30‘ custom_content_size=“ font_color=’custom‘ custom_title=“ custom_content=“ color=’custom‘ custom_bg=’#719430′ custom_font=“ custom_border=“ av-medium-font-size-title=“ av-small-font-size-title=“ av-mini-font-size-title=“ av-medium-font-size=“ av-small-font-size=“ av-mini-font-size=“ av_uid=’av-4qd88p‘ admin_preview_bg=“]
[av_iconlist_item title=’Belichtungsmodus‘ link=“ linktarget=“ linkelement=“ icon=’ue855′ font=’entypo-fontello‘ av_uid=’av-aj4c5m‘]
Blendenvorwahl: A / Av
[/av_iconlist_item]
[av_iconlist_item title=’ISO‘ link=“ linktarget=“ linkelement=“ icon=’ue867′ font=’entypo-fontello‘ av_uid=’av-99zw7u‘]
So niedrig wie möglich (idealerweise ISO 100)
[/av_iconlist_item]
[av_iconlist_item title=’Blende‘ link=“ linktarget=“ linkelement=“ icon=’ue912′ font=’entypo-fontello‘ av_uid=’av-rz3a2′]
zwischen f1,8 und f4
[/av_iconlist_item]
[av_iconlist_item title=’Belichtungszeit‘ link=“ linktarget=“ linkelement=“ icon=’ue862′ font=’entypo-fontello‘ av_uid=’av-695fei‘]
Regelt die Kamera automatisch
[/av_iconlist_item]
[av_iconlist_item title=’Sonstige Einstellungen‘ link=“ linktarget=“ linkelement=“ icon=’ue816′ font=’entypo-fontello‘ av_uid=’av-4v9awq‘]
- RAW-Format
- Gesichtserkennung oder Augen AF können helfen
- Serienbildmodus sorgt für mehr Spielraum
- Bildstabilisator wenn nötig aktivieren
[/av_iconlist_item]
[av_iconlist_item title=’Zubehör‘ link=“ linktarget=“ linkelement=“ icon=’ue856′ font=’entypo-fontello‘ av_uid=’av-1ydsp6′]
- leichtes Tele-Objektiv (85-135mm)
- 5in1 Faltreflektor
[/av_iconlist_item]
[/av_iconlist]
[/av_one_full]