[av_heading heading=‘Bildrezept
Silhouetten‚ tag=’h1′ link_apply=“ link=’manually,http://‘ link_target=“ style=’blockquote modern-quote modern-centered‘ size=“ subheading_active=“ subheading_size=’16‘ margin=“ margin_sync=’true‘ padding=’20‘ color=“ custom_font=“ av-medium-font-size-title=“ av-small-font-size-title=“ av-mini-font-size-title=“ av-medium-font-size=“ av-small-font-size=“ av-mini-font-size=“ av_uid=’av-ju9t9wlt‘ admin_preview_bg=“]
Wie dieser Kurs funktioniert und aufgebaut ist.
[/av_heading]
[av_textblock size=“ font_color=“ color=“ av-medium-font-size=“ av-small-font-size=“ av-mini-font-size=“ av_uid=’av-2y2n69′ admin_preview_bg=“]
Das Fotografieren einer Silhouette ist eine gute Möglichkeit, um die dramatischen Farben eines Sonnenauf- oder Sonnenuntergangs festzuhalten aber auch die Form von etwas zu betonen.
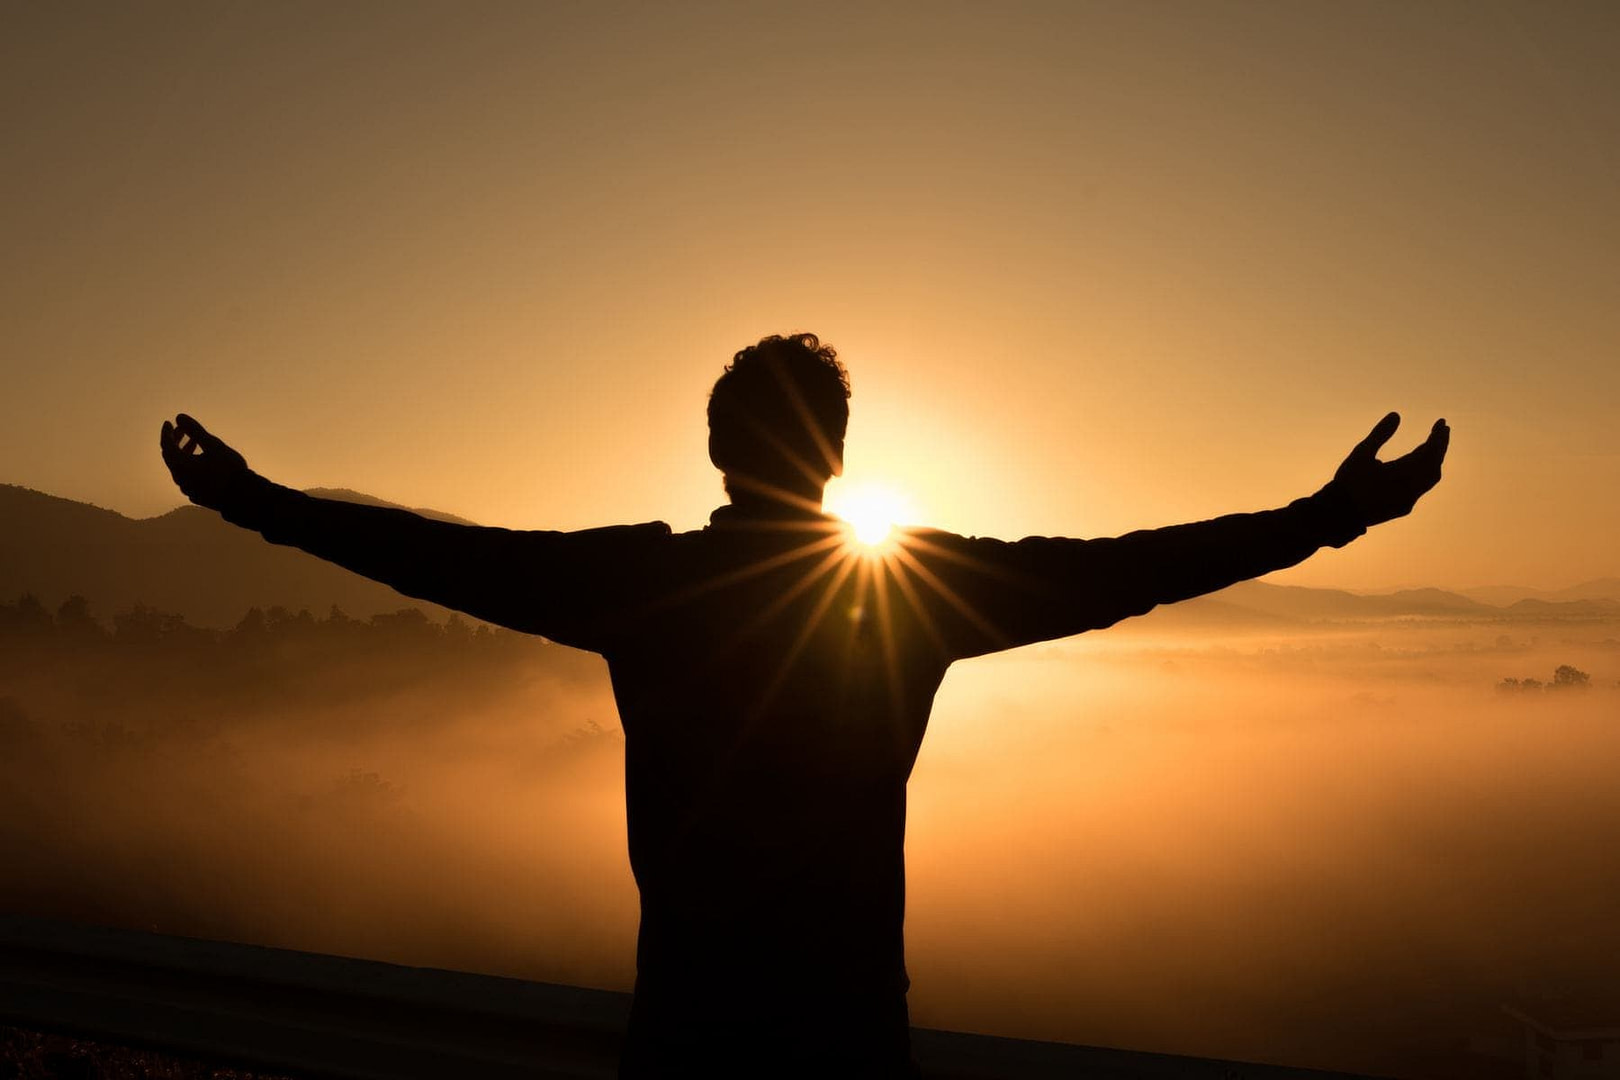
Die Grundidee einer Silhouette besteht darin, etwas zu fotografieren, das von der Sonne oder einer künstlichen Lichtquelle „hinterleuchtet“ wird. Und zwar so, dass das Motiv im Bild vollständig schwarz erscheint. Durch diese Gegenlicht-Technik wird die Form deines Motivs besonders akzentuiert, da nur die Umrisse zu erkennen sind.
Silhouetten eignen sich daher hervorragend für eine Vielzahl von Motiven. Obwohl die Bilder normalerweise einfach aussehen, solltest du beim Fotografieren von Silhouetten ein paar Dinge beachten.
[/av_textblock]
[av_textblock size=“ font_color=“ color=“ av-medium-font-size=“ av-small-font-size=“ av-mini-font-size=“ av_uid=’av-2y2n69′ admin_preview_bg=“]
[/av_textblock]
[av_one_full first min_height=“ vertical_alignment=’av-align-top‘ space=“ margin=’0px‘ margin_sync=’true‘ padding=’0px,0px,20px,0px‘ border=“ border_color=“ radius=’0px‘ radius_sync=’true‘ background_color=“ src=“ attachment=“ attachment_size=“ background_position=’top left‘ background_repeat=’no-repeat‘ animation=“ mobile_breaking=“ mobile_display=“ av_uid=’av-3gkvqp‘]
[av_textblock size=“ font_color=“ color=“ av-medium-font-size=“ av-small-font-size=“ av-mini-font-size=“ av_uid=’av-39uvjt‘ admin_preview_bg=“]
#1 Motivauswahl
[/av_textblock]
[av_hr class=’invisible‘ height=’10‘ shadow=’no-shadow‘ position=’center‘ custom_border=’av-border-thin‘ custom_width=’50px‘ custom_border_color=“ custom_margin_top=’30px‘ custom_margin_bottom=’30px‘ icon_select=’yes‘ custom_icon_color=“ icon=’ue808′ font=’entypo-fontello‘ admin_preview_bg=“ av_uid=’av-348z15′]
[av_textblock size=“ font_color=“ color=“ av-medium-font-size=“ av-small-font-size=“ av-mini-font-size=“ av_uid=’av-2y2n69′ admin_preview_bg=“]
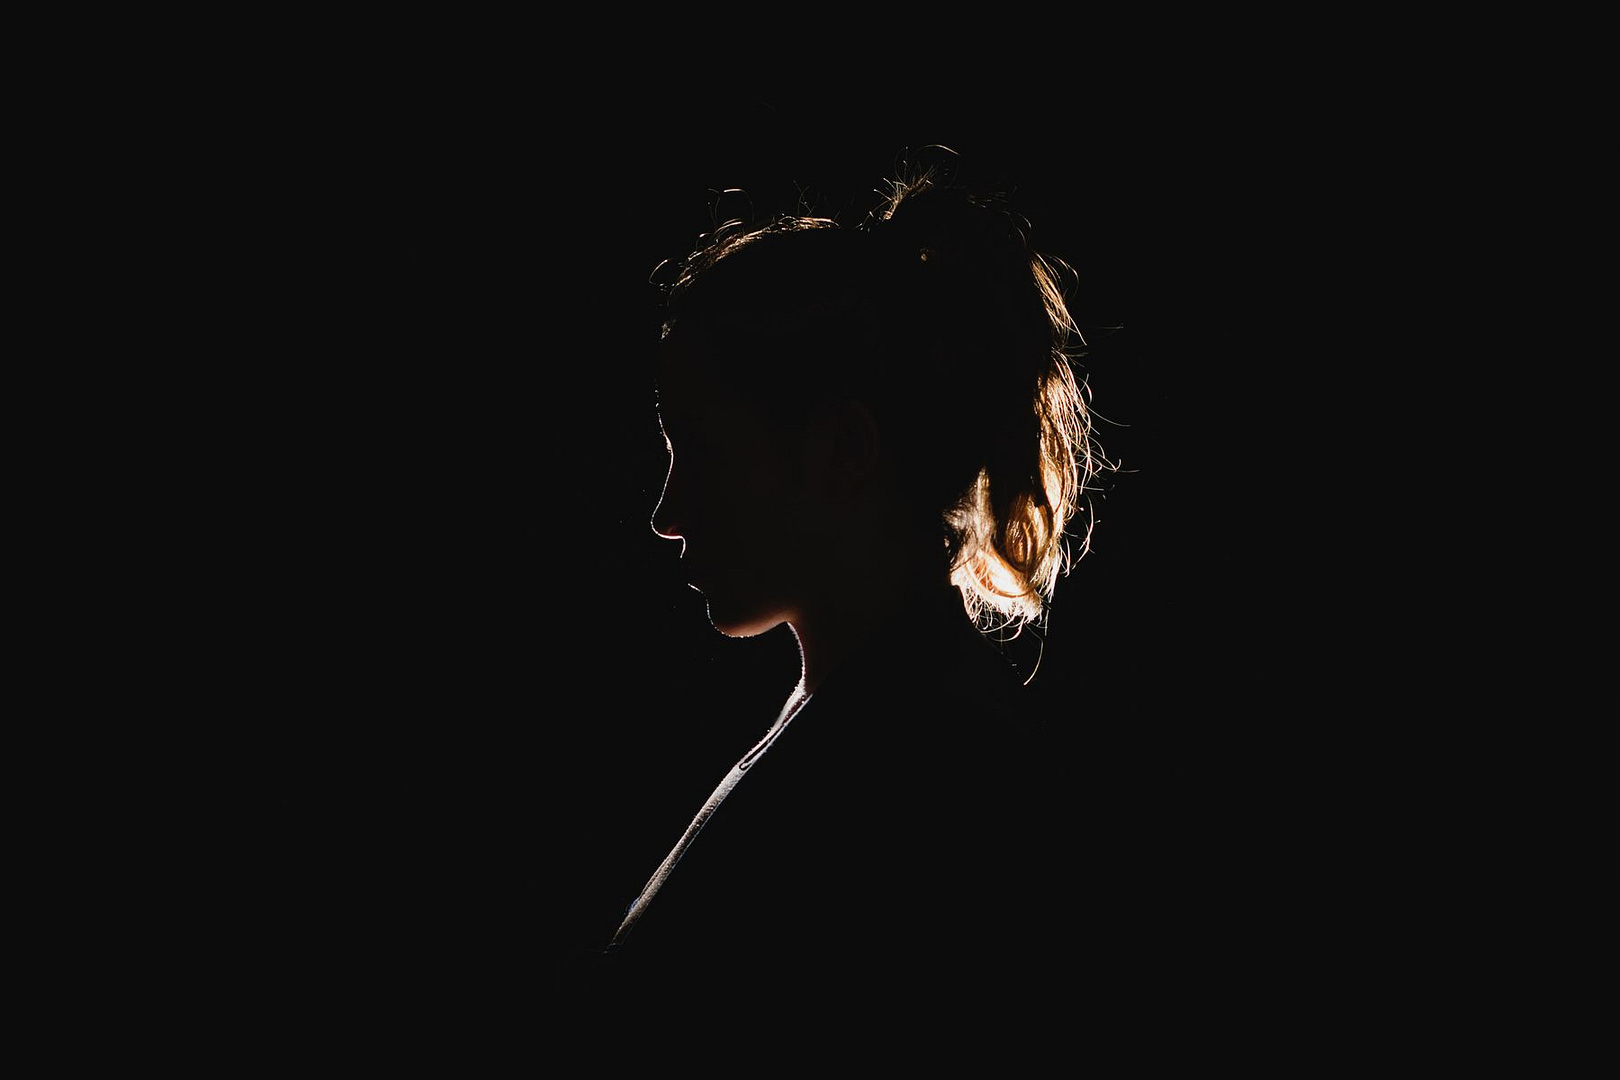
Fast jedes Objekt kann zu einer Silhouette gemacht werden, einige sind jedoch besser geeignet als andere. Bei Silhouetten geht es vor allem darum, die Form deines Motivs hervorzuheben. Wenn du also nach einem geeigneten Motiv suchst, das als Silhouette erscheinen soll, dann konzentriere dich auf die Form: suche Motive mit einer markanten und erkennbaren Form, die in ihrer zweidimensionalen Form interessant genug sind, das Interesse des Betrachters zu wecken.
Silhouetten können nicht auf die Farben, Texturen und Farbtöne von Motiven zurückgreifen. Daher muss die Form eindeutig und markant sein. Silhouetten funktionieren sehr gut, wenn die Motive klar umrissene Strukturen haben – ohne viel Schnörkel.
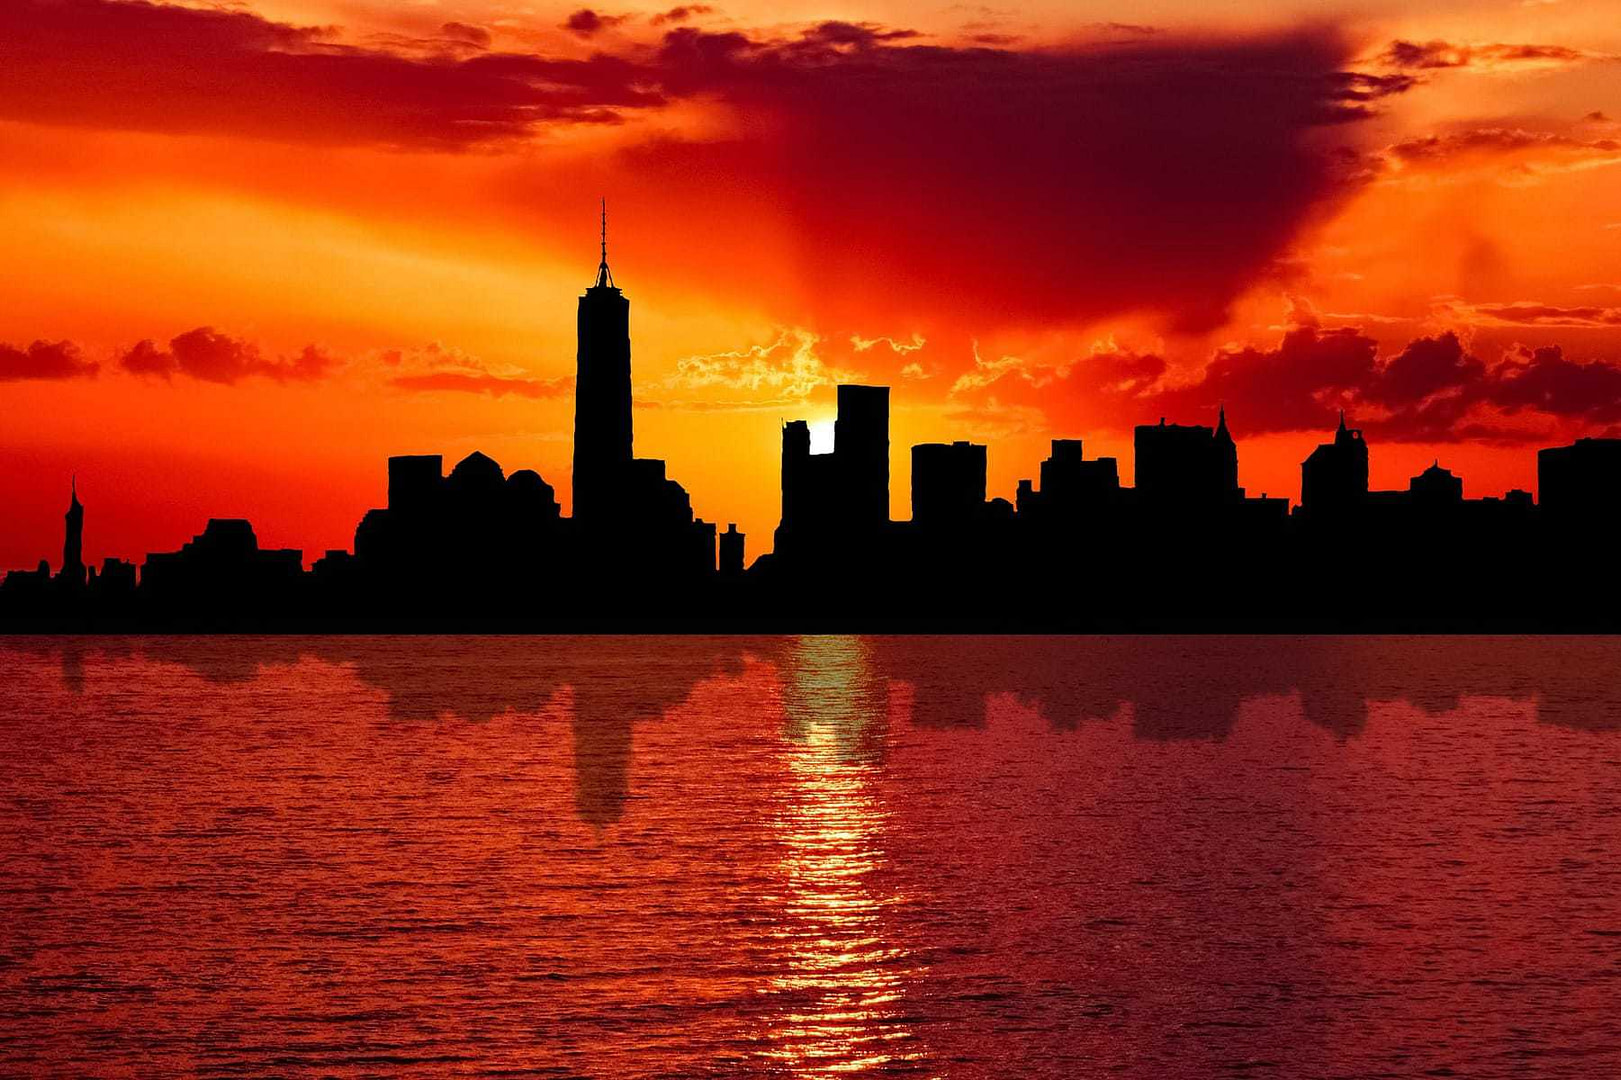
Menschen sind dafür ein gutes Beispiel, wie am Bild oben zu sehen ist. Aber auch Skylines von Städten, bekannte Bauwerke oder alltägliche Gegenstände mit markanten Formen können sich in sehr schöne Silhouetten verwandeln:
[/av_textblock]
[/av_one_full]
[av_one_full first min_height=“ vertical_alignment=’av-align-top‘ space=“ margin=’0px‘ margin_sync=’true‘ padding=’0px,0px,20px,0px‘ border=“ border_color=“ radius=’0px‘ radius_sync=’true‘ background_color=“ src=“ attachment=“ attachment_size=“ background_position=’top left‘ background_repeat=’no-repeat‘ animation=“ mobile_breaking=“ mobile_display=“ av_uid=’av-3gkvqp‘]
[av_textblock size=“ font_color=“ color=“ av-medium-font-size=“ av-small-font-size=“ av-mini-font-size=“ av_uid=’av-39uvjt‘ admin_preview_bg=“]
#2 Kameraeinstellungen
[/av_textblock]
[av_textblock size=“ font_color=“ color=“ av-medium-font-size=“ av-small-font-size=“ av-mini-font-size=“ av_uid=’av-3q3u6x‘ admin_preview_bg=“]
Belichtungsmodus
Manuell (M)
Das starke Gegenlicht stellt deine Kamera vor die Herausforderung das Motiv richtig zu belichten. Das liegt daran, dass der Kontrastumfang des Motivs in aller Regel größer ist als ihn die Kamera darstellen kann. Silhouetten-Fotos sind im formalen Sinne nicht richtig belichtet. Wir müssen hier die Belichtung daher selbst übernehmen und folglich im Modus M fotografieren.
ISO
möglichst niedrig; idealerweise auf 100
Blende
Geringe Schärfentiefe ist in aller Regel bei Silhouetten nicht gewünscht. Es wird eher versucht große Schärfentiefe zu erzielen. Die Blende sollte deshalb möglichst klein sein (große Blendenzahl). Idealerweise zwischen f8 und f16
Belichtungszeit
Die Verschlusszeit solltest du verhältnismäßig kurz auswählen. Dabei solltest du dich auf dein Auge verlassen. Der Belichtungsmesser deiner Kamera wird dir wenig helfen, da du sonst das Bild überbelichten würdest und damit keine Silhouette entstehen würde
An die korrekte und gewünschte Verschlusszeit musst du dich entsprechend herantasten. Sie liegt meiner Erfahrung nach bei 1/250 Sekunde oder noch deutlich kürzer.
Fokus
wir empfehlen dir den Autofokus zu deaktivieren und manuell zu fokussieren
Weißabgleich
Wurscht egal – da du RAW fotografierst und nicht JPEG, kann dieser später in der Nachbearbeitung gewählt werden.
Blitz
Wenn du nicht gerade im Studio Silhouetten fotografierst, solltest du unbedingt den Blitz deaktivieren.
[/av_textblock]
[/av_one_full]
[av_one_full first min_height=“ vertical_alignment=’av-align-top‘ space=“ margin=’0px‘ margin_sync=’true‘ padding=’0px,0px,20px,0px‘ border=“ border_color=“ radius=’0px‘ radius_sync=’true‘ background_color=“ src=“ attachment=“ attachment_size=“ background_position=’top left‘ background_repeat=’no-repeat‘ animation=“ mobile_breaking=“ mobile_display=“ av_uid=’av-3gkvqp‘]
[av_textblock size=“ font_color=“ color=“ av-medium-font-size=“ av-small-font-size=“ av-mini-font-size=“ av_uid=’av-39uvjt‘ admin_preview_bg=“]
#3 Die richtige Perspektive
[/av_textblock]
[av_hr class=’invisible‘ height=’10‘ shadow=’no-shadow‘ position=’center‘ custom_border=’av-border-thin‘ custom_width=’50px‘ custom_border_color=“ custom_margin_top=’30px‘ custom_margin_bottom=’30px‘ icon_select=’yes‘ custom_icon_color=“ icon=’ue808′ font=’entypo-fontello‘ admin_preview_bg=“ av_uid=’av-348z15′]
[av_textblock size=“ font_color=“ color=“ av-medium-font-size=“ av-small-font-size=“ av-mini-font-size=“ av_uid=’av-2y2n69′ admin_preview_bg=“]
Deine Augen haben einen viel größeren Dynamikbereich als der Sensor deiner Kamera. Mit deinen Augen kannst du eine Person ganz wunderbar erkennen, selbst wenn direkt hinter ihr die Sonne untergeht. Mit der Kamera sieht das ganz anders aus, aber dadurch eröffnet sich überhaupt erst die Möglichkeit etwa Personen als Silhouetten darzustellen.
Solange sich die Lichtquelle hinter dem Motiv befindet, bleibt das Motiv im Schatten und wird bei der „richtigen“ Belichtung automatisch zu einer Silhouette.
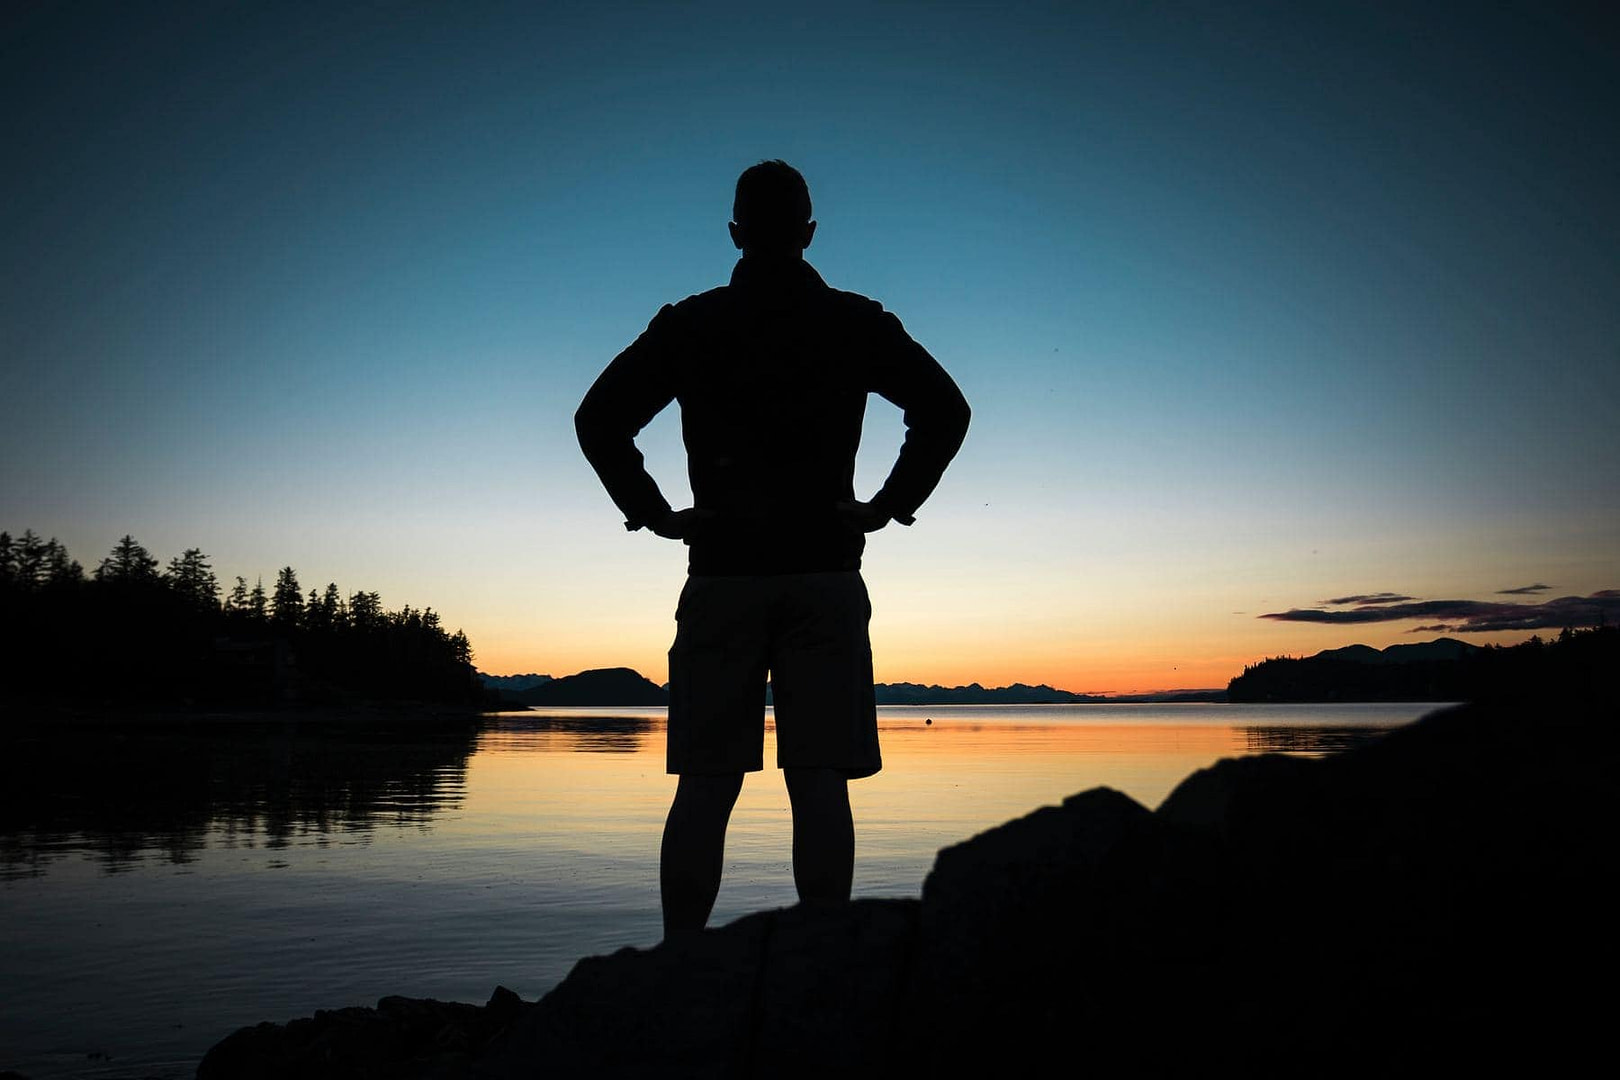
Am besten gelingen dir Silhouetten-Fotos, wenn sich die Sonne relativ niedrig über dem Horizont befindet. Aus diesem Grund sind Sonnenuntergänge, Sonnenaufgänge und Wintertage in höheren Breiten ideal für die Silhouetten-Fotografie.
Ein weiterer Tipp, gerade wenn die Sonne etwas höher steht: versuche es mit Fotos aus der Froschperspektive. Somit gelingt es dir sehr leicht dein Motiv vor der Sonne zu platzieren:
[/av_textblock]
[/av_one_full]
[av_one_full first min_height=“ vertical_alignment=’av-align-top‘ space=“ margin=’0px‘ margin_sync=’true‘ padding=’0px,0px,20px,0px‘ border=“ border_color=“ radius=’0px‘ radius_sync=’true‘ background_color=“ src=“ attachment=“ attachment_size=“ background_position=’top left‘ background_repeat=’no-repeat‘ animation=“ mobile_breaking=“ mobile_display=“ av_uid=’av-3gkvqp‘]
[av_textblock size=“ font_color=“ color=“ av-medium-font-size=“ av-small-font-size=“ av-mini-font-size=“ av_uid=’av-39uvjt‘ admin_preview_bg=“]
#4 Tipps zum fokussieren
[/av_textblock]
[av_hr class=’invisible‘ height=’10‘ shadow=’no-shadow‘ position=’center‘ custom_border=’av-border-thin‘ custom_width=’50px‘ custom_border_color=“ custom_margin_top=’30px‘ custom_margin_bottom=’30px‘ icon_select=’yes‘ custom_icon_color=“ icon=’ue808′ font=’entypo-fontello‘ admin_preview_bg=“ av_uid=’av-348z15′]
[av_textblock size=“ font_color=“ color=“ av-medium-font-size=“ av-small-font-size=“ av-mini-font-size=“ av_uid=’av-2y2n69′ admin_preview_bg=“]
In aller Regel sollte der Fokus auf dem Motivbereich liegen, der als Silhouette dargestellt wird. Daher ist hier auch der Autofokus keine gute Idee. Dieser würde sich eher auf den sehr viel helleren Hintergrund konzentrieren.
Um willkürliches Fokussieren zu umgehen, solltest du auf den Manuellen Fokus setzen und gleichzeitig eine relativ große Schärfentiefe wählen.
Das gelingt dir mit Blendenwerten von f8 oder höher.
[/av_textblock]
[/av_one_full]
[av_one_full first min_height=“ vertical_alignment=’av-align-top‘ space=“ margin=’0px‘ margin_sync=’true‘ padding=’0px,0px,20px,0px‘ border=“ border_color=“ radius=’0px‘ radius_sync=’true‘ background_color=“ src=“ attachment=“ attachment_size=“ background_position=’top left‘ background_repeat=’no-repeat‘ animation=“ mobile_breaking=“ mobile_display=“ av_uid=’av-3gkvqp‘]
[av_textblock size=“ font_color=“ color=“ av-medium-font-size=“ av-small-font-size=“ av-mini-font-size=“ av_uid=’av-39uvjt‘ admin_preview_bg=“]
#5 PROFITIPP: Wie entsteht echtes Gegenlicht für perfekte Silhouetten?
[/av_textblock]
[av_hr class=’invisible‘ height=’10‘ shadow=’no-shadow‘ position=’center‘ custom_border=’av-border-thin‘ custom_width=’50px‘ custom_border_color=“ custom_margin_top=’30px‘ custom_margin_bottom=’30px‘ icon_select=’yes‘ custom_icon_color=“ icon=’ue808′ font=’entypo-fontello‘ admin_preview_bg=“ av_uid=’av-348z15′]
[av_textblock size=“ font_color=“ color=“ av-medium-font-size=“ av-small-font-size=“ av-mini-font-size=“ av_uid=’av-2y2n69′ admin_preview_bg=“]
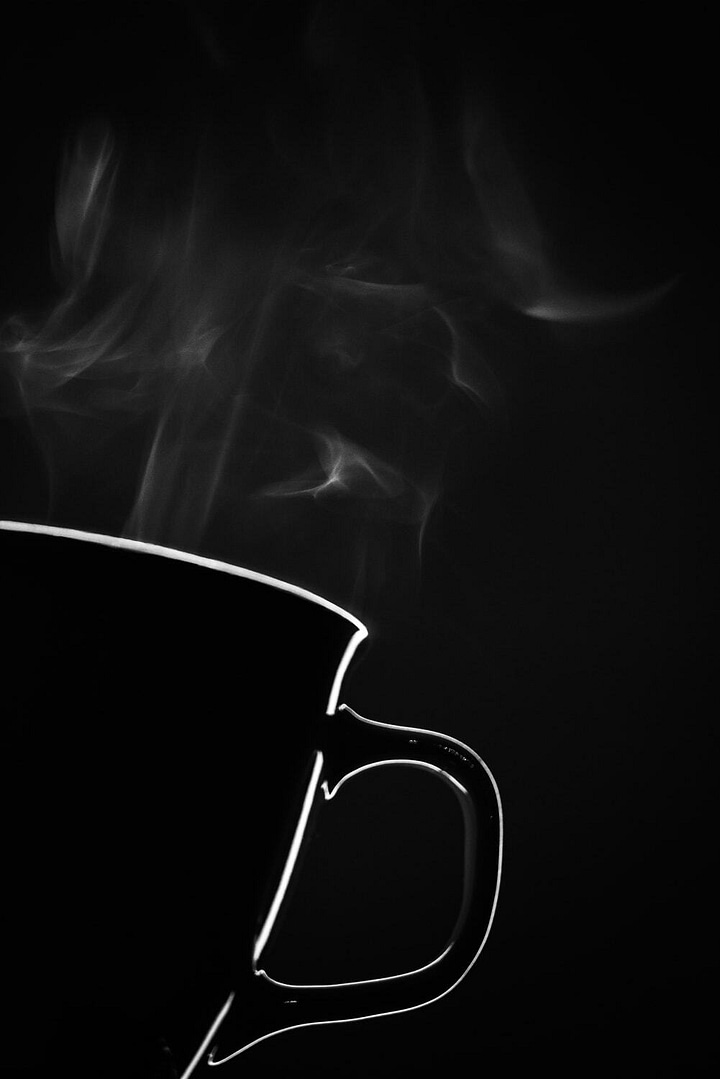
Wir haben uns bis hierhin im wesentlichen mit Silhouetten im Freien auseinandergesetzt. Wie gelingen nun aber perfekte Silhouetten, wie bei der Kaffeetasse oben oder aber auf dem nachfolgenden Foto?
Perfektes Gegenlicht erhältst du ganz einfach, indem du deine Lichtquelle (z.B. externes Blitzgerät) exakt gegenüber der Kamera und direkt hinter dem Motiv platzierst.
Das erzeugt eine perfekte Silhouette und taucht den Rest des Bildes in tiefes Schwarz.
[/av_textblock]
[/av_one_full]
[av_one_full first min_height=“ vertical_alignment=’av-align-top‘ space=“ margin=’0px‘ margin_sync=’true‘ padding=’20px,0px,0px,0px‘ border=“ border_color=“ radius=’0px‘ radius_sync=’true‘ background_color=“ src=“ attachment=“ attachment_size=“ background_position=’top left‘ background_repeat=’no-repeat‘ animation=“ mobile_breaking=“ mobile_display=“ av_uid=’av-i4znt‘]
[av_textblock size=“ font_color=“ color=“ av-medium-font-size=“ av-small-font-size=“ av-mini-font-size=“ av_uid=’av-39uvjt‘ admin_preview_bg=“]
#6 Kurz und knapp
[/av_textblock]
[av_iconlist position=’left‘ iconlist_styling=“ animation=“ custom_title_size=’30‘ custom_content_size=“ font_color=’custom‘ custom_title=“ custom_content=“ color=’custom‘ custom_bg=’#719430′ custom_font=“ custom_border=“ av-medium-font-size-title=“ av-small-font-size-title=“ av-mini-font-size-title=“ av-medium-font-size=“ av-small-font-size=“ av-mini-font-size=“ av_uid=’av-4qd88p‘ admin_preview_bg=“]
[av_iconlist_item title=’Belichtungsmodus‘ link=“ linktarget=“ linkelement=“ icon=’ue855′ font=’entypo-fontello‘ av_uid=’av-awzy9o‘]
Manuell: M
[/av_iconlist_item]
[av_iconlist_item title=’ISO‘ link=“ linktarget=“ linkelement=“ icon=’ue867′ font=’entypo-fontello‘ av_uid=’av-8tsouk‘]
So niedrig wie möglich (idealerweise ISO 100)
[/av_iconlist_item]
[av_iconlist_item title=’Blende‘ link=“ linktarget=“ linkelement=“ icon=’ue912′ font=’entypo-fontello‘ av_uid=’av-7o09wc‘]
zwischen f8 und f16
[/av_iconlist_item]
[av_iconlist_item title=’Belichtungszeit‘ link=“ linktarget=“ linkelement=“ icon=’ue862′ font=’entypo-fontello‘ av_uid=’av-5r1f6k‘]
relativ kurz
[/av_iconlist_item]
[av_iconlist_item title=’Sonstige Einstellungen‘ link=“ linktarget=“ linkelement=“ icon=’ue816′ font=’entypo-fontello‘ av_uid=’av-497enw‘]
- RAW-Format
- Manueller Fokus
- Blitz im Freien deaktivieren
[/av_iconlist_item]
[av_iconlist_item title=’Zubehör‘ link=“ linktarget=“ linkelement=“ icon=’ue856′ font=’entypo-fontello‘ av_uid=’av-22ijn0′]
- kein Zubehör nötig
[/av_iconlist_item]
[/av_iconlist]
[/av_one_full]