[av_heading tag=’h1′ padding=’20‘ heading=’Modul 2 – Lektion 8
ZU DUNKEL? ZU HELL? – Teil 1′ color=“ style=’blockquote modern-quote modern-centered‘ custom_font=“ size=“ subheading_active=’subheading_below‘ subheading_size=’16‘ custom_class=“ admin_preview_bg=“ av-desktop-hide=“ av-medium-hide=“ av-small-hide=“ av-mini-hide=“ av-medium-font-size-title=“ av-small-font-size-title=“ av-mini-font-size-title=“ av-medium-font-size=“ av-small-font-size=“ av-mini-font-size=“ margin=“]
Belichtungsmessung:
[/av_heading]
[av_hr class=’invisible‘ height=’70‘ shadow=’no-shadow‘ position=’center‘ custom_border=’av-border-thin‘ custom_width=’50px‘ custom_border_color=“ custom_margin_top=’30px‘ custom_margin_bottom=’30px‘ icon_select=’yes‘ custom_icon_color=“ icon=’ue808′ font=’entypo-fontello‘ av_uid=’av-6yofkp‘ admin_preview_bg=“]
[av_textblock size=“ font_color=“ color=“ av-medium-font-size=“ av-small-font-size=“ av-mini-font-size=“ av_uid=’av-6t20jd‘ admin_preview_bg=“]
In dieser Lektion lernst du…
- …was Sinn und Zweck der Belichtungsmessung ist.
- …nach welchen zwei Arten die Belichtungsmessung grundsätzlich funktioniert.
- …welche Mittel zur Belichtungsmessung dir konkret mit deiner Kamera zur Verfügung stehen und meine Empfehlung.
Wir haben im ersten Modul viel über die Belichtung geredet, und wie wir mit dem Belichtungsdreieck eine „korrekte Belichtung“ unseres Motivs erreichen können. Stellt sich nun aber die Frage, woher die Kamera überhaupt weiß, wann ein Motiv korrekt belichtet ist und wie dies gemessen wird. Diese Lektion bringt Licht ins Dunkel ;-)
[/av_textblock]
[av_hr class=’invisible‘ height=’70‘ shadow=’no-shadow‘ position=’center‘ custom_border=’av-border-thin‘ custom_width=’50px‘ custom_border_color=“ custom_margin_top=’30px‘ custom_margin_bottom=’30px‘ icon_select=’yes‘ custom_icon_color=“ icon=’ue808′ font=’entypo-fontello‘ av_uid=’av-6rta75′ admin_preview_bg=“]
[av_one_full first min_height=“ vertical_alignment=’av-align-top‘ space=“ margin=’0px‘ margin_sync=’true‘ padding=’0px,0px,20px,0px‘ border=“ border_color=“ radius=’0px‘ radius_sync=’true‘ background_color=“ src=“ attachment=“ attachment_size=“ background_position=’top left‘ background_repeat=’no-repeat‘ animation=“ mobile_breaking=“ mobile_display=“ av_uid=’av-6j2c8h‘]
[av_textblock size=“ font_color=“ color=“ av-medium-font-size=“ av-small-font-size=“ av-mini-font-size=“ av_uid=’av-6d2agh‘ admin_preview_bg=“]
Grundlagen der Belichtungsmessung:
[/av_textblock]
[av_hr class=’invisible‘ height=’10‘ shadow=’no-shadow‘ position=’center‘ custom_border=’av-border-thin‘ custom_width=’50px‘ custom_border_color=“ custom_margin_top=’30px‘ custom_margin_bottom=’30px‘ icon_select=’yes‘ custom_icon_color=“ icon=’ue808′ font=’entypo-fontello‘ admin_preview_bg=“ av_uid=’av-65g089′]
[av_textblock size=“ font_color=“ color=“ av-medium-font-size=“ av-small-font-size=“ av-mini-font-size=“ av_uid=’av-5z8v1t‘ admin_preview_bg=“]
[s3mm type=“video“ source=“cloudfront“ files=“Videos/3..1_1 BELICHTUNGSMESSUNG GRUNDLAGEN.mp4″ titles=“Videos/3..1_1 BELICHTUNGSMESSUNG GRUNDLAGEN.mp4″ splash=“https://mlzwymt16oxv.i.optimole.com/w:auto/h:auto/q:90/ig:avif/f:best/https://photo-inspirator.com/wp-content/uploads/2018/10/Belichtungsmessung-basics.jpg“ /]
[/av_textblock]
[/av_one_full]
[av_hr class=’invisible‘ height=’50‘ shadow=’no-shadow‘ position=’center‘ custom_border=’av-border-thin‘ custom_width=’50px‘ custom_border_color=“ custom_margin_top=’30px‘ custom_margin_bottom=’30px‘ icon_select=’yes‘ custom_icon_color=“ icon=’ue808′ font=’entypo-fontello‘ av_uid=’av-6rta75′ admin_preview_bg=“]
[av_icon_box position=’top‘ icon_style=“ boxed=“ icon=’ue81e‘ font=’entypo-fontello‘ title=’Belichtungsmessung‘ link=“ linktarget=“ linkelement=“ font_color=“ custom_title=“ custom_content=“ color=“ custom_bg=“ custom_font=“ custom_border=“ av-medium-font-size-title=“ av-small-font-size-title=“ av-mini-font-size-title=“ av-medium-font-size=“ av-small-font-size=“ av-mini-font-size=“ av_uid=’av-jh95m5n3′ admin_preview_bg=“]
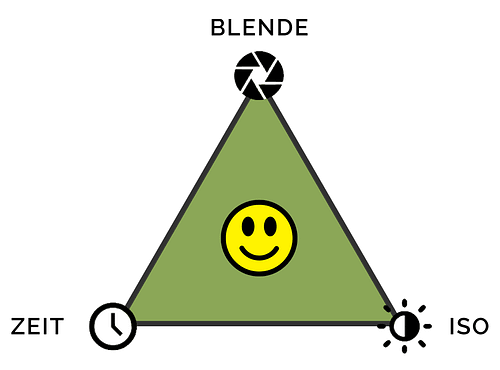
Die Belichtungsmessung stellt dem Fotografen bzw. der Kamera jene Werte zur Verfügung, die für das „Belichtungsdreieck“ relevant sind: Blende, Belichtungszeit und ISO.
[/av_icon_box]
[av_hr class=’invisible‘ height=’100′ shadow=’no-shadow‘ position=’center‘ custom_border=’av-border-thin‘ custom_width=’50px‘ custom_border_color=“ custom_margin_top=’30px‘ custom_margin_bottom=’30px‘ icon_select=’yes‘ custom_icon_color=“ icon=’ue808′ font=’entypo-fontello‘ av_uid=’av-6rta75′ admin_preview_bg=“]
[av_one_full first min_height=“ vertical_alignment=’av-align-top‘ space=“ margin=’0px‘ margin_sync=’true‘ padding=’0px,20px,px,0px‘ border=“ border_color=“ radius=’0px‘ radius_sync=’true‘ background_color=“ src=“ attachment=“ attachment_size=“ background_position=’top left‘ background_repeat=’no-repeat‘ animation=“ mobile_breaking=“ mobile_display=“ av_uid=’av-l3kup‘]
[av_textblock size=“ font_color=“ color=“ av-medium-font-size=“ av-small-font-size=“ av-mini-font-size=“ av_uid=’av-5q61m9′ admin_preview_bg=“]
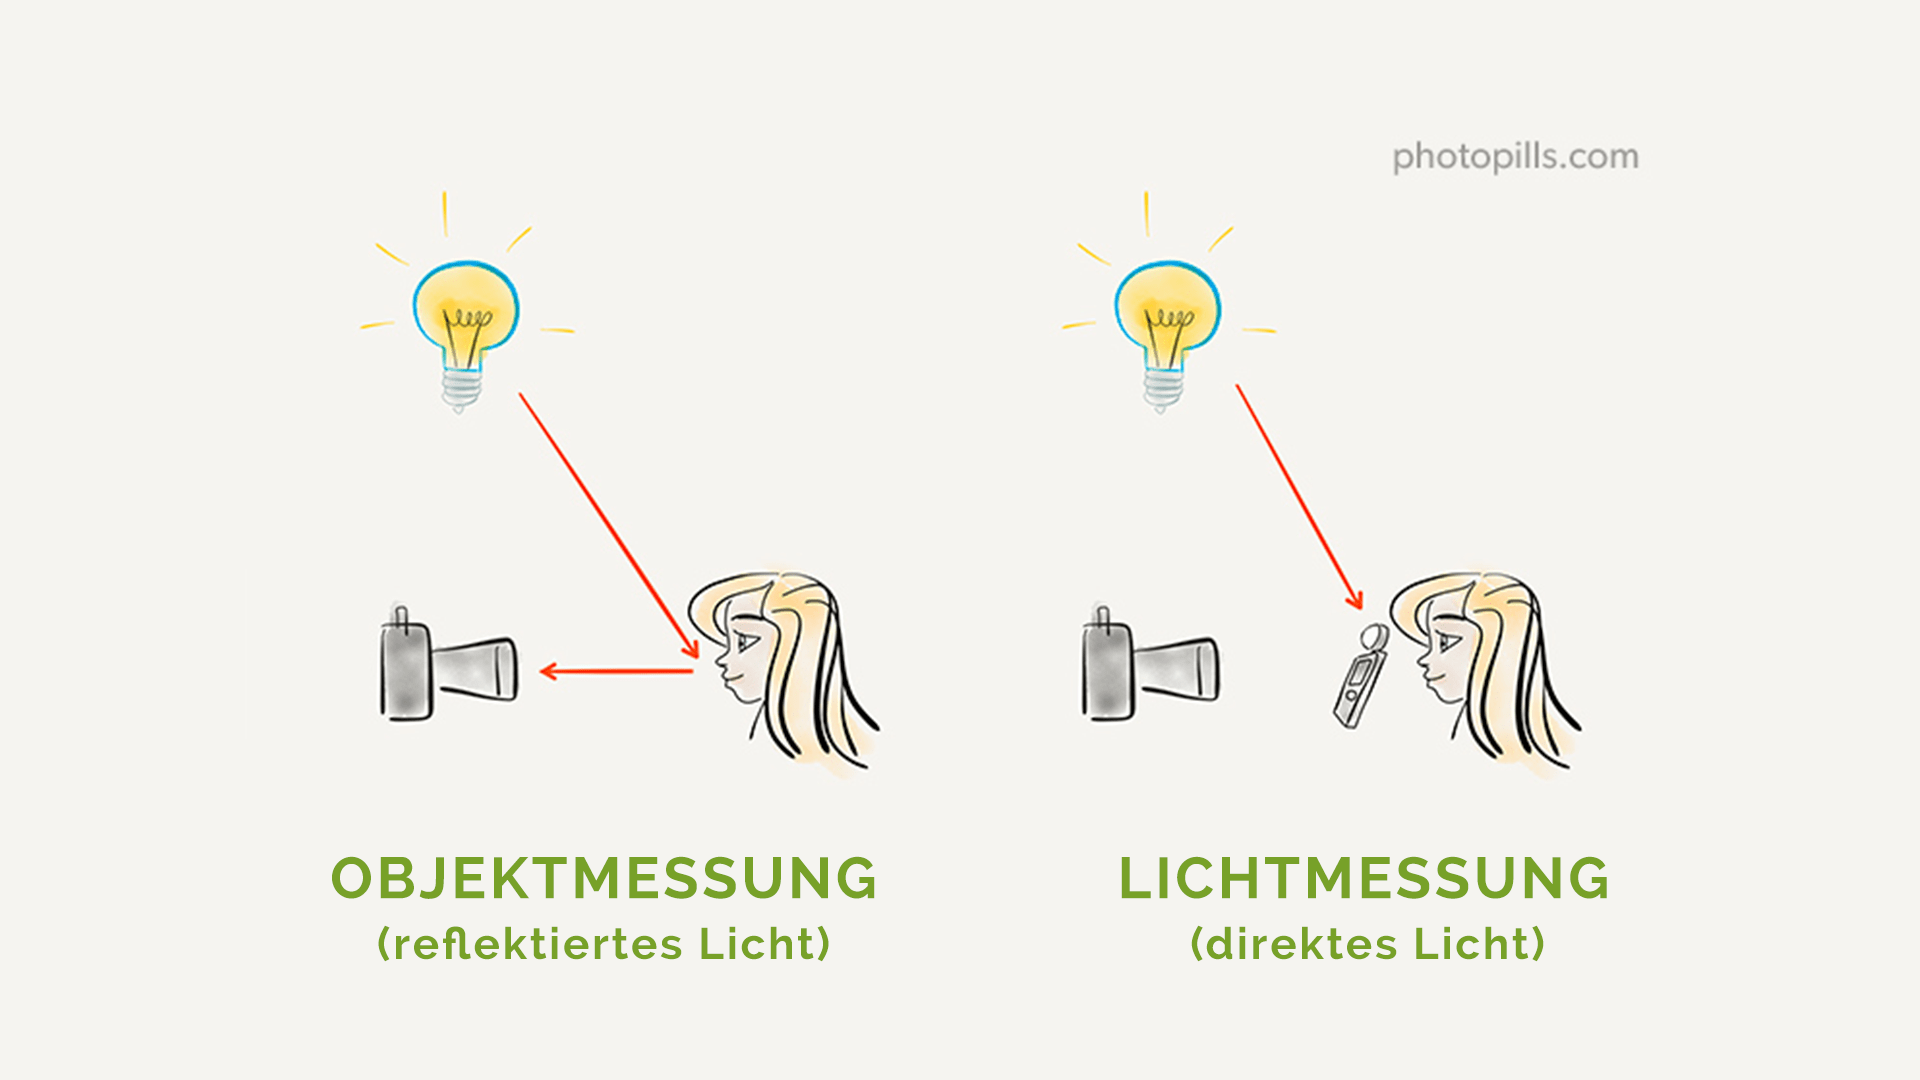
Objektmessung vs. Lichtmessung:
[/av_textblock]
[av_hr class=’invisible‘ height=’10‘ shadow=’no-shadow‘ position=’center‘ custom_border=’av-border-thin‘ custom_width=’50px‘ custom_border_color=“ custom_margin_top=’30px‘ custom_margin_bottom=’30px‘ icon_select=’yes‘ custom_icon_color=“ icon=’ue808′ font=’entypo-fontello‘ admin_preview_bg=“ av_uid=’av-5jhgcp‘]
[av_textblock size=“ font_color=“ color=“ av-medium-font-size=“ av-small-font-size=“ av-mini-font-size=“ av_uid=’av-j4vbt‘ admin_preview_bg=“]
[s3mm type=“video“ source=“cloudfront“ files=“Videos/3..1_2 BELICHTUNGSMESSUNG ARTEN.mp4″ titles=“Videos/3..1_2 BELICHTUNGSMESSUNG ARTEN.mp4″ splash=“https://mlzwymt16oxv.i.optimole.com/w:auto/h:auto/q:90/ig:avif/f:best/https://photo-inspirator.com/wp-content/uploads/2018/10/Objekt-vs-Licht.jpg“ /]
[/av_textblock]
[/av_one_full]
[av_hr class=’invisible‘ height=’100′ shadow=’no-shadow‘ position=’center‘ custom_border=’av-border-thin‘ custom_width=’50px‘ custom_border_color=“ custom_margin_top=’30px‘ custom_margin_bottom=’30px‘ icon_select=’yes‘ custom_icon_color=“ icon=’ue808′ font=’entypo-fontello‘ av_uid=’av-6rta75′ admin_preview_bg=“]
[av_icon_box position=’top‘ icon_style=“ boxed=“ icon=’ue81e‘ font=’entypo-fontello‘ title=’Objektmessung vs. Lichtmessung‘ link=“ linktarget=“ linkelement=“ font_color=“ custom_title=“ custom_content=“ color=“ custom_bg=“ custom_font=“ custom_border=“ av-medium-font-size-title=“ av-small-font-size-title=“ av-mini-font-size-title=“ av-medium-font-size=“ av-small-font-size=“ av-mini-font-size=“ av_uid=’av-jh95m5n3′ admin_preview_bg=“]
Bei der Objektmessung misst die Kamera das vom Objekt reflektierte Licht. Bei der Lichtmessung misst das externe Belichtungsmessgerät das tatsächlich auf das Objekt einfallende Licht.

[/av_icon_box]
[av_hr class=’invisible‘ height=’100′ shadow=’no-shadow‘ position=’center‘ custom_border=’av-border-thin‘ custom_width=’50px‘ custom_border_color=“ custom_margin_top=’30px‘ custom_margin_bottom=’30px‘ icon_select=’yes‘ custom_icon_color=“ icon=’ue808′ font=’entypo-fontello‘ av_uid=’av-6rta75′ admin_preview_bg=“]
[av_one_full first min_height=“ vertical_alignment=“ space=“ custom_margin=“ margin=’0px‘ link=“ linktarget=“ link_hover=“ padding=’0px‘ border=“ border_color=“ radius=’0px‘ background=’bg_color‘ background_color=“ background_gradient_color1=“ background_gradient_color2=“ background_gradient_direction=’vertical‘ src=“ background_position=’top left‘ background_repeat=’no-repeat‘ animation=“ mobile_breaking=“ mobile_display=“ av_uid=’av-bic4j3′]
[av_textblock size=“ font_color=“ color=“ av-medium-font-size=“ av-small-font-size=“ av-mini-font-size=“ av_uid=’av-5q61m9′ admin_preview_bg=“]
Welche Belichtungsmessmethoden gibt es in meiner Kamera?
[/av_textblock]
[av_textblock size=“ font_color=“ color=“ av-medium-font-size=“ av-small-font-size=“ av-mini-font-size=“ av_uid=’av-6t20jd‘ admin_preview_bg=“]
Grundsätzlich ist Belichtungsmessung nicht gleich Belichtungsmessung. Abhängig von der Einstellung wird der integrierte Belichtungsmesser die gesamte Fläche des Sucherbildes oder nur einen kleinen Teil davon messen.
Hinter Begriffen wie Integral- und Matrixmessung stehen ganz wichtige Techniken, die mit der Gewichtung der Messbereiche zusammenhängen.
Das sind die Messmethoden, mit denen sich der Fotograf auseinandersetzen sollte, um professionelle Ergebnisse zu liefern. Wie bisher erwähnt sind die Messmethoden die deine Kamera mitbringt per se Methoden der Objekt- und nicht der Lichtmessung. Das heißt es wird das vom Objekt reflektierte Licht gemessen.
Kommen wir nun zu den wesentlichen Belichtungsmessmethoden deiner Kamera. Der genaue Name kann in deinem Kameramodell abweichen. Hier bitte einfach in dein Handbuch schauen. Die üblichen Messmethoden moderner Digitalkameras sind:
- Die (mittenbetonte) Integralmessung
- Die mittenbetonte Messung / Selektivmessung
- Die Spotmessung
- Die Mehrfeld – / Matrixmessung
[/av_textblock]
[/av_one_full][av_one_full first min_height=“ vertical_alignment=“ space=“ custom_margin=“ margin=’0px‘ link=“ linktarget=“ link_hover=“ padding=’0px‘ border=“ border_color=“ radius=’0px‘ background=’bg_color‘ background_color=“ background_gradient_color1=“ background_gradient_color2=“ background_gradient_direction=’vertical‘ src=“ background_position=’top left‘ background_repeat=’no-repeat‘ animation=“ mobile_breaking=“ mobile_display=“ av_uid=’av-bic4j3′]
[av_textblock size=“ font_color=“ color=“ av-medium-font-size=“ av-small-font-size=“ av-mini-font-size=“ av_uid=’av-5q61m9′ admin_preview_bg=“]
1. (Mittenbetonte) Integralmessung
[/av_textblock]
[av_textblock size=“ font_color=“ color=“ av-medium-font-size=“ av-small-font-size=“ av-mini-font-size=“ av_uid=’av-6t20jd‘ admin_preview_bg=“]
Da ist zunächst die Integralmessung. Die Integralmessung misst den gesamten Bildbereich, und bildet daraus einen Mittelwert (Durchschnitt). Diese Art der Messung bevorzugt eher gleichmäßige Helligkeitsverteilungen und liefert auch bei schwachen Kontrasten gute Ergebnisse.
Geräte der neueren Art messen „mittenbetont“, das bedeutet, der mittlere Bereich erfährt eine stärkere Beachtung, als die Bereiche, die außen liegen. Bei der Messung wird nun das Objekt oder Motiv, das in der Mitte des Bildes (Suchfeldes) liegt bevorzugt, während die nach außen verlaufenden Ränder mehr oder weniger ignoriert werden.
Die Entwicklung folgt der Vorliebe vieler Fotografen, ihr Motiv in der Mitte zu platzieren, um ein „aus dem Bild laufen“ zu vermeiden. Technisch verständlich, gestalterisch kreativ eher falscher Ansatz. Der Vorteil der mittenbetonten Integralmessung liegt sicher darin, dass störende Lichteffekte am Bildrand ignoriert werden. Oft ist es ein ganz heller Himmel oder die Sonne, die im Normalfall zu einer „zu hellen Szene“ führen würde. Diese Messmethode schließt das weitgehend aus.
Die Integralmessung in aller Kürze:
- Ist der Belichtungsmesser, der bereits am längsten in Kameras verwendet wird
- Das gesamte Bildfeld wird vermessen und die mittlere Bildhelligkeit ermittelt
- Brauchbare Ergebnisse bei kontrastarmen Motiven
- Nicht empfohlen für die digitale Fotografie
[/av_textblock]
[/av_one_full]
[av_one_full first min_height=“ vertical_alignment=“ space=“ custom_margin=“ margin=’0px‘ link=“ linktarget=“ link_hover=“ padding=’0px‘ border=“ border_color=“ radius=’0px‘ background=’bg_color‘ background_color=“ background_gradient_color1=“ background_gradient_color2=“ background_gradient_direction=’vertical‘ src=“ background_position=’top left‘ background_repeat=’no-repeat‘ animation=“ mobile_breaking=“ mobile_display=“ av_uid=’av-bic4j3′]
[av_textblock size=“ font_color=“ color=“ av-medium-font-size=“ av-small-font-size=“ av-mini-font-size=“ av_uid=’av-5q61m9′ admin_preview_bg=“]
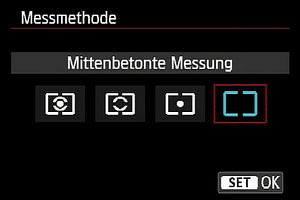
2. Mittenbetonte Messung / Selektivmessung
[/av_textblock]
[av_textblock size=“ font_color=“ color=“ av-medium-font-size=“ av-small-font-size=“ av-mini-font-size=“ av_uid=’av-6t20jd‘ admin_preview_bg=“]
Wie der Name sagt, ist es ein kreisförmiger Bereich rund um die Bildmitte, der zur Belichtungsmessung herangezogen wird. Auch hier geht man davon aus, dass sich die wichtigen Teile des Motivs in der Bildmitte befinden. Abweichungen in das Helle oder Dunkle am Bildrand sind nur bis zu 25% beteiligt. Ist allerdings das Hauptmotiv nicht in der Bildmitte, kann es zu Problemen kommen, genauso wie bei starken Schwarz-Weiß-Kontrasten.

Die mittenbetonte Messung in aller Kürze:
- Bessere Ergebnisse als der integrale Belichtungsmesser (wenn der Motivkontrast nicht zu hoch ist)
- Einige spezielle Lichtsituationen begünstigen den professionellen Einsatz (Studio, extreme Kontraste im Motiv)
- Sehr gut geeignet für wirklich professionelle Fotokunst, allerdings nicht in der digitalen Form
[/av_textblock]
[/av_one_full]
[av_one_full first min_height=“ vertical_alignment=“ space=“ custom_margin=“ margin=’0px‘ link=“ linktarget=“ link_hover=“ padding=’0px‘ border=“ border_color=“ radius=’0px‘ background=’bg_color‘ background_color=“ background_gradient_color1=“ background_gradient_color2=“ background_gradient_direction=’vertical‘ src=“ background_position=’top left‘ background_repeat=’no-repeat‘ animation=“ mobile_breaking=“ mobile_display=“ av_uid=’av-bic4j3′]
[av_textblock size=“ font_color=“ color=“ av-medium-font-size=“ av-small-font-size=“ av-mini-font-size=“ av_uid=’av-5q61m9′ admin_preview_bg=“]
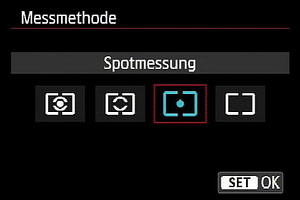
3. Spotmessung
[/av_textblock]
[av_textblock size=“ font_color=“ color=“ av-medium-font-size=“ av-small-font-size=“ av-mini-font-size=“ av_uid=’av-6t20jd‘ admin_preview_bg=“]
Eine Methode, die eher von professionellen Fotografen verwendet wird, da sie sehr viel Erfahrung erfordert. Sie liefert ein sehr genaues Ergebnis, da nur ein sehr kleiner Bereich in der Bildmitte gemessen wird – der allerdings auch richtig ausgewählt werden muss. Der Haupteinsatz der Spotmessung erfolgt in der analogen Fotografie, weil unterschiedlich helle Bereiche des Motivs verglichen werden können. Bei der Digitalfotografie ist das nicht mehr erforderlich. Alles in allem kein Werkzeug für die Schnappschuss-Fotografie.
Die Spotmessung in aller Kürze:
- Sehr kleiner Bereich in der Bildmitte ist der Messpunkt
- Eher für die analoge Fotografie geeignet
- Gute technische Kenntnisse für den Umgang sind erforderlich
- Für die digitale Fotografie nicht empfehlenswert
[/av_textblock]
[/av_one_full]
[av_one_full first min_height=“ vertical_alignment=“ space=“ custom_margin=“ margin=’0px‘ link=“ linktarget=“ link_hover=“ padding=’0px‘ border=“ border_color=“ radius=’0px‘ background=’bg_color‘ background_color=“ background_gradient_color1=“ background_gradient_color2=“ background_gradient_direction=’vertical‘ src=“ background_position=’top left‘ background_repeat=’no-repeat‘ animation=“ mobile_breaking=“ mobile_display=“ av_uid=’av-bic4j3′]
[av_textblock size=“ font_color=“ color=“ av-medium-font-size=“ av-small-font-size=“ av-mini-font-size=“ av_uid=’av-5q61m9′ admin_preview_bg=“]
4. Mehrfeld- oder Matrixbelichtungsmessung
[/av_textblock]
[av_textblock size=“ font_color=“ color=“ av-medium-font-size=“ av-small-font-size=“ av-mini-font-size=“ av_uid=’av-6t20jd‘ admin_preview_bg=“]
Die derzeit am weitesten fortgeschrittene, technische Entwicklung ist die Matrixfeldmessung, die eine ausgesprochen hohe Trefferquote hat.
Die Technik dahinter ist die Einteilung des Bildes in verschiedene Messbereiche. Die unterschiedliche Kombination von Helligkeiten und Kontrasten zwischen den einzelnen Feldern liefern ein meist sehr genaues und zuverlässiges Ergebnis. Es gibt bei der Methode keine eindeutigen Messergebnisse mehr, die Technik nimmt dem Menschen die Arbeit des Interpretierens und Einschätzens ab. Auch hinsichtlich der Auto-Fokus-Funktion ist die Mehrfeldmessung von Bedeutung. So kann ein niedrig aufgelöster RGB-Sensor auch kleinere Bereiche erfassen und den Autofokus mit Informationen über Veränderungen des Motivs versorgen.
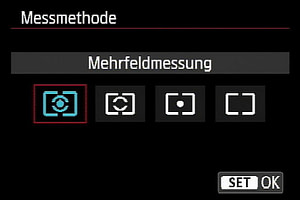
Die Mehrfeldessung in aller Kürze:
- Derzeit state-of-the-art unter den Belichtungsmessern und der Quasi Standard
- Einteilung des Bildes in viele einzelne Messfelder, die separat gemessen werden
- Auch für Laien ein sehr geeignetes Werkzeug, da kaum Vorkenntnisse nötig sind
- Meine Empfehlung für dich, da du damit in 95% der Fälle richtig fährst und für die restlichen 5 musst du eben manuell korrigieren, darüber werden wir noch sprechen
[/av_textblock]
[/av_one_full]
[av_hr class=’invisible‘ height=’100′ shadow=’no-shadow‘ position=’center‘ custom_border=’av-border-thin‘ custom_width=’50px‘ custom_border_color=“ custom_margin_top=’30px‘ custom_margin_bottom=’30px‘ icon_select=’yes‘ custom_icon_color=“ icon=’ue808′ font=’entypo-fontello‘ av_uid=’av-6rta75′ admin_preview_bg=“]
[av_icon_box position=’top‘ icon_style=“ boxed=“ icon=’ue83e‘ font=’entypo-fontello‘ title=’WICHTIG‘ link=“ linktarget=“ linkelement=“ font_color=“ custom_title=“ custom_content=“ color=“ custom_bg=“ custom_font=“ custom_border=“ av-medium-font-size-title=“ av-small-font-size-title=“ av-mini-font-size-title=“ av-medium-font-size=“ av-small-font-size=“ av-mini-font-size=“ av_uid=’av-jh95m5n3′ admin_preview_bg=“]
Ich empfehle dir bis auf weiteres die Mehrfeldmessung!
[/av_icon_box]
[av_hr class=’invisible‘ height=’100′ shadow=’no-shadow‘ position=’center‘ custom_border=’av-border-thin‘ custom_width=’50px‘ custom_border_color=“ custom_margin_top=’30px‘ custom_margin_bottom=’30px‘ icon_select=’yes‘ custom_icon_color=“ icon=’ue808′ font=’entypo-fontello‘ av_uid=’av-6rta75′ admin_preview_bg=“]
[av_icon_box position=’top‘ icon_style=“ boxed=“ icon=’ue803′ font=’entypo-fontello‘ title=’EXKURS:Bedeutung von Neutralgrau in Bezug auf die Belichtungsmessung‘ link=“ linktarget=“ linkelement=“ font_color=“ custom_title=“ custom_content=“ color=“ custom_bg=“ custom_font=“ custom_border=“ av-medium-font-size-title=“ av-small-font-size-title=“ av-mini-font-size-title=“ av-medium-font-size=“ av-small-font-size=“ av-mini-font-size=“ av_uid=’av-jh95m5n3′ admin_preview_bg=“]
Grau in Grau so erscheinen für alle Belichtungsmesser die Motive vor dem Sucher – sie „sehen“ also immer eine einheitlich graue Fläche. Nun wird als Durchschnittswert 18% des darauf fallenden Lichtes angenommen, dass von dieser Fläche reflektiert wird. Das entspricht dann dem durchschnittlichen Grauwert unterschiedlicher Motive. Dies führt bei Objekten, mit starken schwarz-weiß Kontrasten zu Fehlberechnungen. So würde der schwarze Anzug eines Mannes auf dem Bild eher dunkelgrau erscheinen, während die Dame im strahlend weißen Kleid einen unansehnlichen Graustich verpasst bekommt. Eine manuelle Änderung der Belichtung ist erforderlich, um ein korrektes Ergebnis zu erhalten.
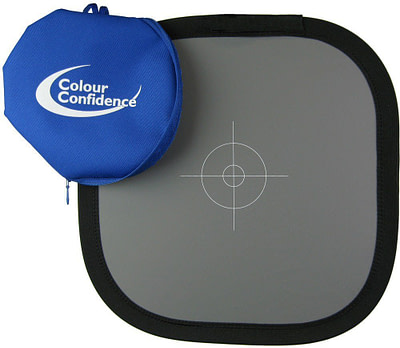
Als Hilfsmittel für die Ermittlung der konkreten Werte für die Verschlusszeit und die Blendenwerte wird oft eine sogenannte „Graukarte“ eingesetzt. Dabei handelt es sich um eine genormte Fläche, die 18% des auftreffenden Lichts reflektiert und die direkt vor das aufzunehmende Objekt gehalten wird. Die so ermittelten Werte ergeben die exakte Belichtung und sind für die korrekte Einstellung zu verwenden.
[/av_icon_box]
[av_hr class=’invisible‘ height=’100′ shadow=’no-shadow‘ position=’center‘ custom_border=’av-border-thin‘ custom_width=’50px‘ custom_border_color=“ custom_margin_top=’30px‘ custom_margin_bottom=’30px‘ icon_select=’yes‘ custom_icon_color=“ icon=’ue808′ font=’entypo-fontello‘ av_uid=’av-6rta75′ admin_preview_bg=“]
[av_textblock size=“ font_color=“ color=“ av-medium-font-size=“ av-small-font-size=“ av-mini-font-size=“ av_uid=’av-13f3op‘ admin_preview_bg=“]
Dein Kursfortschritt:
[av_hr class=’invisible‘ height=’100′ shadow=’no-shadow‘ position=’center‘ custom_border=’av-border-thin‘ custom_width=’50px‘ custom_border_color=“ custom_margin_top=’30px‘ custom_margin_bottom=’30px‘ icon_select=’yes‘ custom_icon_color=“ icon=’ue808′ font=’entypo-fontello‘ av_uid=’av-6rta75′ admin_preview_bg=“]
[av_one_half first min_height=“ vertical_alignment=“ space=“ custom_margin=“ margin=’0px‘ padding=’0px‘ border=“ border_color=“ radius=’0px‘ background_color=“ src=“ background_position=’top left‘ background_repeat=’no-repeat‘ animation=“ mobile_breaking=“ mobile_display=“ av_uid=’av-rlrep‘]
[av_button label=’VORHERIGE LEKTION‘ link=’page,7321′ link_target=“ size=’small‘ position=’center‘ label_display=“ icon_select=’no‘ icon=’ue800′ font=’entypo-fontello‘ color=’theme-color‘ custom_bg=’#444444′ custom_font=’#ffffff‘ av_uid=’av-ixlr5′ admin_preview_bg=“]
[/av_one_half]
[av_one_half min_height=“ vertical_alignment=“ space=“ custom_margin=“ margin=’0px‘ padding=’0px‘ border=“ border_color=“ radius=’0px‘ background_color=“ src=“ background_position=’top left‘ background_repeat=’no-repeat‘ animation=“ mobile_breaking=“ mobile_display=“ av_uid=’av-csyup‘]
[av_button label=’NÄCHSTE LEKTION‘ link=’page,10517′ link_target=“ size=’small‘ position=’center‘ label_display=“ icon_select=’no‘ icon=’ue800′ font=’entypo-fontello‘ color=’theme-color‘ custom_bg=’#444444′ custom_font=’#ffffff‘ av_uid=’av-ayi3t‘ admin_preview_bg=“]
[/av_one_half]